GitHub Enterprise
Configure Connector
GitHub Enterprise (GH EE) is a robust version of GitHub tailored for larger organizations. It supports advanced features and deployment options to cater to enterprise needs, ensuring seamless integration and enhanced security. GH EE also offers comprehensive support and compliance tools to meet stringent organizational requirements.
Basics: GitHub vs. GitHub Enterprise (GH EE)
GitHub is a public cloud service ideal for open-source projects, small to medium-sized teams, and individual developers. It offers free and paid plans with features like GitHub Actions for CI/CD, GitHub Pages for static site hosting, and various integrations.
GitHub Enterprise (GH EE) is designed for larger organizations needing advanced security, compliance, and administrative features. It offers both cloud and on-premises deployment options. GH EE also provides premium support and service level agreements (SLAs).
Setting up GitHub EE Connector
To set up a GitHub Enterprise Edition (EE) connector with StackGuardian, follow these steps carefully. You will need to switch between your GitHub Enterprise portal and StackGuardian's connector form frequently. For convenience, it is recommended to open these in two separate tabs of your browser.
Step 1: Open Connector Form in StackGuardian
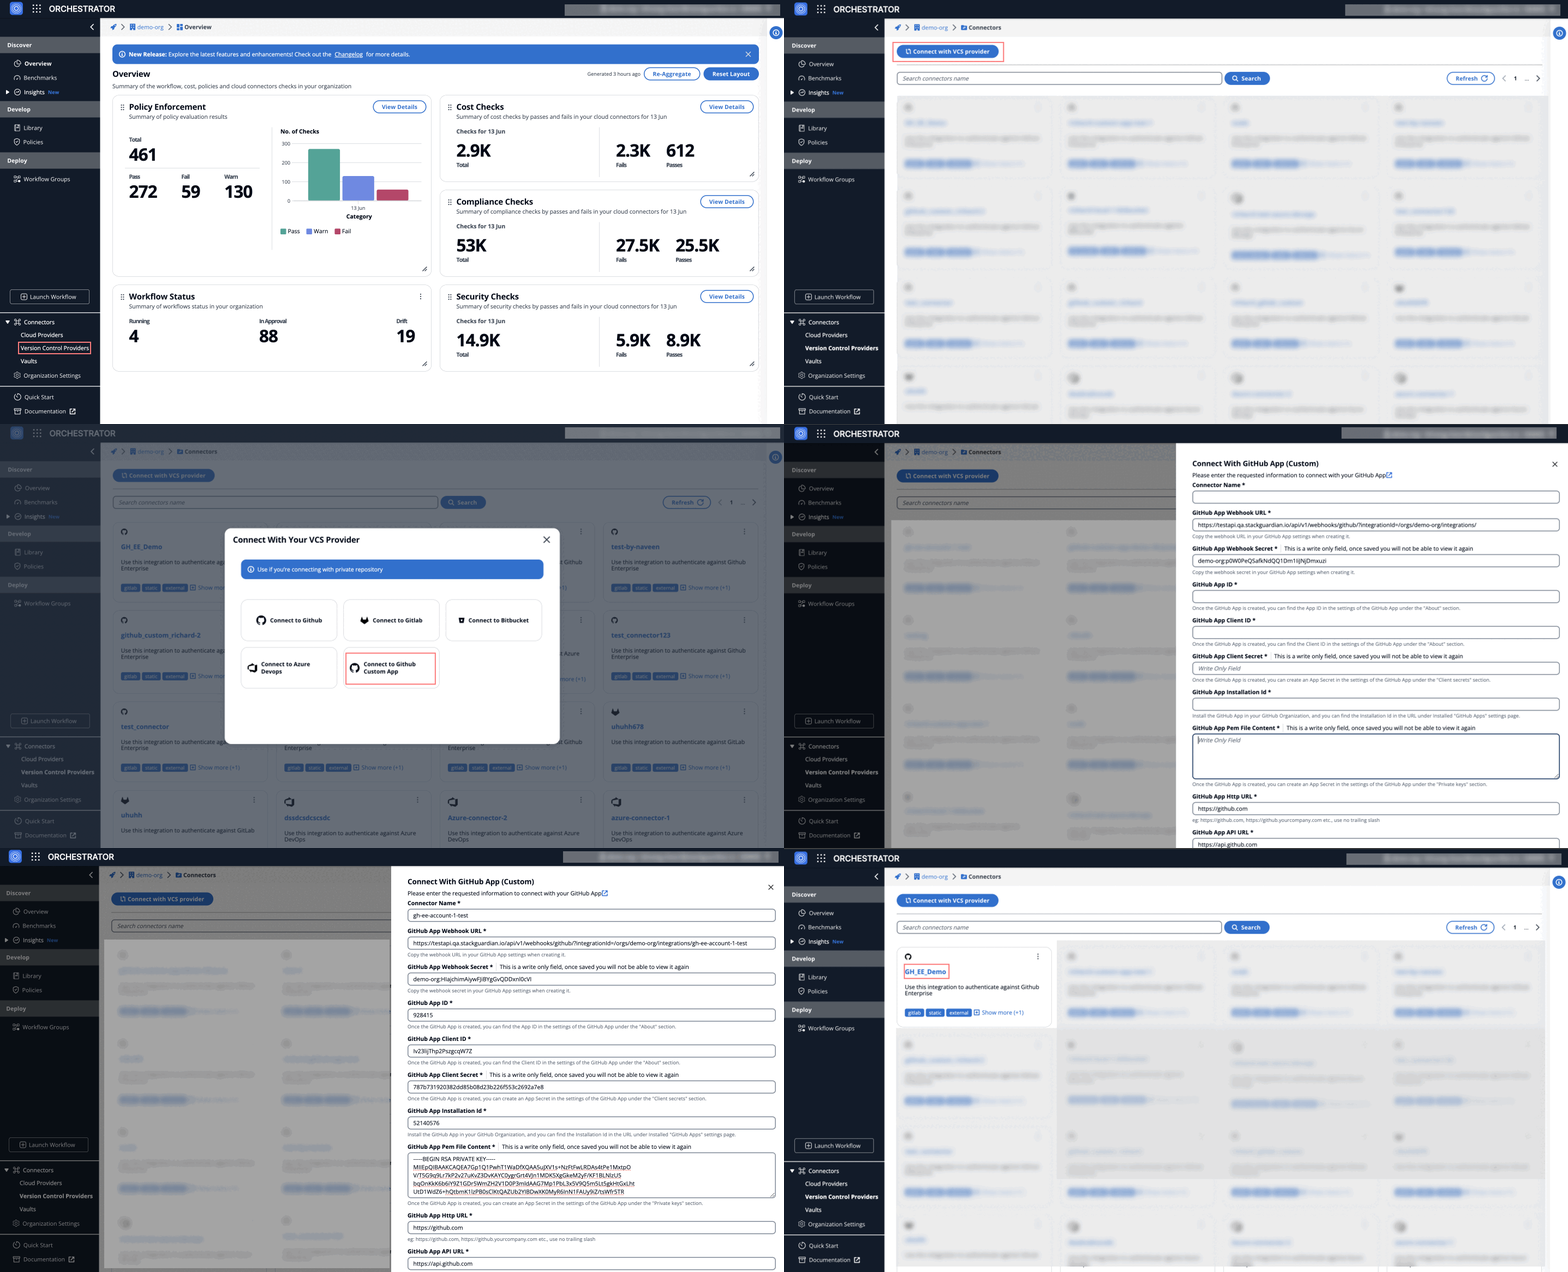
- Go to the Orchestrator > Connectors tab.
- Select Connect With GitHub App (Custom).
- Fill in the details as follows:
- Connector Name: Enter a descriptive name, example,
test-account1-gh-ee.
- Connector Name: Enter a descriptive name, example,
Step 2: Create a GitHub App in GitHub Enterprise
- Go to your GitHub organization settings:
- Navigate to Settings > Developer Settings > GitHub Apps.
- Click on New GitHub App and fill in the details:
- GitHub App Name: Provide a unique name, For example,
stackguardian-gh-app. - Homepage URL: This is the URL to the GitHub app's website, which provides users with more information about the app. For example,
https://stackguardian.io. - Webhook URL: Use the URL generated in the StackGuardian GitHub EE connector form, after entering the connector name. This URL is where events will be posted.
- Webhook Secret: Use the value from the StackGuardian GitHub EE connector form.
- Click Create GitHub App.
- GitHub App Name: Provide a unique name, For example,
Step 3: Configure Permissions Before Installing the App
Before installing the app, configure the required permissions:
- Click on "Permissions & events" under the General settings of the newly created app.
- Set the following permissions:
- Repository permissions:
- Read access to contents, metadata, and webhooks.
- Read and write access to checks, code scanning alerts, commit statuses, and pull requests.
- Organization permissions: Read access to webhooks.
After saving changes in permissions, you will see the events that you can subscribe to. For example, push event, pull request event. You need to enable these events to process webhooks.
- Subscribe to events:
- Installation target: A GitHub App installation target is renamed.
- Meta: When this App is deleted and the associated hook is removed.
- Code scanning alert: Code scanning alert created, fixed in branch, or closed.
- Check run: Check run is created, requested, rerequested, or completed.
- Check suite: Check suite is requested, rerequested, or completed.
- Commit comment: Commit or diff comment commented on.
- Create: Branch or tag created.
- Delete: Branch or tag deleted.
- Pull request: Pull request assigned, auto merge disabled, auto merge enabled, closed, converted to draft, demilestoned, dequeued, edited, enqueued, labeled, locked, milestoned, opened, ready for review, reopened, review request removed, review requested, synchronized, unassigned, unlabeled, or unlocked.
- Pull request review: Pull request review submitted, edited, or dismissed.
- Pull request review comment: Pull request diff comment created, edited, or deleted.
- Pull request review thread: Pull request review thread was resolved or unresolved.
- Push: Triggered when a push is made to the repository.
- Repository: Triggered when a repository is created, deleted, archived, unarchived, publicized, privatized, edited, renamed, or transferred.
- Status: Triggered when the commit status is updated from the API.
- Scroll to the bottom and click "Save Changes".
Step 4: Configure GitHub App Connector in StackGuardian
-
Navigate back to StackGuardian's Connect With GitHub Custom App and enter the following details:
-
GitHub App ID: Find this in the GitHub App’s settings under the "About" section. Example:
124635. -
GitHub App Client ID: Copy from the same section. Example:
Iv1.1234567890abcdef. -
GitHub App Client Secret: Click "Generate a new client secret" in the GitHub App settings and copy the value.
-
GitHub App Installation ID:
- Go to the "Install App" tab under "Permissions & Events".
- Install the app to the specific repository and copy the unique digits from the URL after installation. Example:
52140576.
-
GitHub App Pem File Content:
- Go to the GitHub Apps settings and select the app you created.
- Scroll down to "Private keys" and click "Generate a private key". Copy the content of the generated PEM file and paste it here.
-
GitHub App Http URL: The web address for GitHub access. For GitHub, use https://github.com or your custom GitHub Enterprise domain. Example:
https://github.yourcompany.com. -
GitHub App API URL: The endpoint for API calls. For GitHub, use https://api.github.com or your custom API endpoint. Example:
https://api.github.yourcompany.com. -
Finally, click Create to the setup of your GitHub EE connector.
-

Successful GitHub EE Connector