Bitbucket
Overview
Integrating StackGuardian with Bitbucket allows you to leverage Infrastructure and Policy as Code from your Bitbucket repositories. To set up the integration, you will need to authenticate StackGuardian Bitbucket connector using one of the following methods:
- API Token
- Access Token
- App Password (Legacy support – soon to be deprecated by Bitbucket)
This document explains all three authentication methods and how to configure the Bitbucket connector in StackGuardian.
Create API Token
To integrate Bitbucket, you first need to create an API Token in Bitbucket with limited permissions. Follow these steps to create an API Token in Bitbucket:
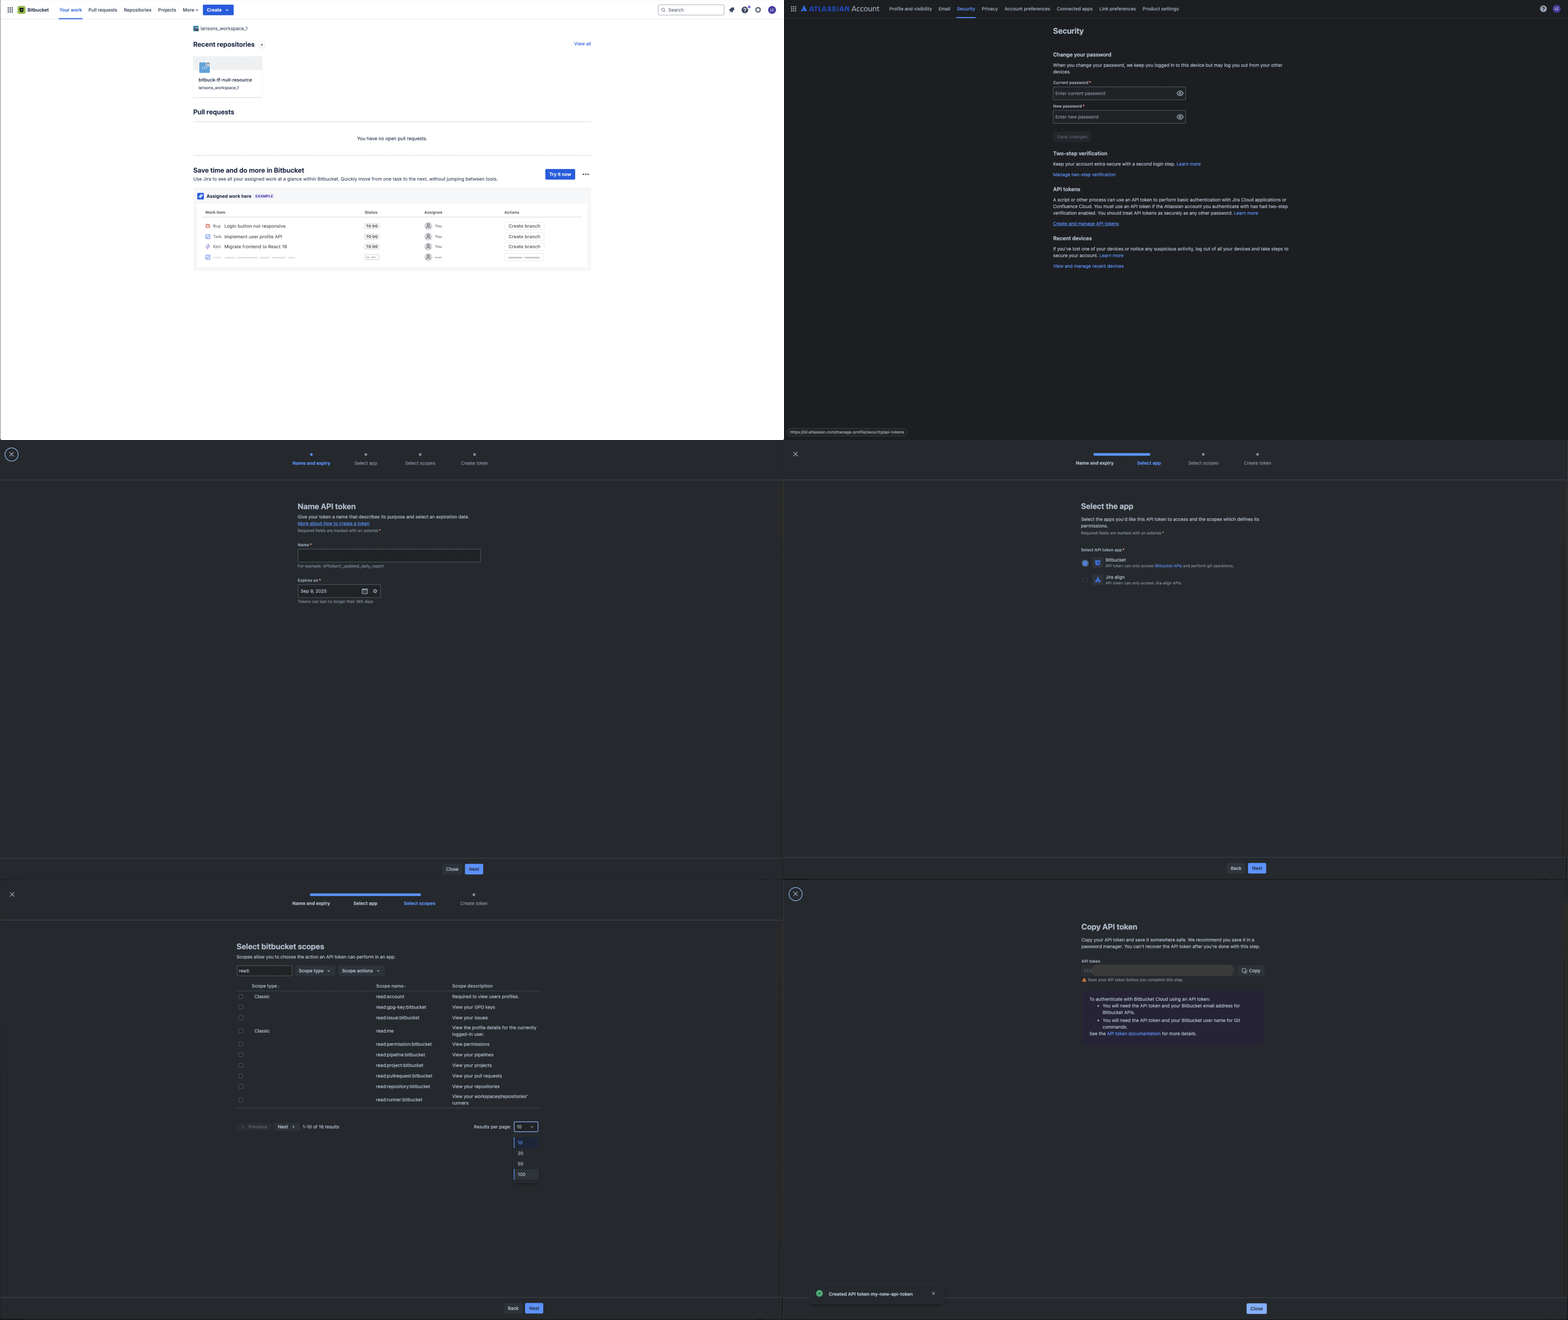
- Login to Bitbucket
- Navigate to Settings (upper-right corner of the top navigation bar).
- Under Personal Settings, go to Atlassian account settings.
- Select Security from the top navigation bar.
- Under API tokens, click on Create and manage API tokens.
- Click on Create API token with scopes.
- Provide a Name for the API token.
- Set an Expires on date (this is the date when the API Token will expire. Choose a long validity period so that StackGuardian integration continues to work).
- Click on Next.
- On the Select the app page, under Select API token app, select Bitbucket.
- Click on Next.
- Under Select bitbucket scopes, Select all of the following scopes (these scopes are required to get read access to the Bitbucket repositories):
- Account:
Read - Me:
Read - Project:bitbucket:
Read - Pullrequest:bitbucket:
Read - Repository:bitbucket:
Read - User:bitbucket:
Read - Workspace:bitbucket:
Read
- Account:
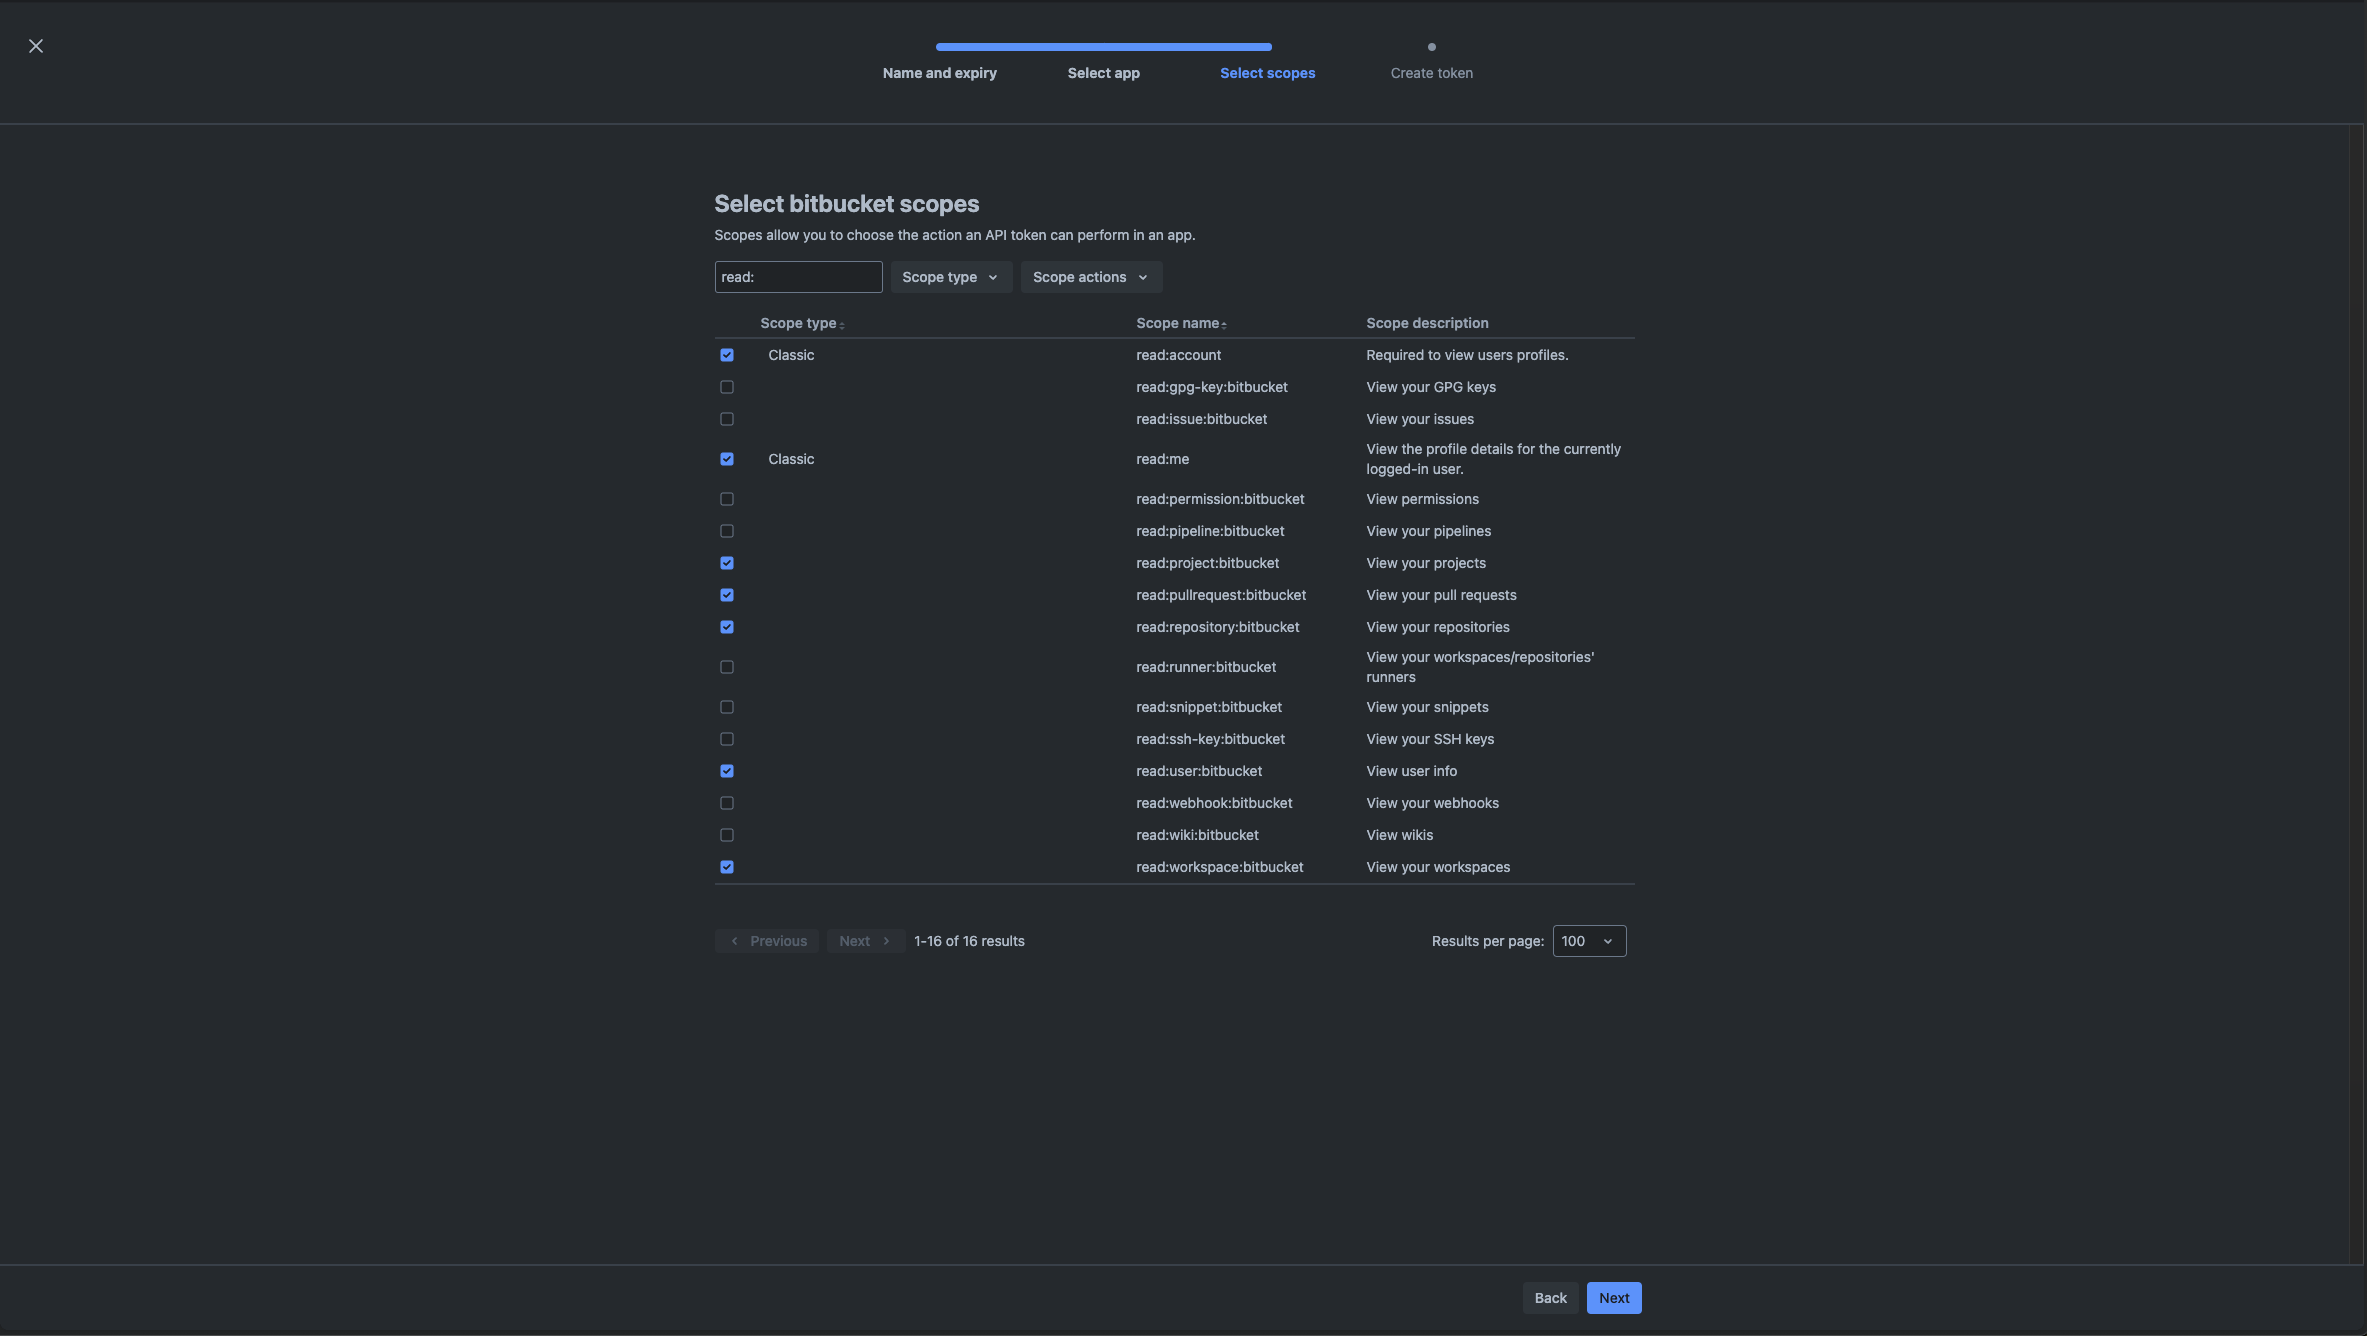
- Click on Next.
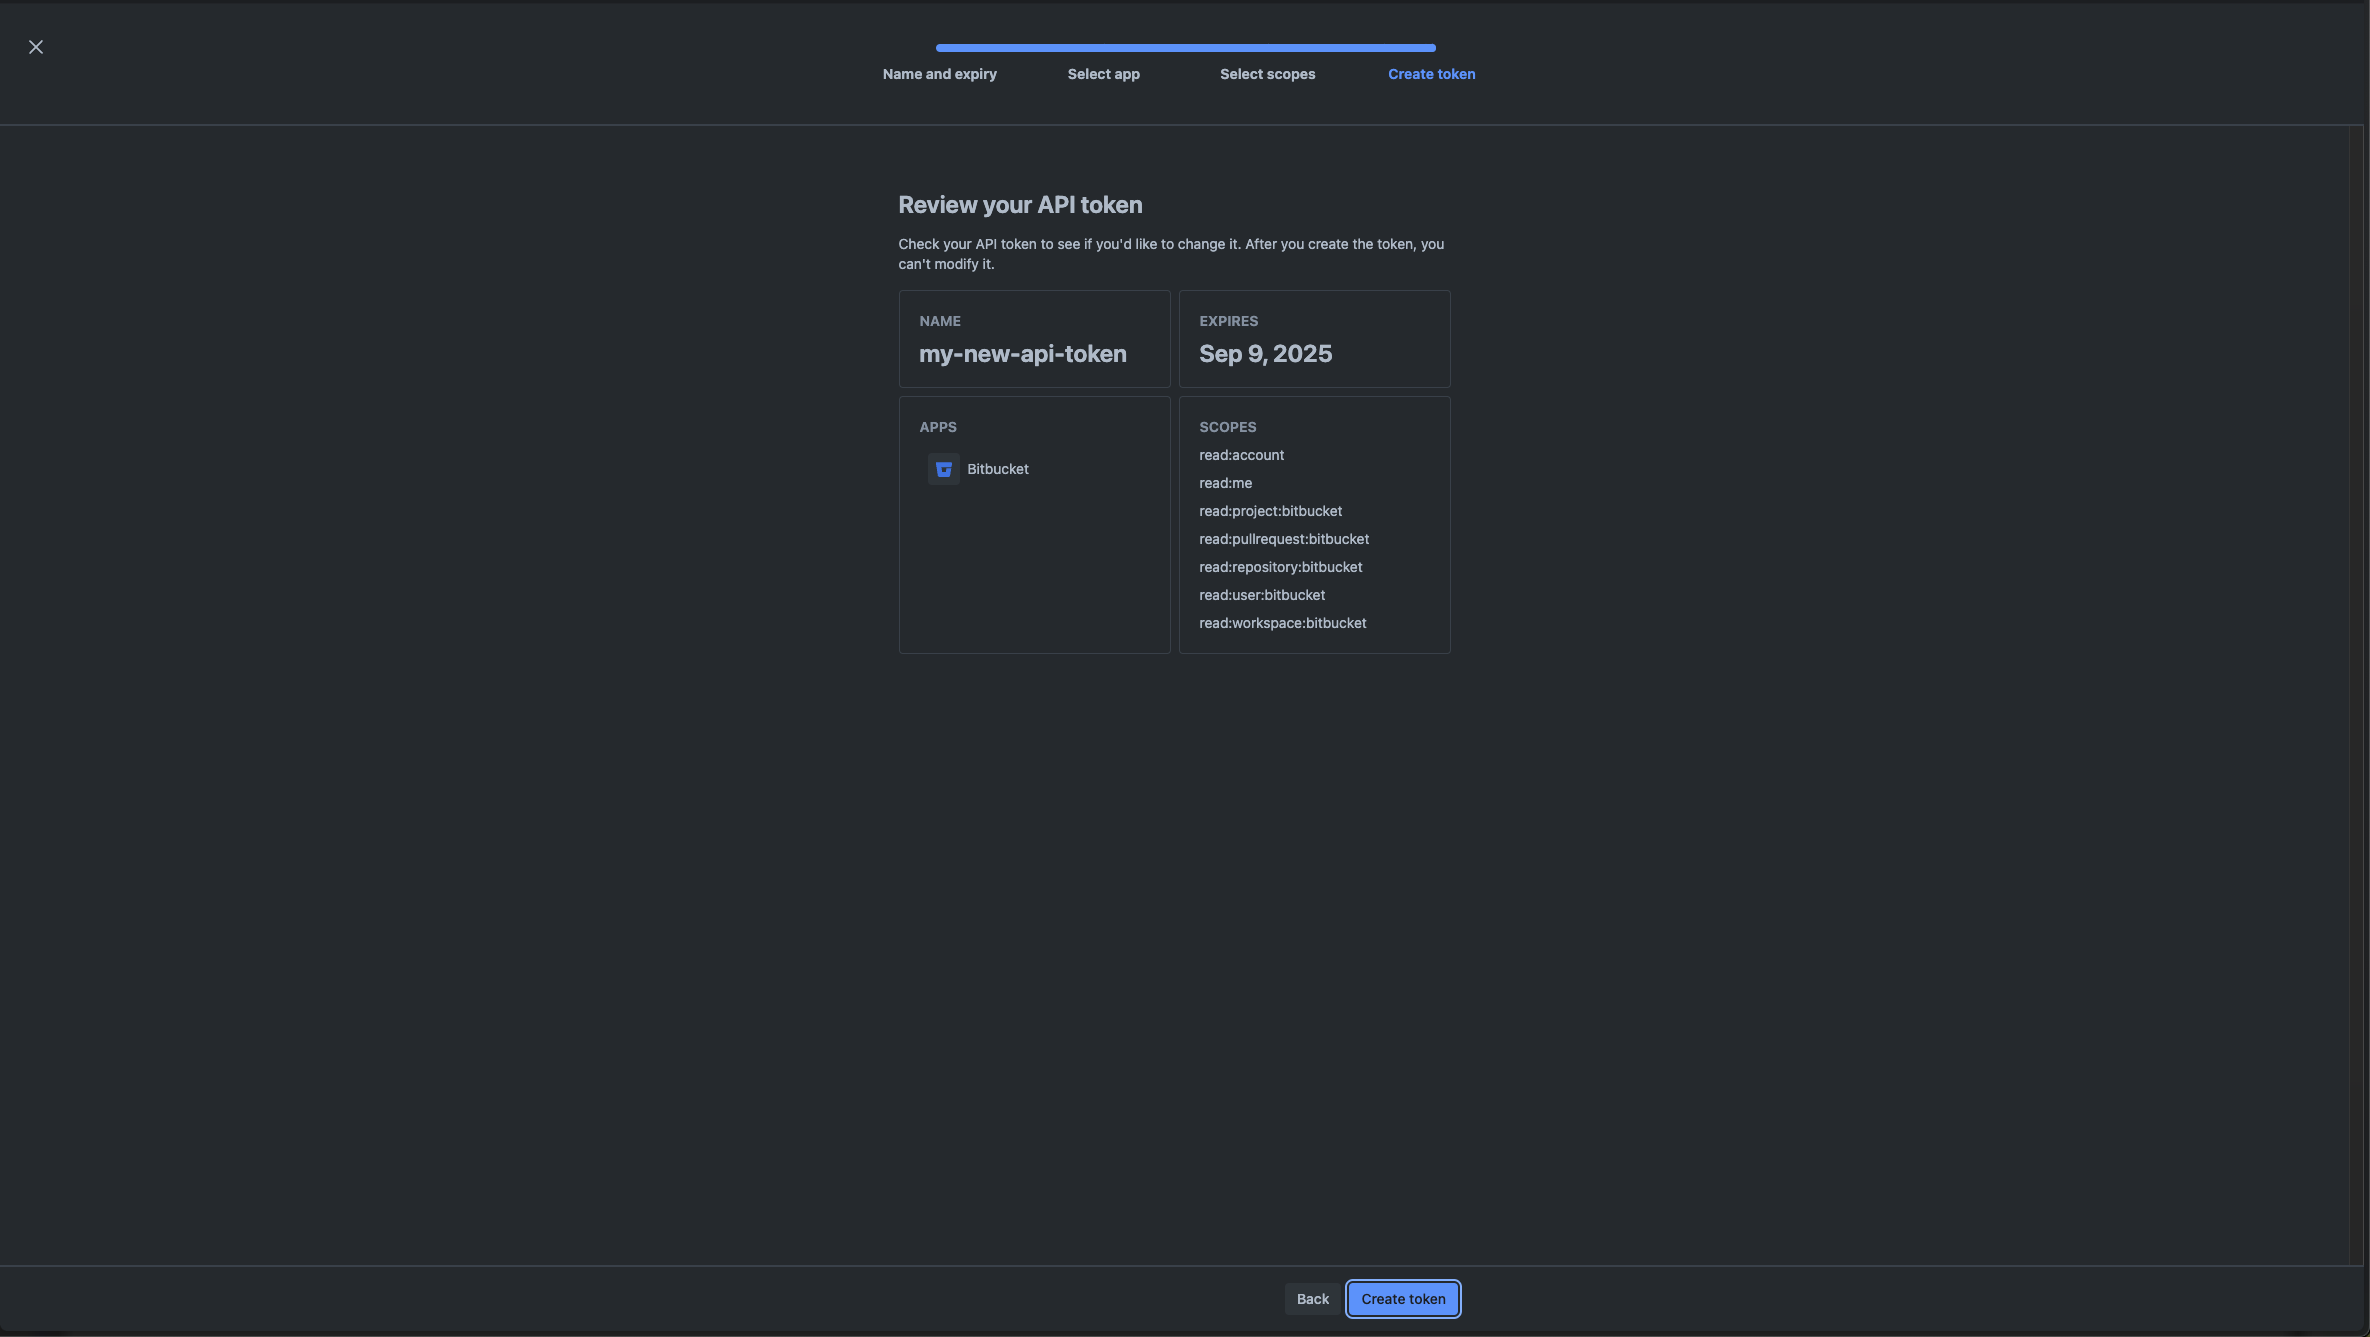
- Review the details of your API Token and click Create token if it all looks good.
- Copy the generated API Token and securely store it. The API Token is displayed only once and cannot be retrieved later.
Create Access Token
To integrate Bitbucket, you first need to create an Access Token in Bitbucket with limited permissions (it’s possible to create an Access Token for a project, a repository or a workspace).
StackGuardian lists your repositories through Bitbucket's account/workspace API (GET /2.0/user/workspaces), which Bitbucket now requires after retiring its cross-workspace repository APIs. For the connector to list repositories, the Access Token must include both of these scopes:
- Account:
Read - Repositories:
Read
Only Workspace access tokens offer an Account scope. Repository and Project access tokens do not, so they can't be used to list repositories in the connector — use a Workspace Access Token (see below) or an API Token instead.
1. Access Token for Repository
Repository access tokens don't offer an Account scope, so they can't be used to list repositories in the StackGuardian connector. Use a Workspace Access Token or an API Token instead.
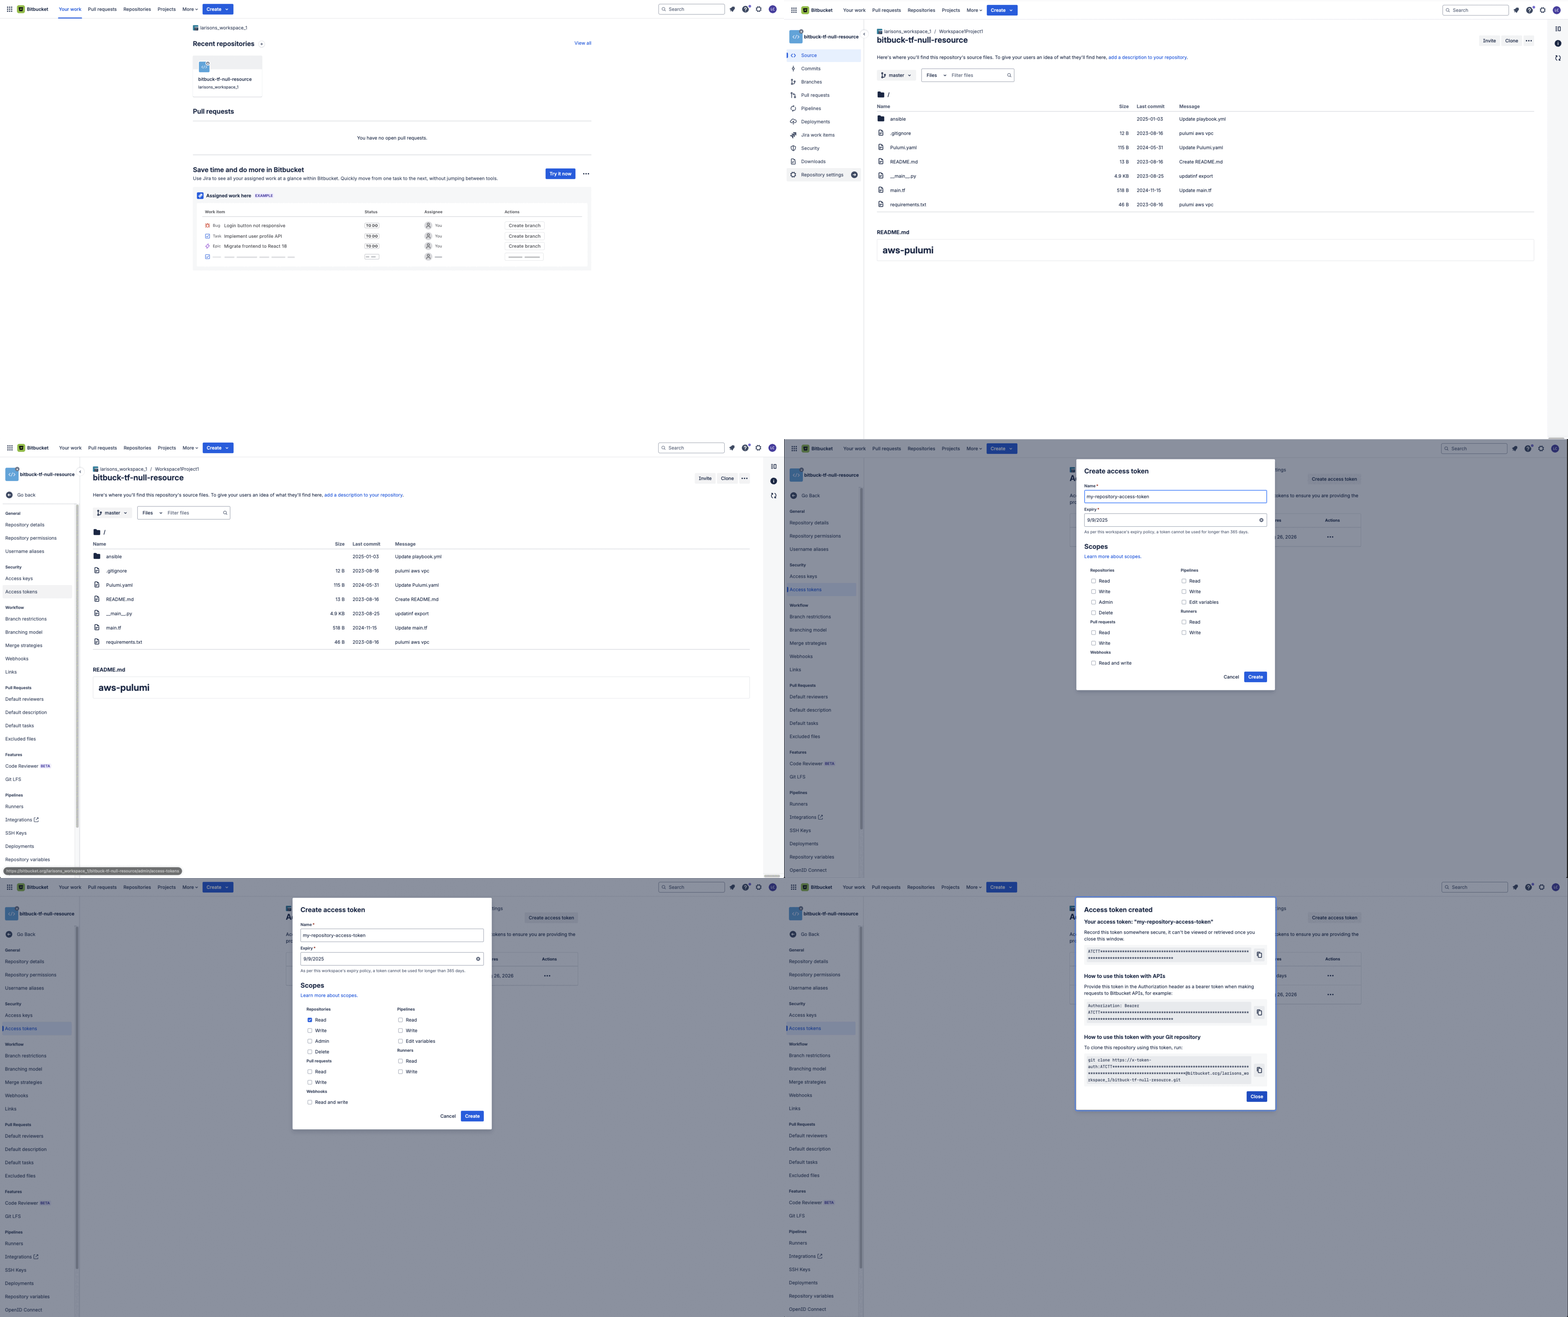
Follow these steps to create an Access Token for a repository in Bitbucket:
- Login to Bitbucket.
- Navigate to target repository for the Access Token (this repository is the only one that the Access Token can access).
- On the sidebar, select Repository Settings.
- Under Security, select Access Tokens.
- Click on Create Access Token.
- Provide a Name for the Access Token.
- Under Expiry, set an Expires on date (select the date which your Access Token will expire. Choose a long validity period, so that StackGuardian integration continues to work).
- Select the permissions the Access Token needs (for detailed descriptions of each permission, see Repository-level access token permissions):
- Repositories:
Read
- Repositories:
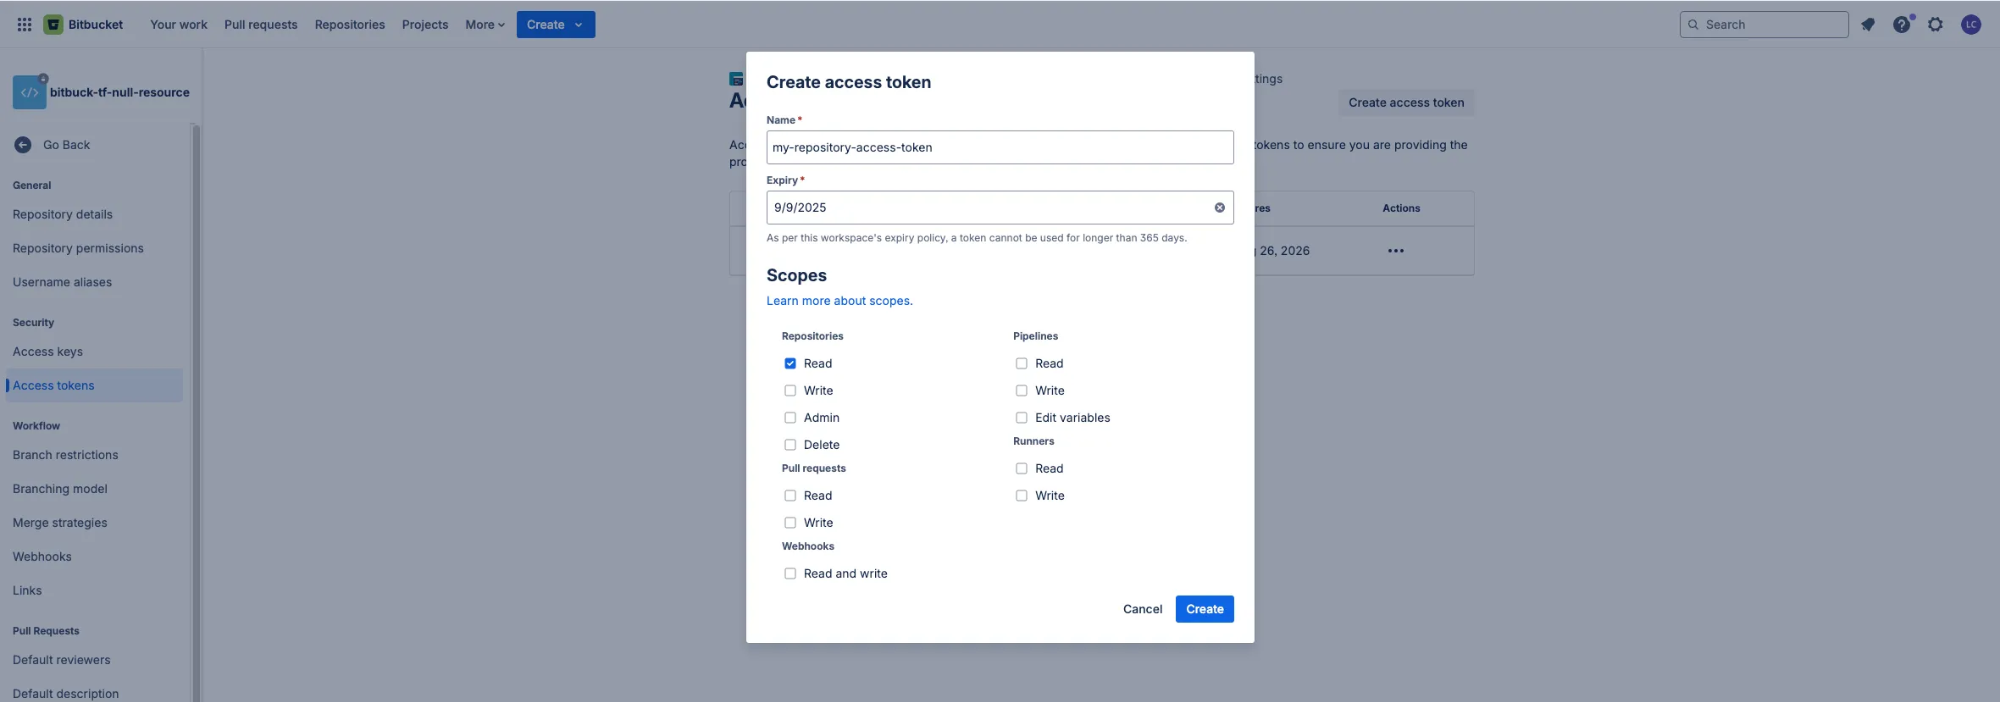
- Click on Create to generate the new Access Token.
- Copy the generated Access Token and securely store it. The Access Token is displayed only once and cannot be retrieved later.
2. Access Token for Project
Project access tokens don't offer an Account scope, so they can't be used to list repositories in the StackGuardian connector. Use a Workspace Access Token or an API Token instead.
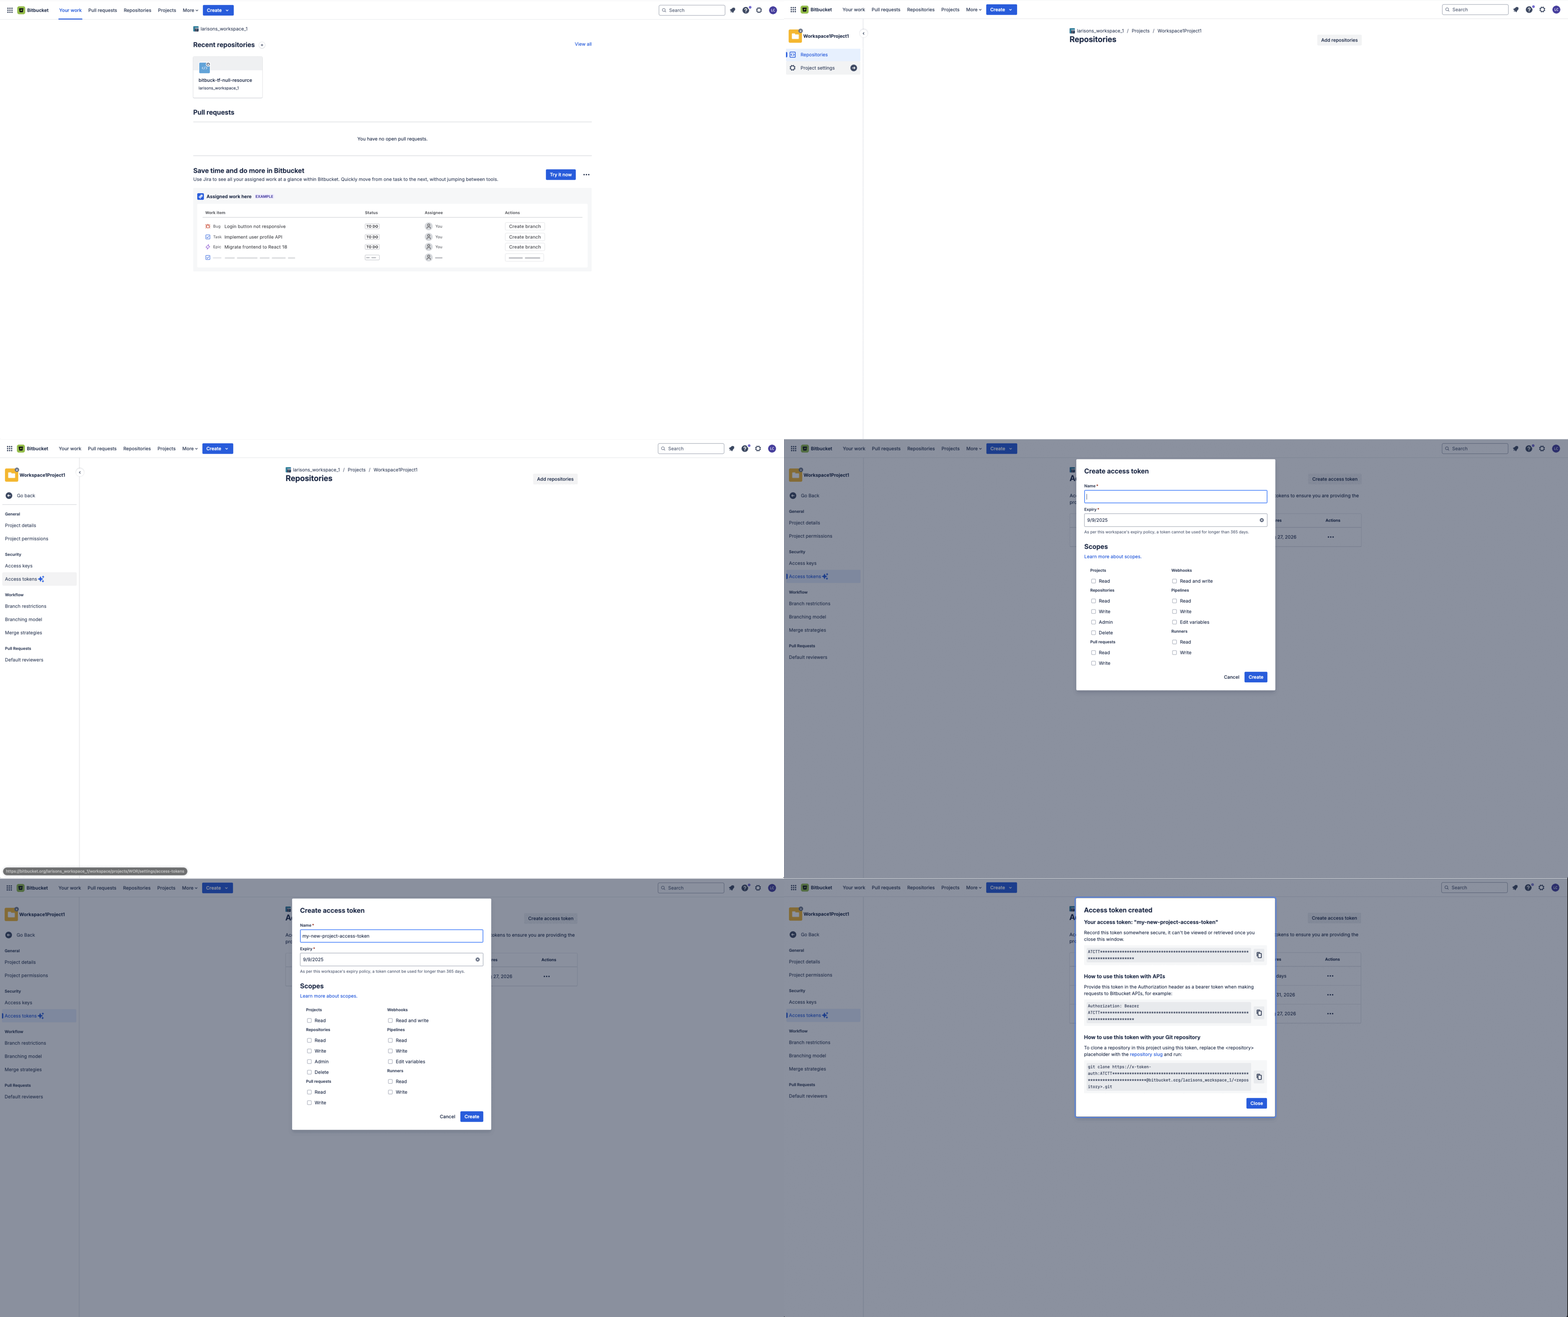
Follow these steps to create an Access Token for a project in Bitbucket:
- Login to Bitbucket.
- Navigate to target project for the Access Token (this project is the only one that the access token can access).
- On the sidebar, select Project Settings.
- Under Security, select Access Tokens.
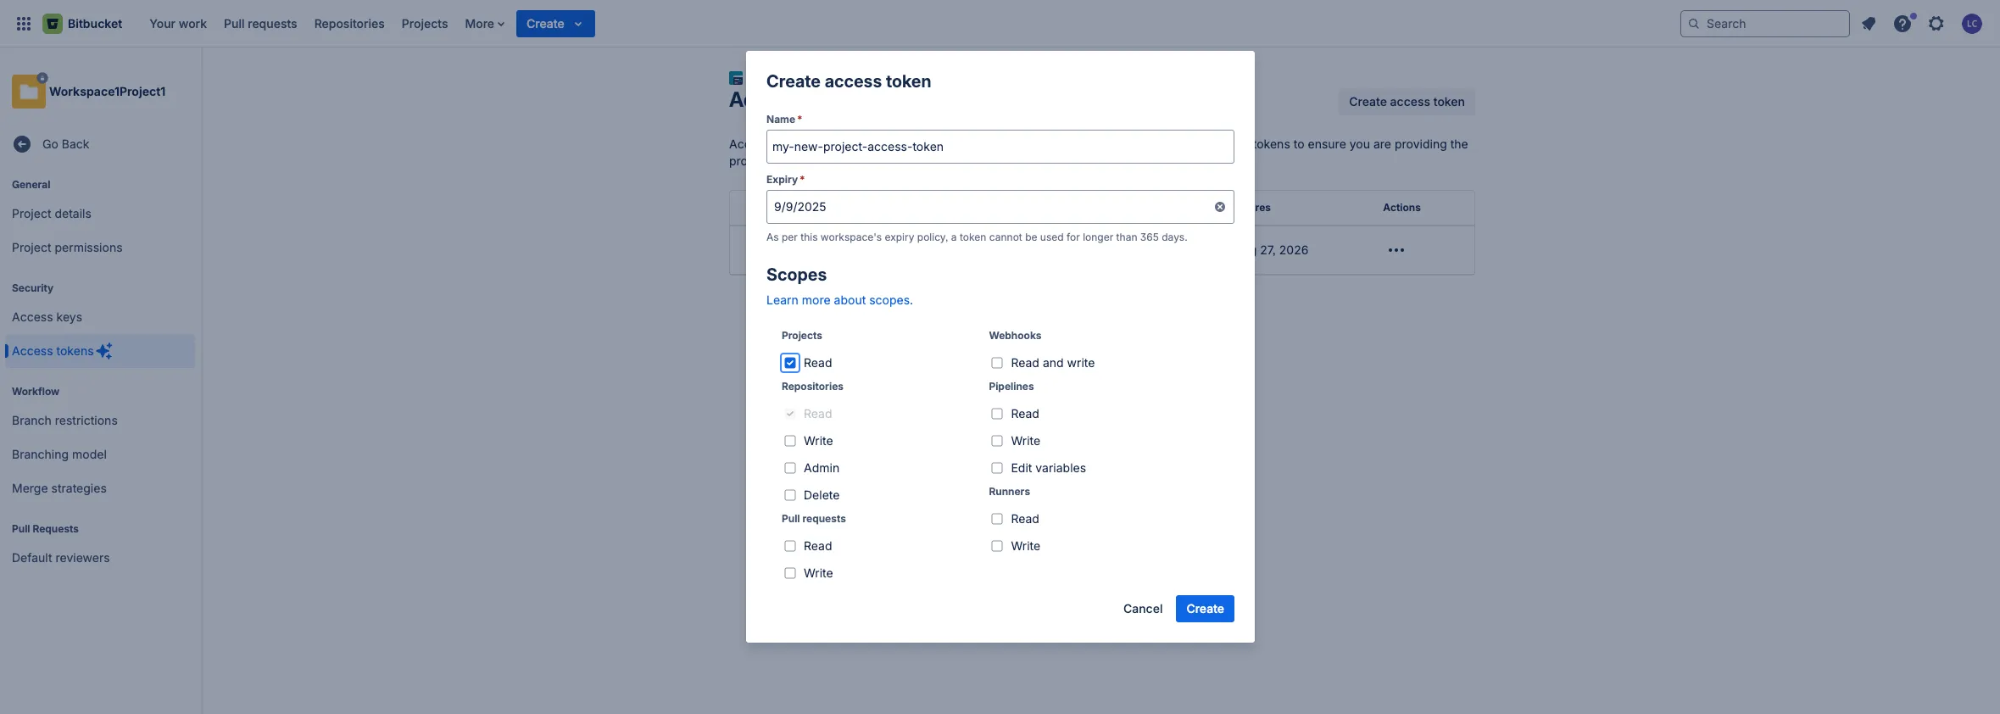
- Click on Create Access Token.
- Provide a Name for the Access Token.
- Under Expiry, set an Expires on date (select the date which your Access Token will expire. Choose a long validity period, so that StackGuardian integration continues to work).
- Select the permissions the Access Token needs. (for detailed descriptions of each permission, see Repository-level access token permissions):
- Projects:
Read - Repositories:
Read
- Projects:
- Click on Create to generate the new Access Token.
- Copy the generated Access Token and securely store it. The Access Token is displayed only once and cannot be retrieved later.
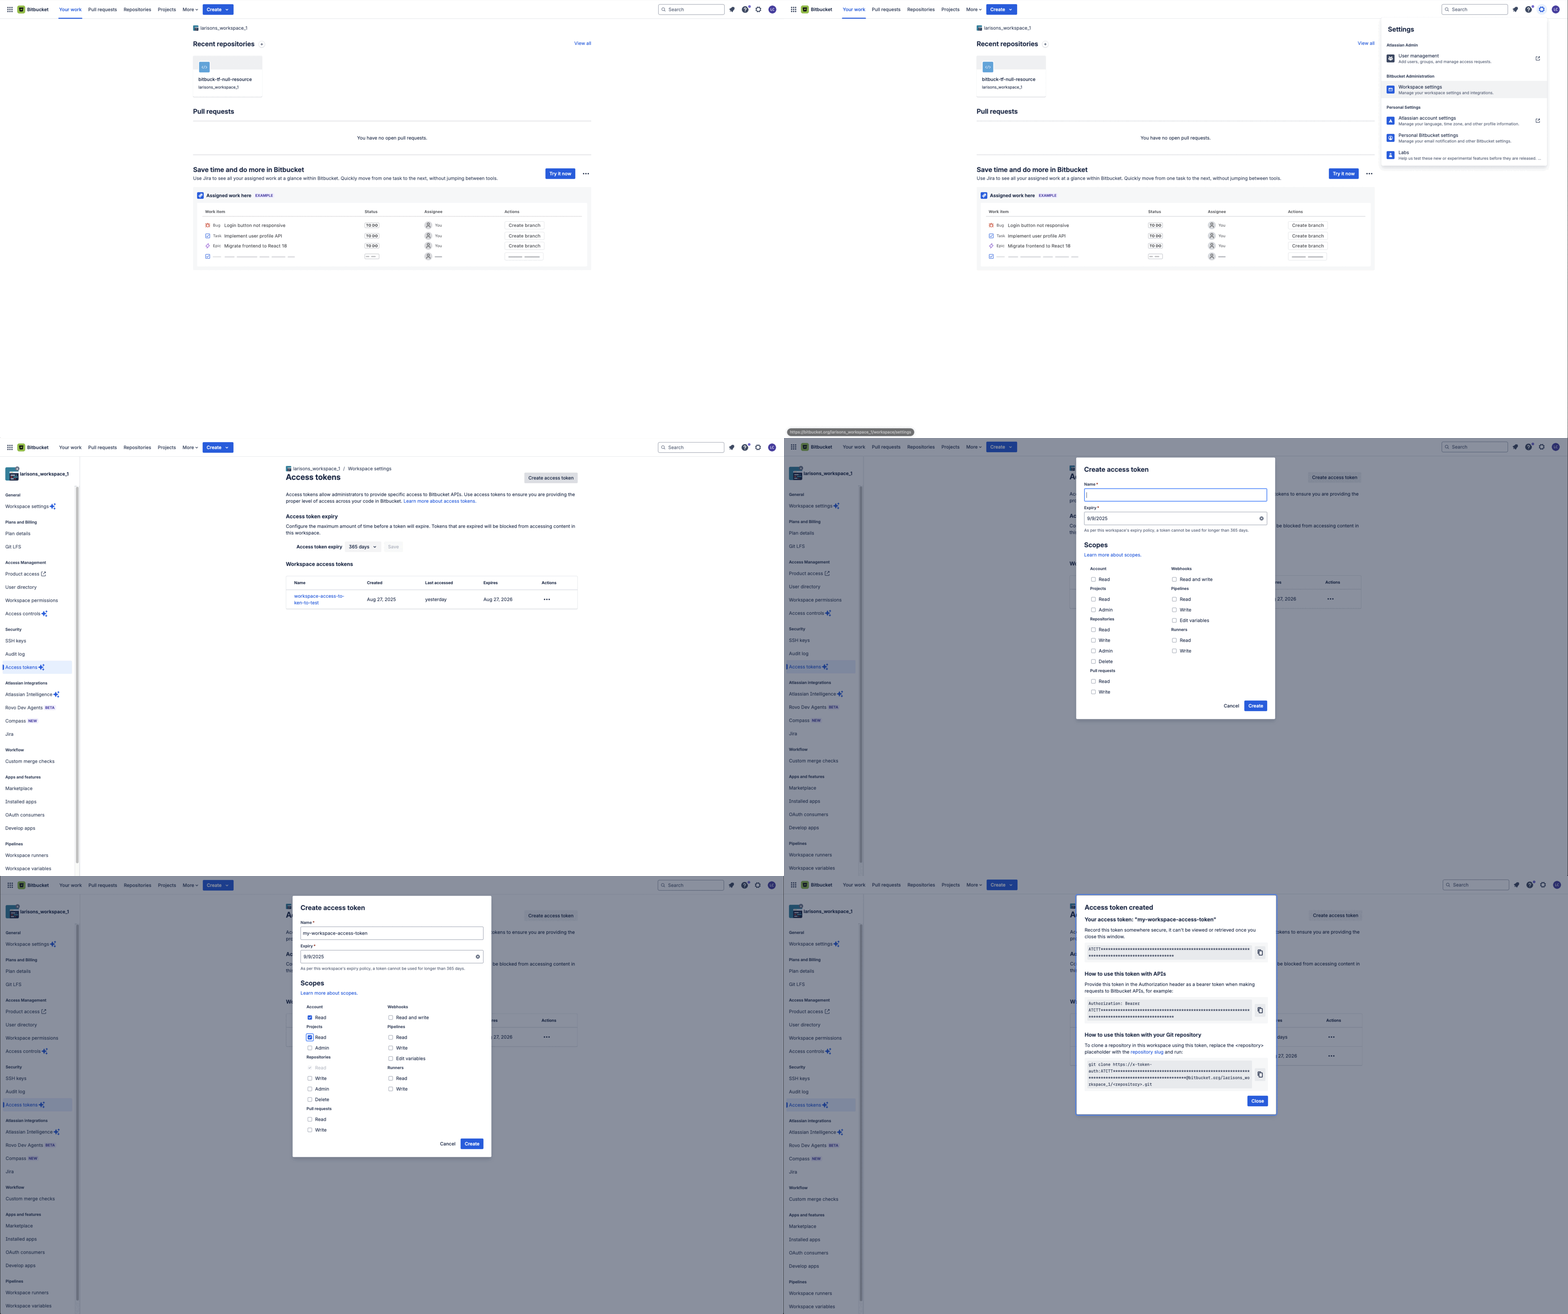
3. Access Token for Workspace
This is the recommended access-token type for the connector — a workspace access token can include the Account: Read scope required to list repositories.
Follow these steps to create an Access Token for a workspace in Bitbucket:
- Login to Bitbucket.
- Navigate to target workspace for the Access Token (this workspace is the only one that the Workspace Access Token can access).
- On top bar navigation, Select Settings.
- On dropdown menu, select Workspace Settings.
- Under Security, select Access Tokens.
- Click on Create Access Token.
- Provide a Name for the Access Token.
- Under Expiry, set an Expires on date (select the date which your Access Token will expire. Choose a long validity period, so that StackGuardian integration continues to work).
- Select the permissions the Access Token needs (for detailed descriptions of each permission, see Repository-level access token permissions):
- Account:
Read - Projects:
Read - Repositories:
Read
- Account:
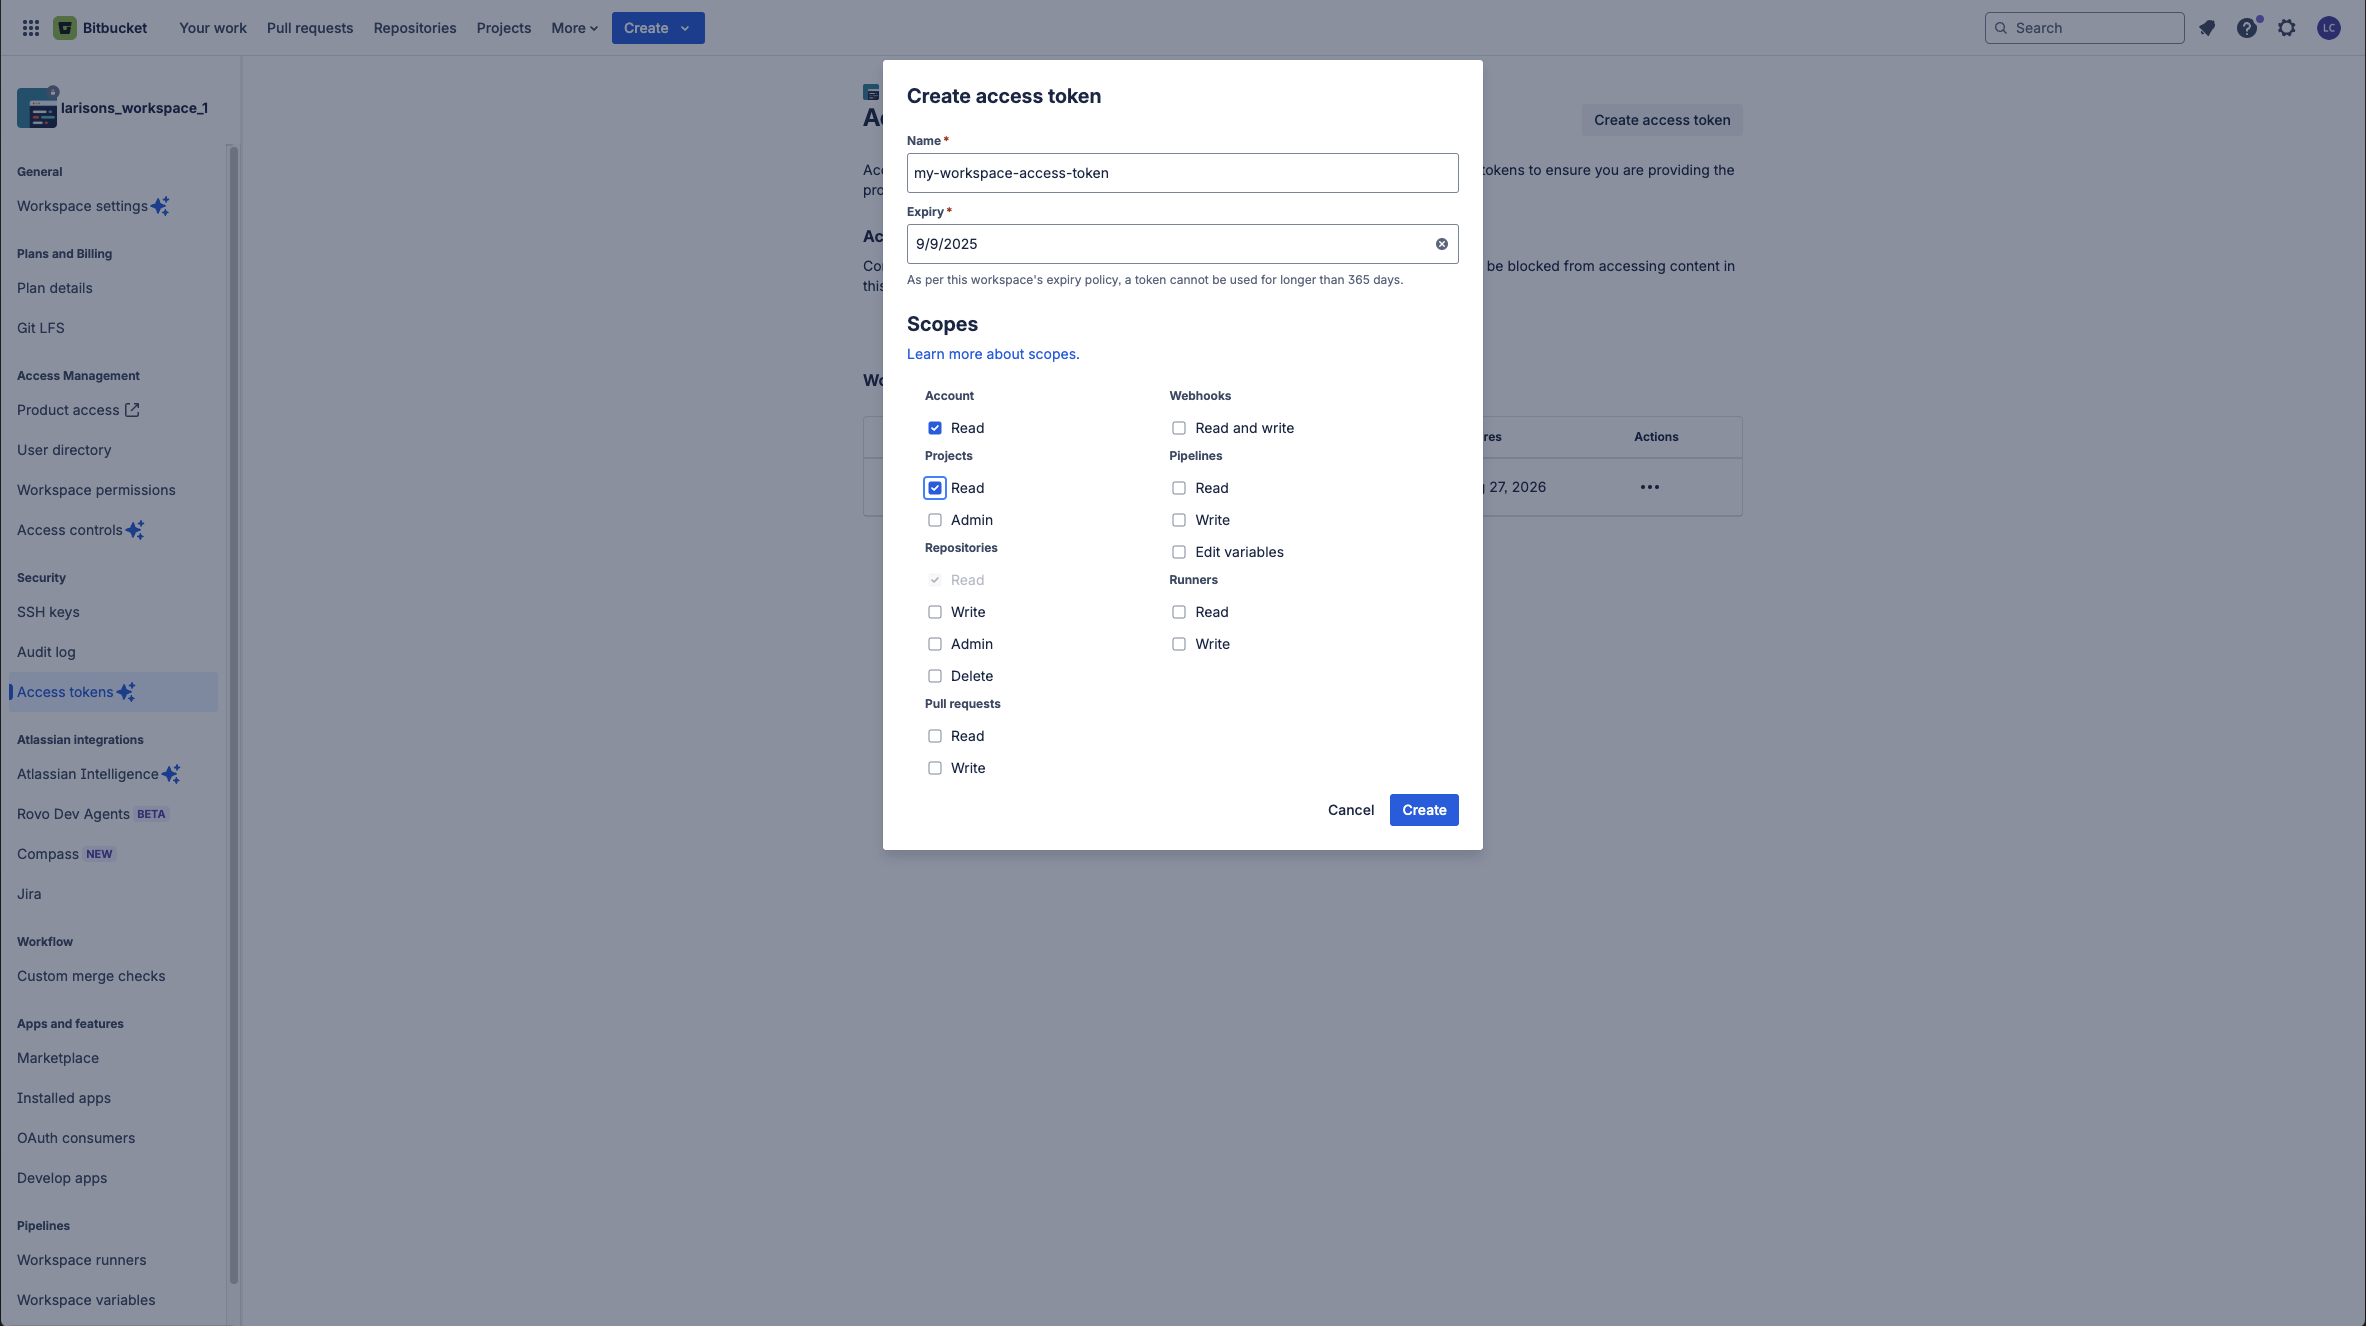
- Click on Create to generate the new Access Token.
- Copy the generated Access Token and securely store it. The Access Token is displayed only once and cannot be retrieved later.
Create a Bitbucket connector on StackGuardian
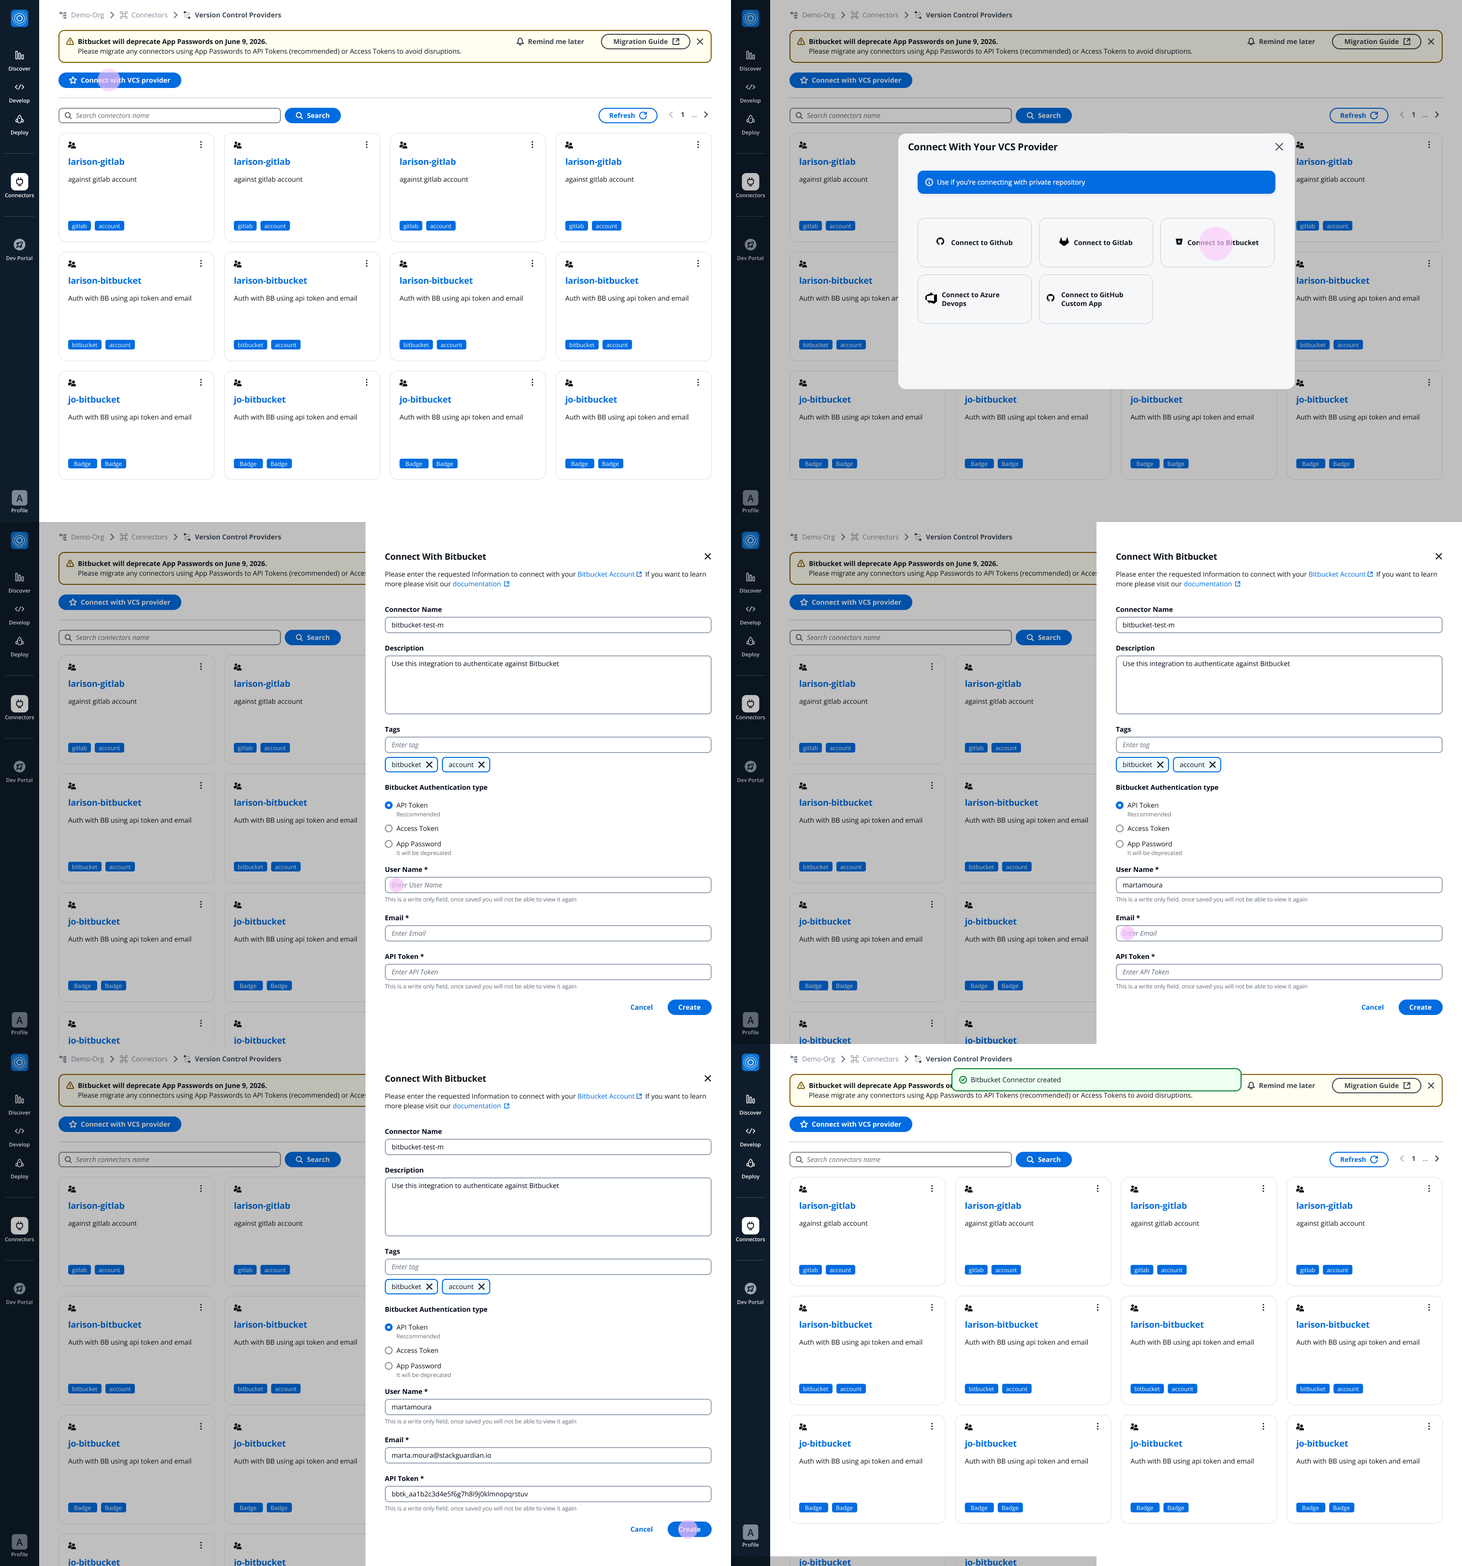
To create a Connector, open the StackGuardian Platform and follow these steps:
- Go to the "Connectors > Version Control Providers" tab in the StackGuardian Orchestrator.
- Select "Connect to Bitbucket."
- Enter a Connector name, Description, Tag.
- Select one Bitbucket authentication type.
- Provide the required authentication information based on your chosen method:
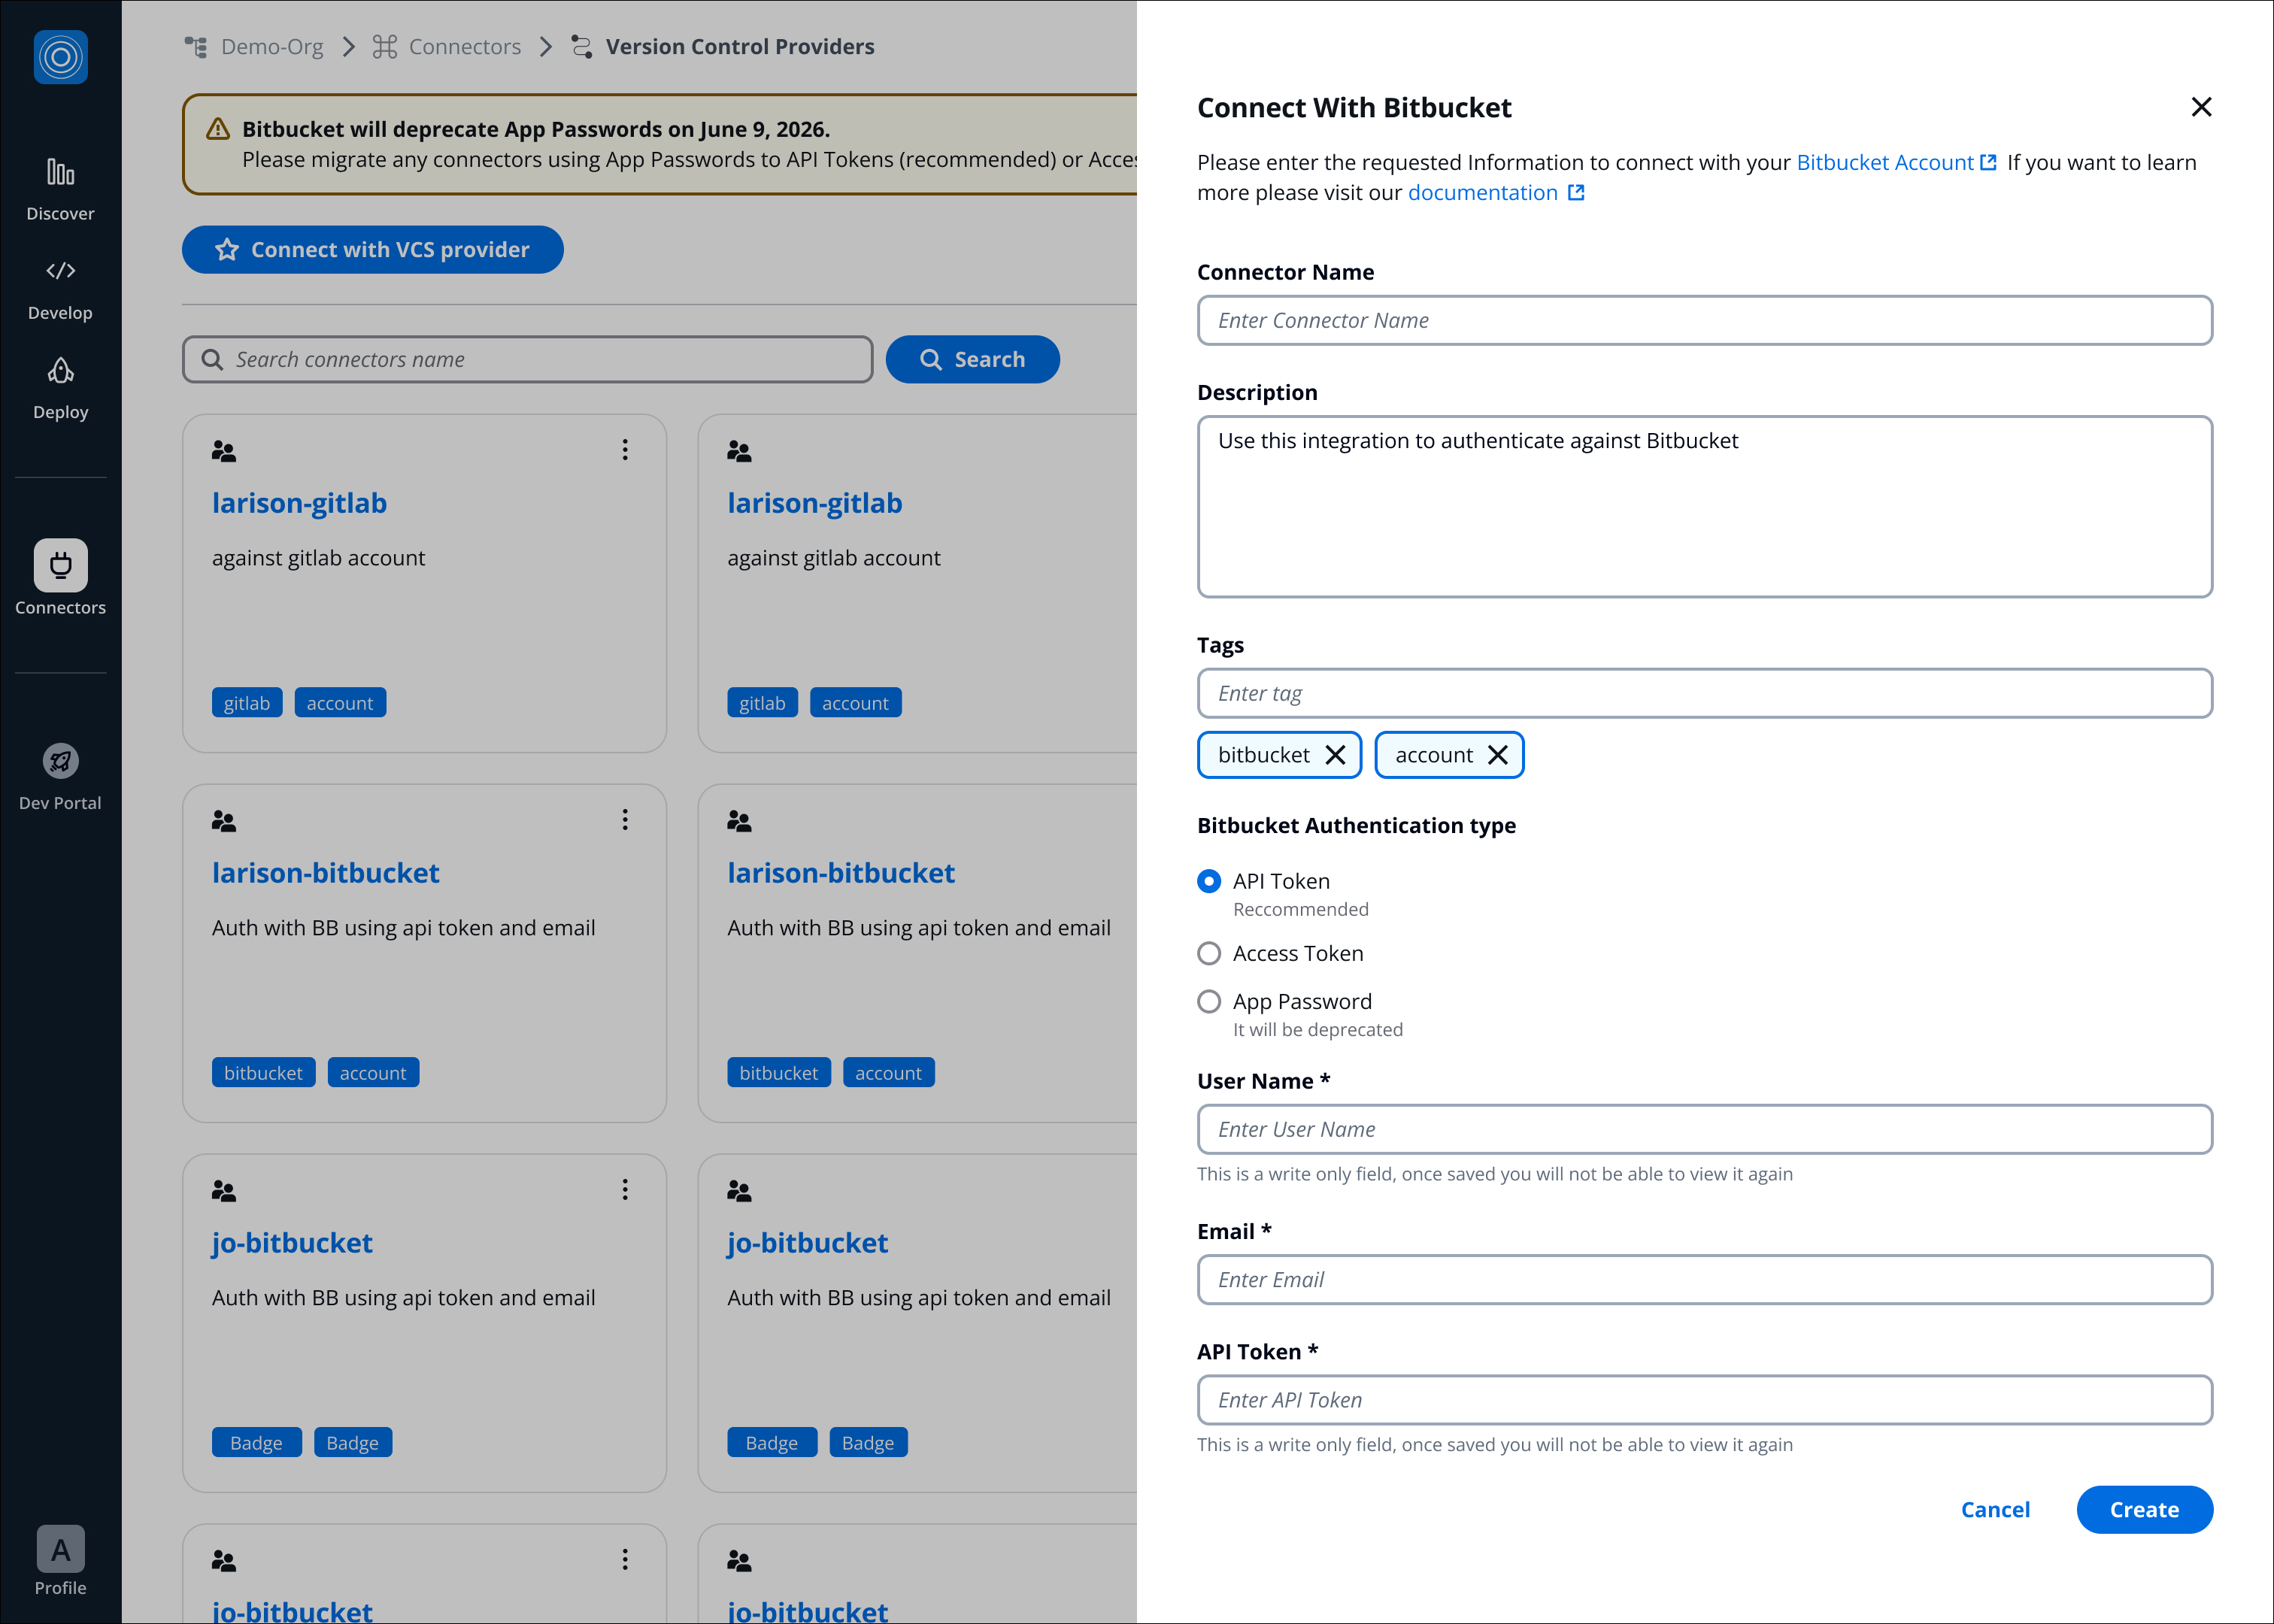
- API Token: Enter Bitbucket User Name, Bitbucket Email, and paste the API Token that was created earlier in Bitbucket.
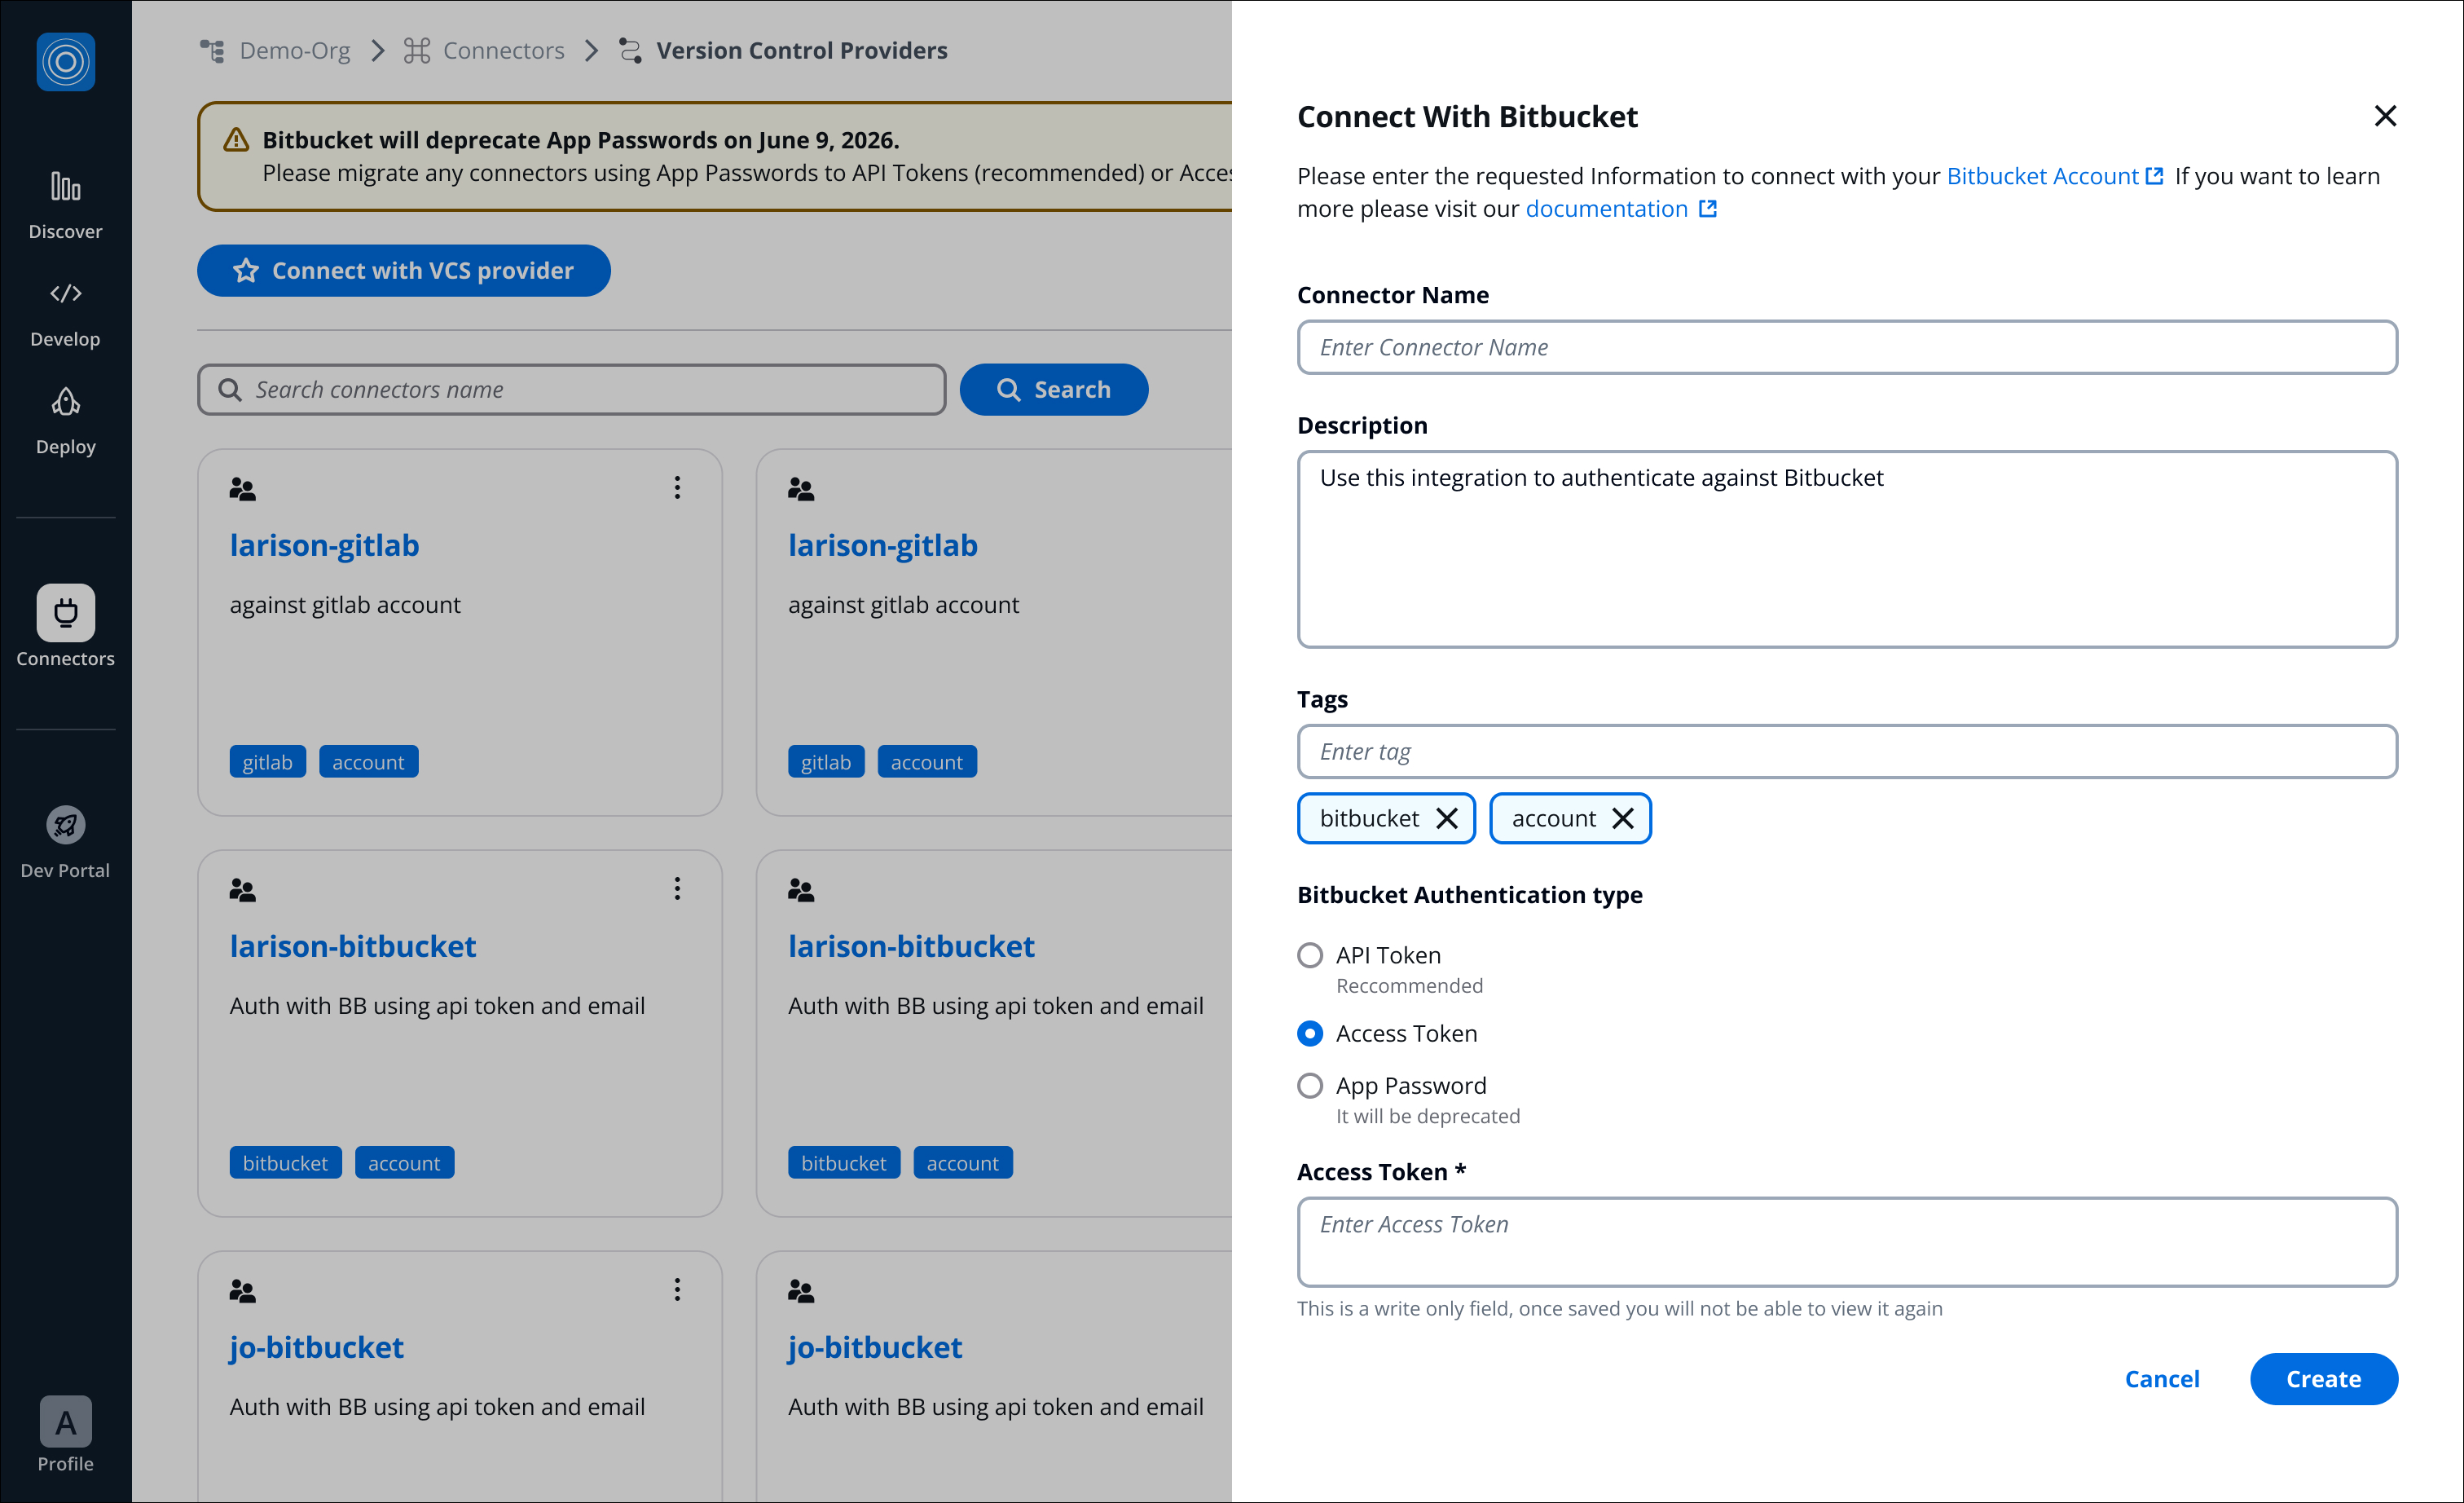
- Access Token: paste the Access Token that was created earlier in Bitbucket (only Access Token is required).
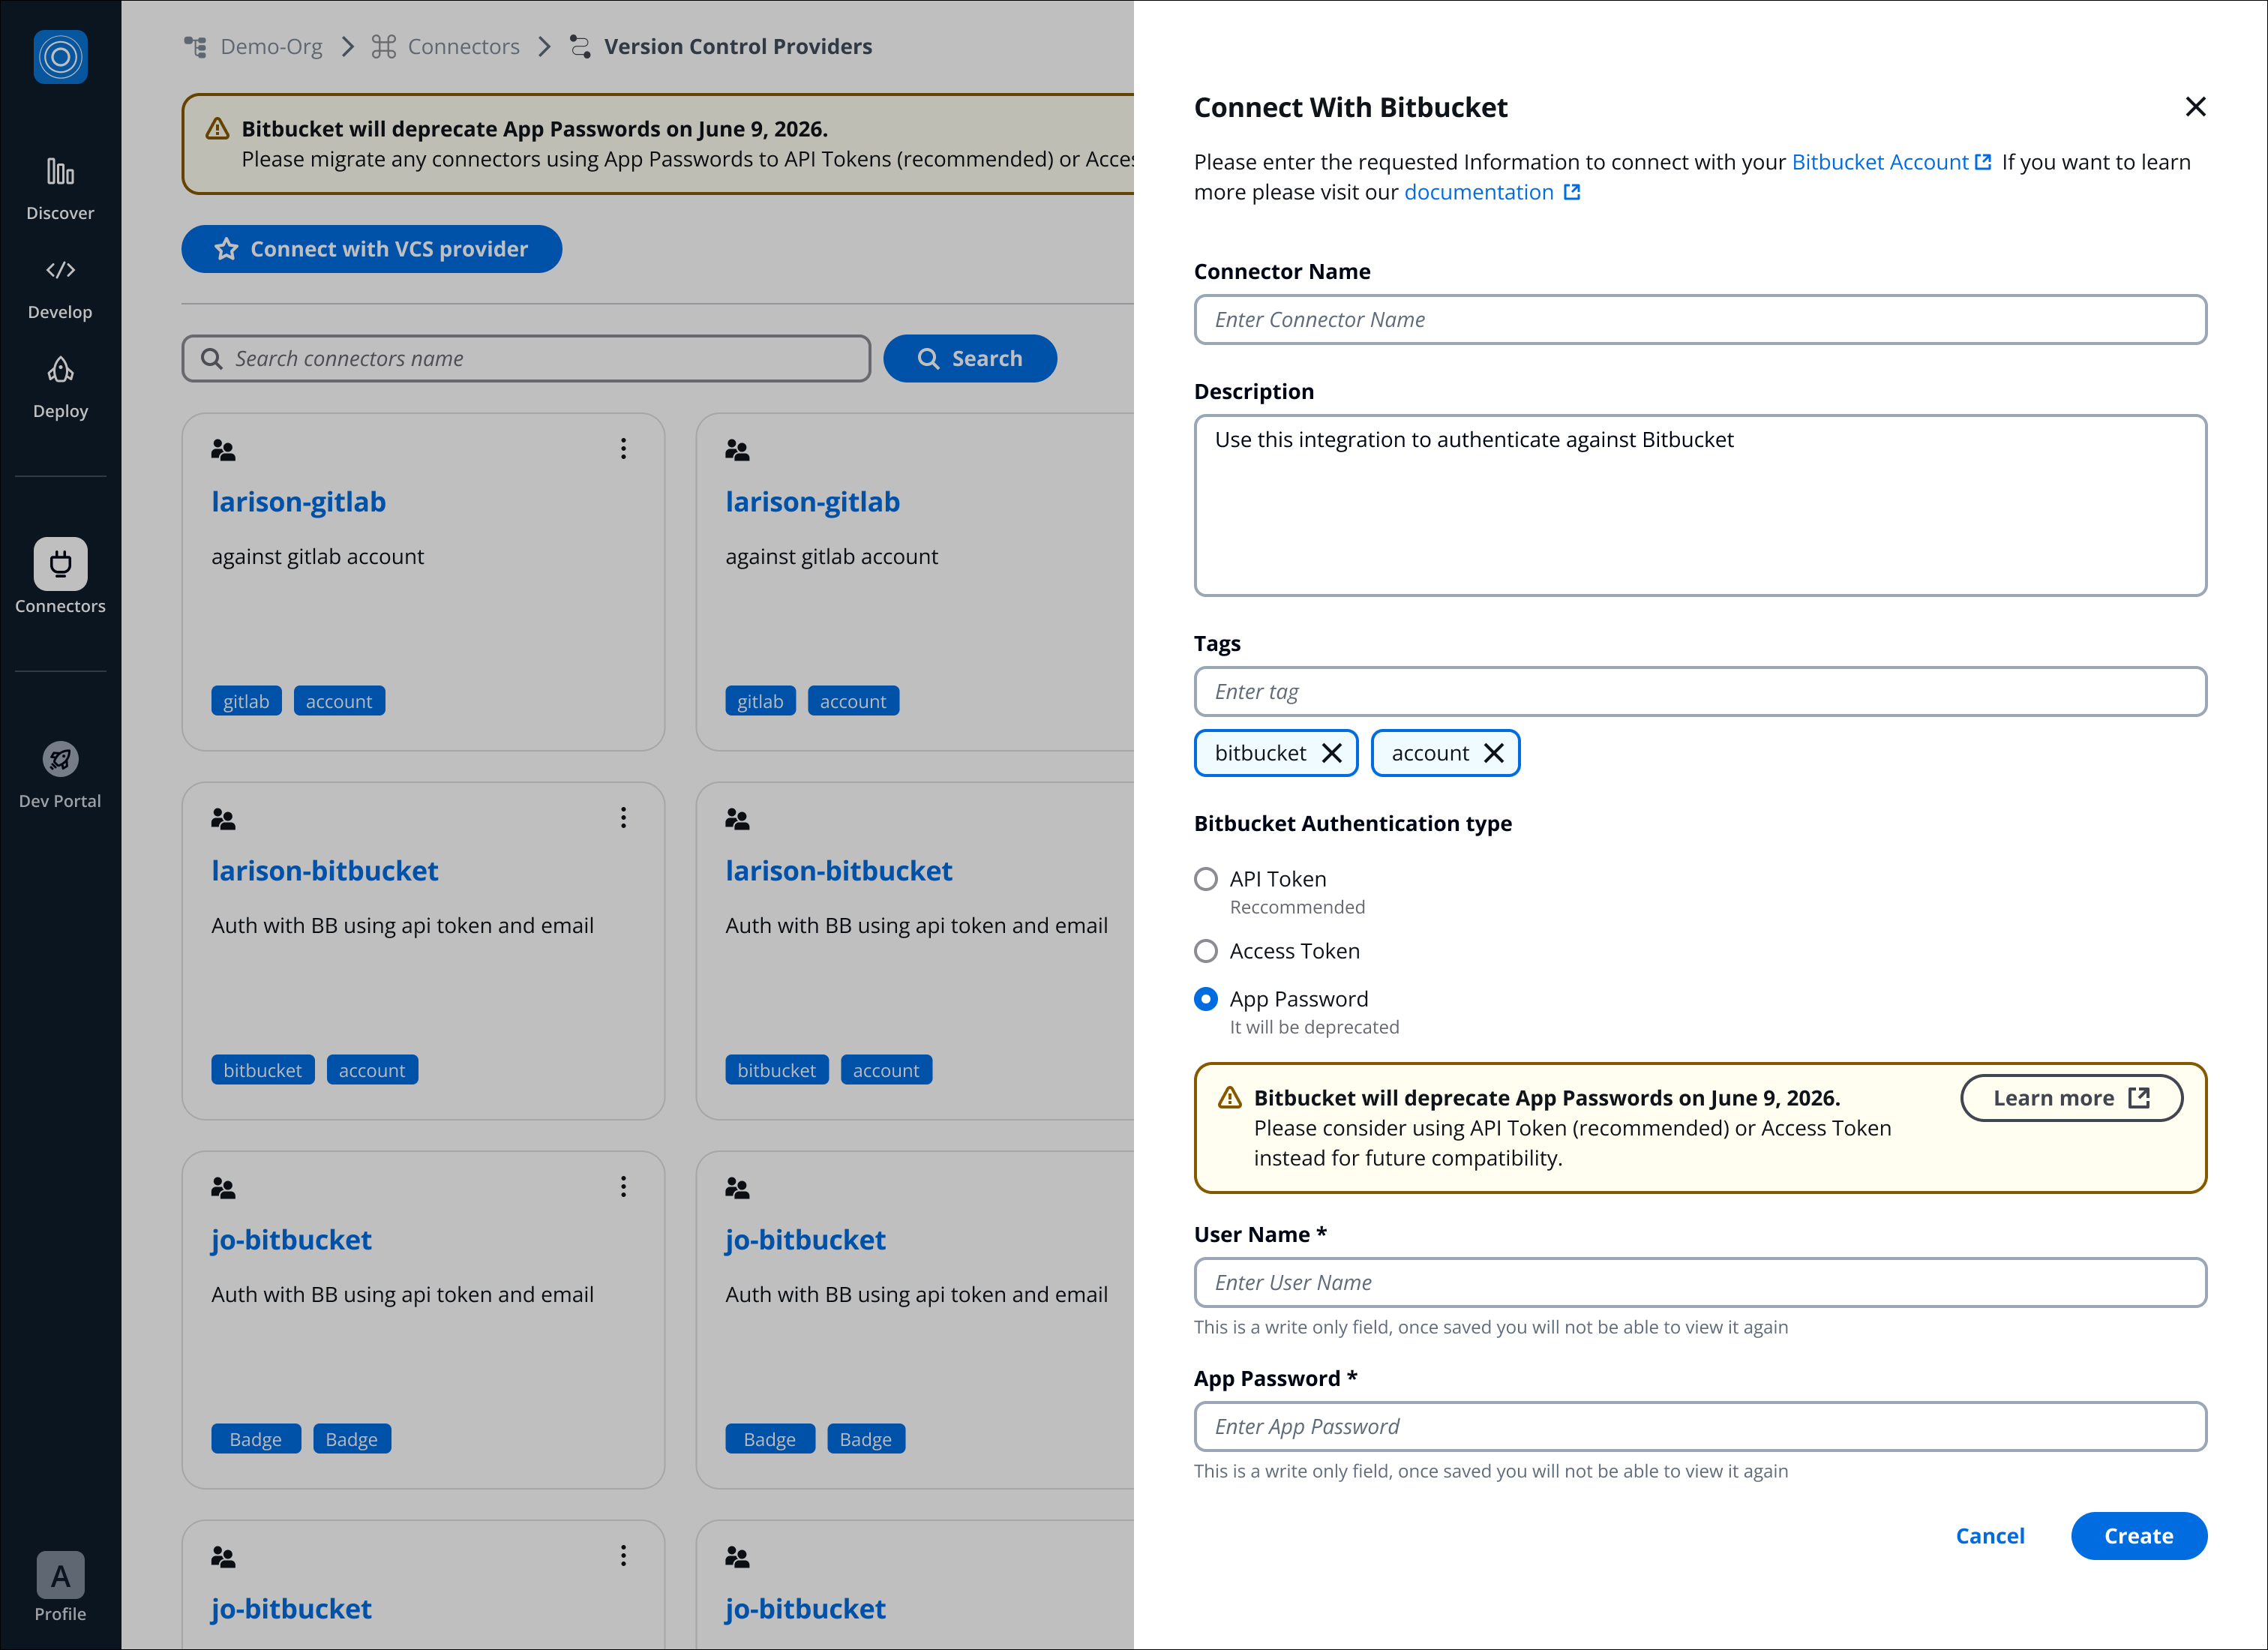
- App Password: Enter Bitbucket User Name, and paste the App Password that was created earlier in Bitbucket.
- Click on Create.
You can configure VCS triggers to automatically run workflows in response to Bitbucket events such as pushes, pull requests, and tag creation. See Workflow triggers.