Connect AWS to StackGuardian
Overview
StackGuardian provides three main approaches for authenticating your workloads or running discovery against an AWS account:
RBAC
This method uses cross-account IAM role assumption with an External ID. It is the recommended approach for securely granting StackGuardian access to your AWS account without storing long-lived credentials.
1. Create an IAM Role in AWS
- Sign in to the AWS Management Console and navigate to IAM → Roles → Create role.
- Select Custom trust policy as the trusted entity type.
- Replace the contents of the trust policy editor with the following, substituting your own External ID:
The External ID must follow the format
{
  "Version": "2012-10-17",
  "Statement": [
    {
      "Effect": "Allow",
      "Principal": {
        "AWS": [
          "arn:aws:iam::476299211833:root",
          "arn:aws:iam::163602625436:root"
        ]
      },
      "Action": "sts:AssumeRole",
      "Condition": {
        "StringEquals": {
          "sts:ExternalId": "<org-name>:<random-string>"
        }
      }
    }
  ]
}<org-name>:<random-string>— for example,myorg:abc12345. - Click Next and assign the required permissions policy:
- For discovery/read-only access: attach
ReadOnlyAccess - For deployment access: attach permissions tailored to the resources StackGuardian will manage
- For discovery/read-only access: attach
- Give the role a descriptive name such as
StackGuardianIntegrationRole, then click Create Role. - Copy the Role ARN — you will need it in the next step.
2. Create the Connector in StackGuardian
- In StackGuardian, navigate to Organization settings → Connectors → Cloud providers.
- Click Connect with Cloud Provider.
- Add a Connector name.
- Input the AWS role ARN and External ID from Step 1.
- Select the Active regions.
- Click Connect & scan to finalize the connector.
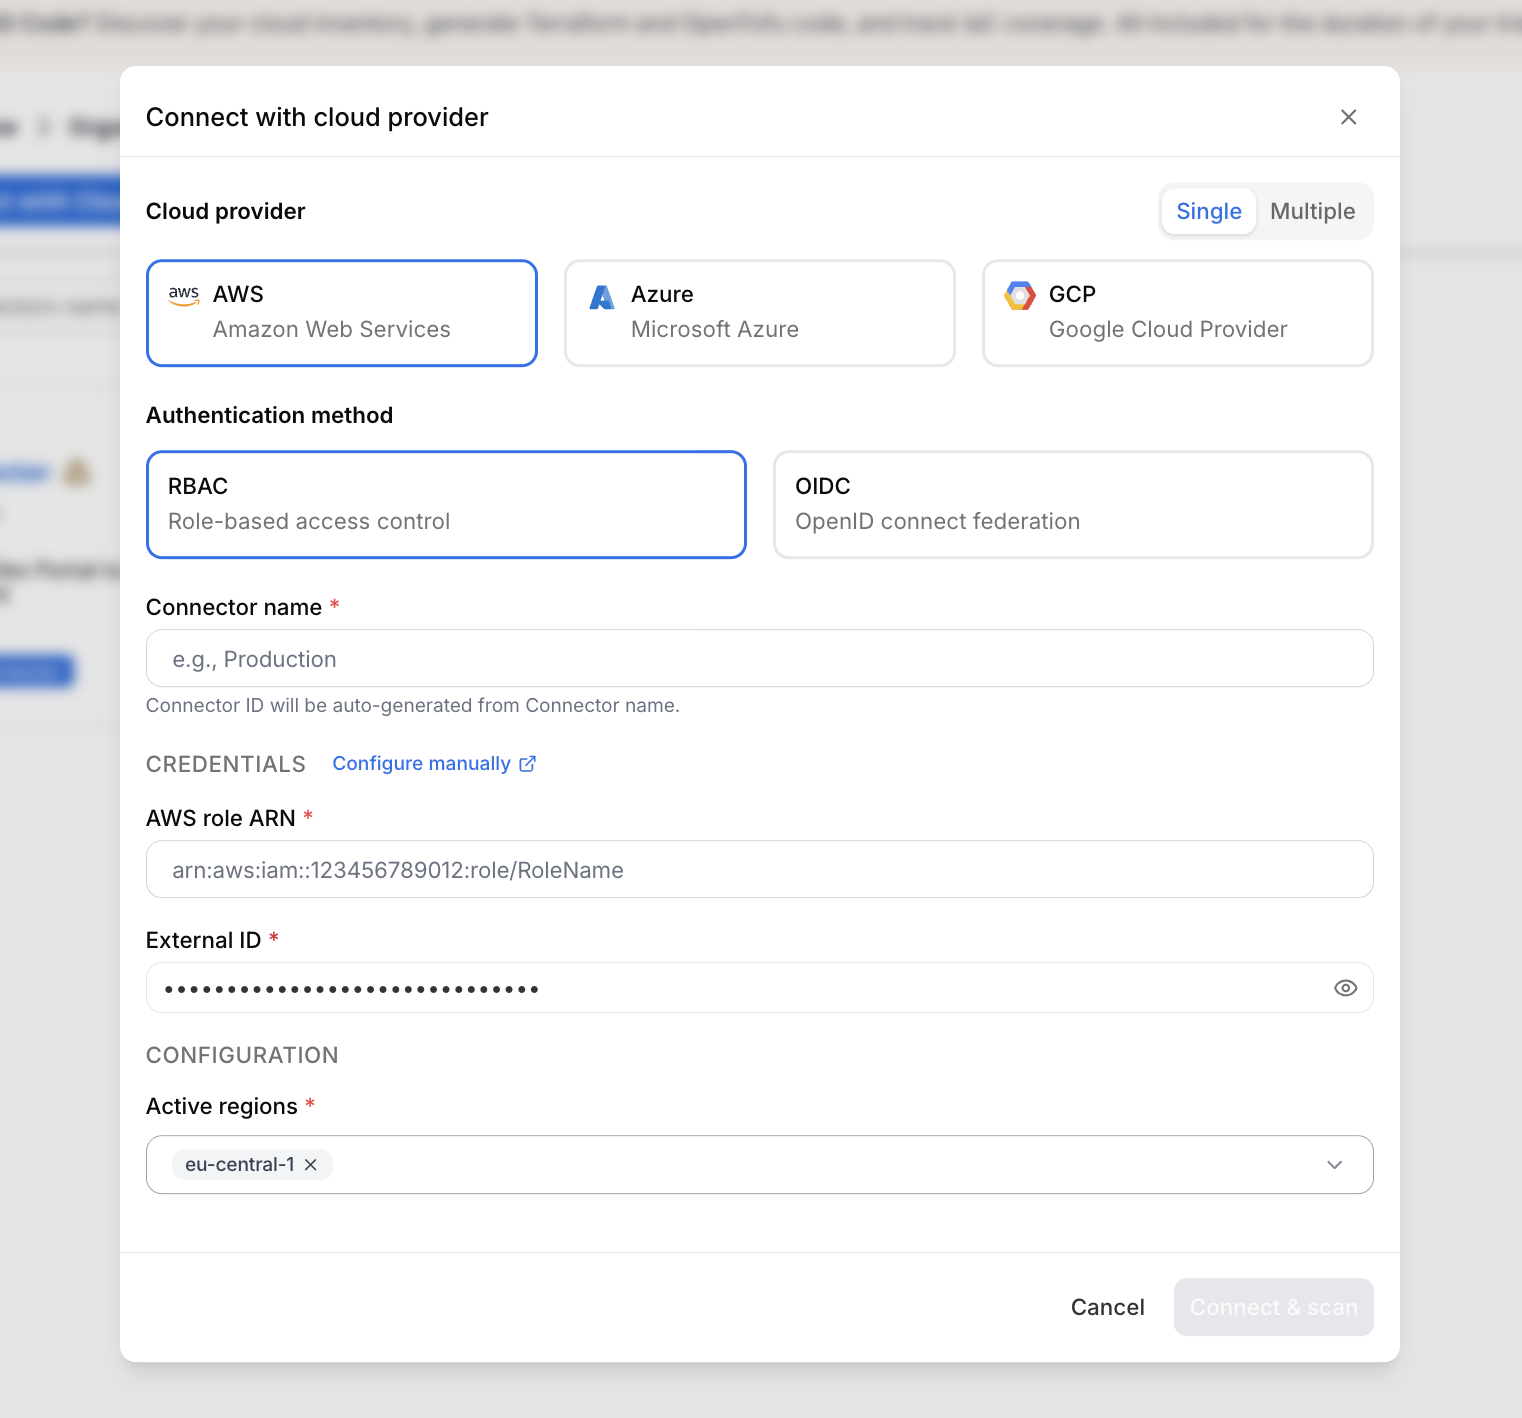
Create RBAC connector
OIDC (recommended)
This method uses OpenID Connect (OIDC) federation to allow StackGuardian to authenticate to AWS using temporary credentials — no long-lived secrets required.
For US Region, use https://api.us.stackguardian.io as Provider URL and Audience.
1. Create an OIDC Identity Provider in AWS
- In the AWS Management Console, go to IAM → Identity Providers → Add provider.
- Select OpenID Connect as the provider type.
- Enter the Provider URL and Audience based on your region:
- For EU Region:
https://api.app.stackguardian.io - For US Region:
https://api.us.stackguardian.io
- For EU Region:
- Click Add provider.
2. Create an IAM Role for the OIDC Provider
- In IAM → Roles → Create role, select Web Identity as the trusted entity type.
- Choose the identity provider you just created
- For EU Region:
https://api.app.stackguardian.io - For US Region:
https://api.us.stackguardian.io
- For EU Region:
- Select the audience:
- For EU Region:
https://api.app.stackguardian.io - For US Region:
https://api.us.stackguardian.io
- For EU Region:
- Assign the required permissions:
- For discovery/read-only access: attach
ReadOnlyAccess - For deployment access: attach the least permissions required for your use case
- For discovery/read-only access: attach
- Name the role and click Create Role.
- Copy the Role ARN — you will need it for the final step.
3. Update the Trust Policy
Navigate to your newly created role → Trust relationships → Edit trust policy and apply the following, replacing the placeholder values:
- EU Region
- US Region
{
  "Version": "2012-10-17",
  "Statement": [
    {
      "Effect": "Allow",
      "Principal": {
        "Federated": "arn:aws:iam::<YOUR_AWS_ACCOUNT_ID>:oidc-provider/api.app.stackguardian.io"
      },
      "Action": "sts:AssumeRoleWithWebIdentity",
      "Condition": {
        "StringEquals": {
          "api.app.stackguardian.io:aud": "https://api.app.stackguardian.io"
        },
        "StringLike": {
          "api.app.stackguardian.io:sub": "/orgs/<YOUR_SG_ORG>"
        }
      }
    }
  ]
}
{
  "Version": "2012-10-17",
  "Statement": [
    {
      "Effect": "Allow",
      "Principal": {
        "Federated": "arn:aws:iam::<YOUR_AWS_ACCOUNT_ID>:oidc-provider/api.us.stackguardian.io"
      },
      "Action": "sts:AssumeRoleWithWebIdentity",
      "Condition": {
        "StringEquals": {
          "api.us.stackguardian.io:aud": "https://api.us.stackguardian.io"
        },
        "StringLike": {
          "api.us.stackguardian.io:sub": "/orgs/<YOUR_SG_ORG>"
        }
      }
    }
  ]
}
- Replace
<YOUR_AWS_ACCOUNT_ID>with your AWS account ID. - Replace
<YOUR_SG_ORG>with your StackGuardian organization name.
4. Create the Connector in StackGuardian
- In StackGuardian, navigate to Organization settings → Connectors → Cloud providers.
- Click Connect with Cloud Provider.
- Add a Connector name.
- Input the AWS role ARN from Step 2.
- Click Connect & scan to finalize the connector.
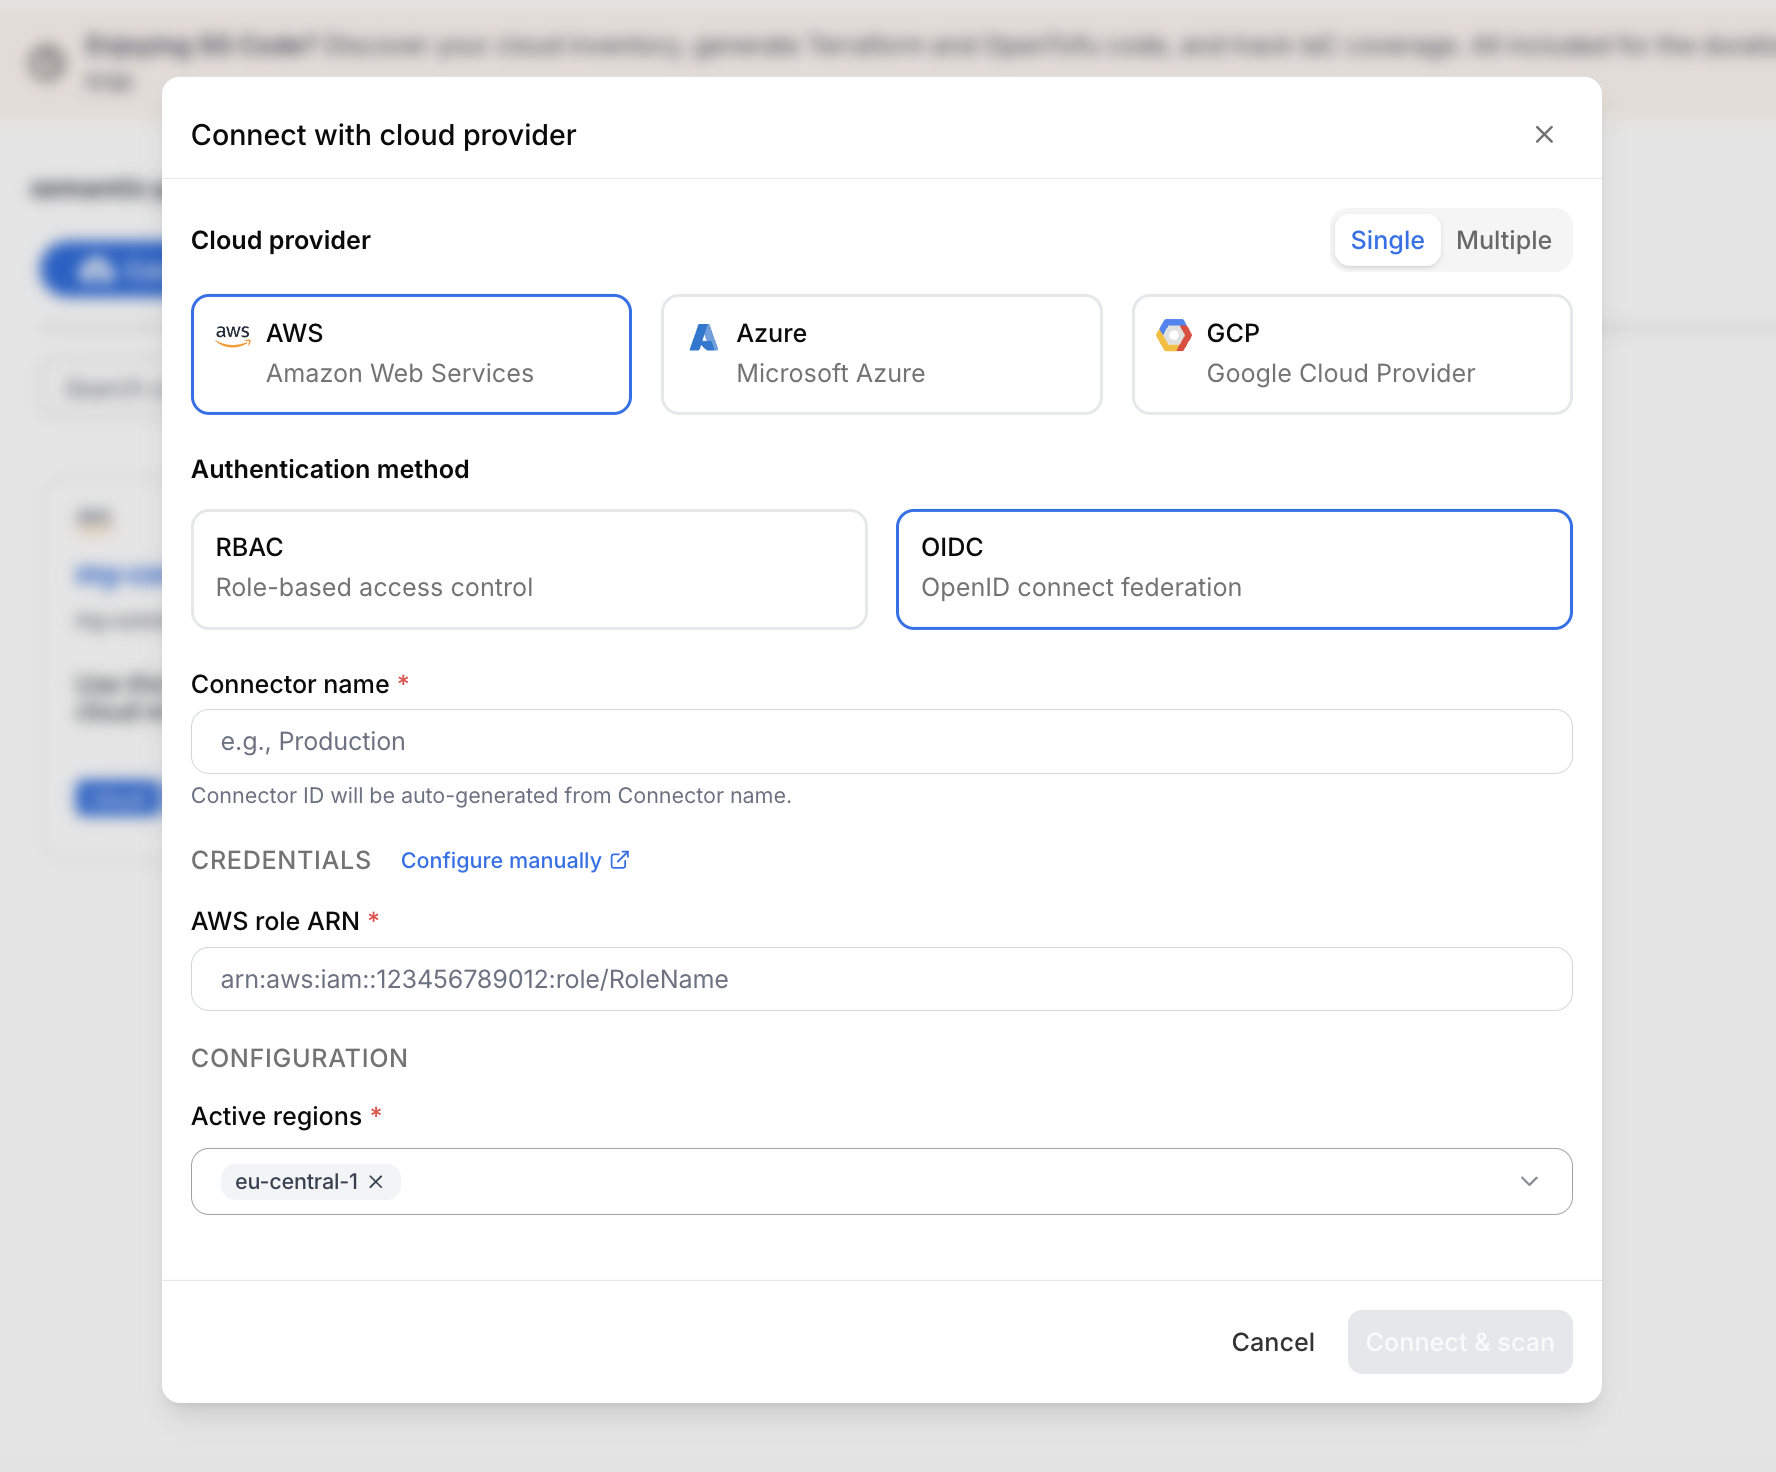
Create OIDC connector
Multiple connectors
You can connect multiple AWS accounts at once instead of creating individual connectors — ideal for organizations managing large numbers of accounts.
1. Begin multiple connectors setup
- Log in to the StackGuardian Platform and navigate to Organization settings → Connectors → Cloud providers.
- Click Connect with Cloud Provider.
- In the connectors modal, select Multiple.
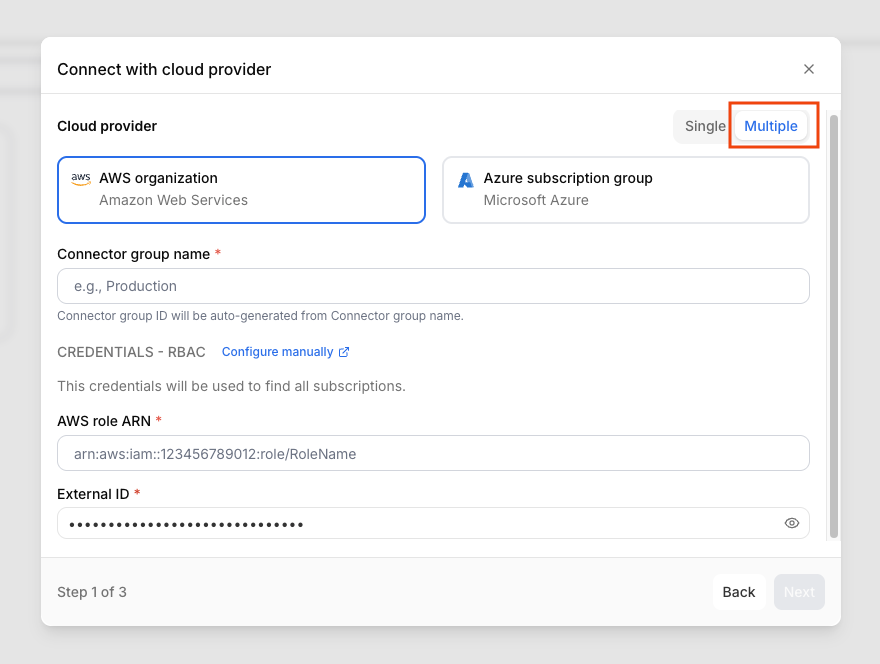
Create multiple connectors
- Enter a Connector group name.
- Provide the AWS role ARN and External ID for the management role. Ensure the External ID matches the format
<org-name>:<random-string>or<org-name>-<random-string> - Click Next.
2. Select AWS accounts
- Use the Select accounts dropdown to select individual accounts or All accounts. The list will include each account's Email and Account ID.
- Click Next.
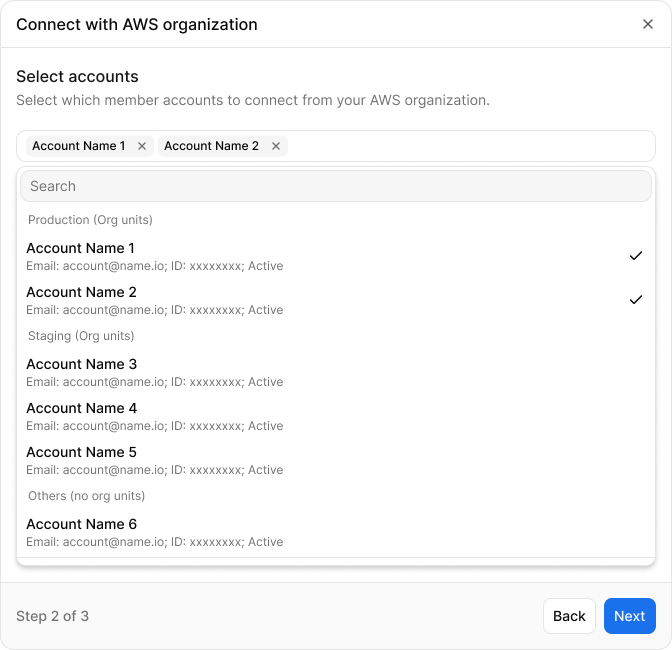
Select AWS accounts
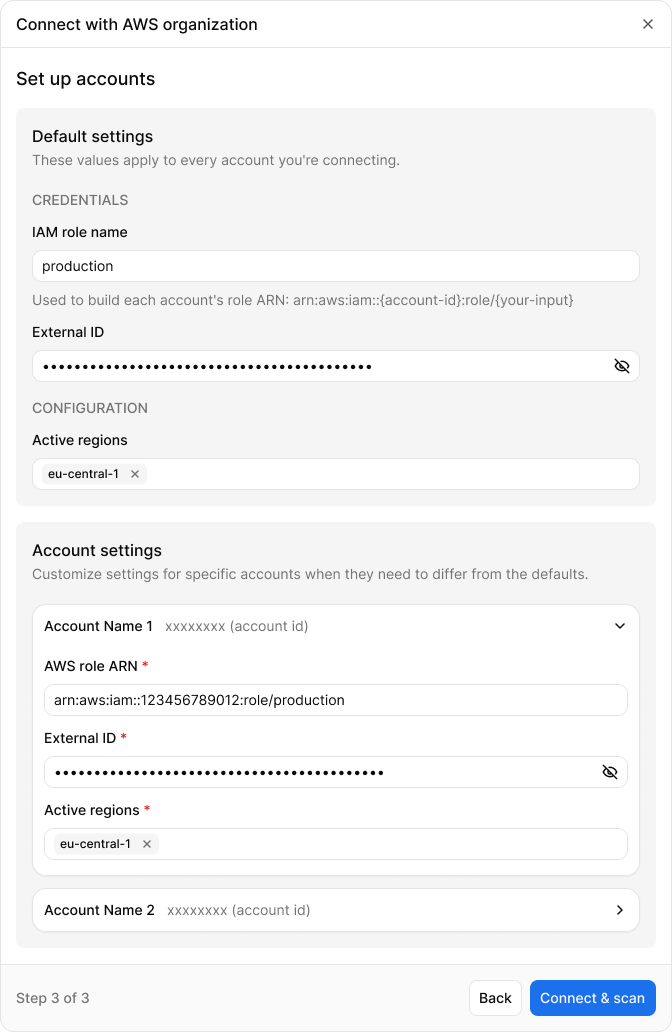
3. Configure default settings and individual accounts
- Under Default settings, set the IAM role name, External ID, and the Active regions — these apply to all connected accounts.
- Under Accounts settings, fill in the following for each account:
- AWS role ARN — the role ARN for that account
- External ID — the external ID associated with the role
- Active regions
- Click Connect & scan to complete the setup.
Configure default settings and individual accounts