Connect Azure to StackGuardian
Overview
Azure Connectors in StackGuardian allow you to securely link your Azure subscriptions so that StackGuardian can discover, monitor, and orchestrate cloud resources on your behalf. Once connected, StackGuardian can enforce compliance policies, manage infrastructure workflows, and provide continuous visibility across your cloud estate.
StackGuardian supports the following connection methods:
- Single Connectors — Connect one Azure subscription at a time:
- Service principal with federated credentials — Authenticates using short-lived tokens without storing long-lived secrets.
- Service principal with client secret — Authenticates using a client secret tied to an app registration.
- Managed identity — Authenticates using an identity already configured in your Azure environment, without managing secrets.
- Multiple Connectors — Connect multiple Azure subscriptions at once:
- Service principal with client secret — Uses a single service principal with cross-subscription permissions to authenticate across multiple subscriptions.
Single Connectors
Service principal with federated credentials
Service principal with federated credentials lets you authenticate without storing long-lived secrets — using short-lived tokens instead, so your credentials can't expire or be compromised in transit.
1. Create the app registration
- Under Microsoft Entra ID, navigate to App Registrations and click New registration.
- Enter the following and click Register:
- Name:
StackGuardianConnector - Supported Account Types: Accounts in this organizational directory only
- Name:
2. Configure federated credentials
- In your App Registration, go to Certificates & secrets > Federated credentials and click Add credential.
- In the Federated credential scenario dropdown, select Other issuer.
- Fill in the following fields based on your StackGuardian region:
| Field | EU region | US region |
|---|---|---|
| Issuer | https://api.app.stackguardian.io | https://api.us.stackguardian.io |
| Subject identifier | /orgs/<YOUR_SG_ORG_ID> | /orgs/<YOUR_SG_ORG_ID> |
| Audience | https://api.app.stackguardian.io | https://api.us.stackguardian.io |
| Name | StackGuardian-Trust | StackGuardian-Trust |
Replace <YOUR_SG_ORG_ID> with your StackGuardian organization ID.
- Click Add.
3. Grant permissions to the application
Always assign the minimum permissions required. Follow the principle of least privilege:
- SGCode (compliance scanning and resource discovery) requires only read-only access — assign the Reader role.
- SGOrchestrator (infrastructure provisioning and management) requires minimal write access — assign the Contributor role, or a custom role scoped to only the resource types it needs to manage.
Steps:
- Navigate to Subscriptions and click on the target subscription.
- Select Access control (IAM) and click Add > Add role assignment.
- Under Role, select the appropriate role:
- Reader — read-only access, recommended for SGCode.
- Contributor — read and write access, minimum required for SGOrchestrator. Prefer a custom role with narrower scope where possible.
- Under Select, choose the app registration created above (e.g.,
StackGuardianConnector) and click Review + assign. - Repeat for any additional subscriptions StackGuardian should have access to.
4. Finalize the connector in StackGuardian
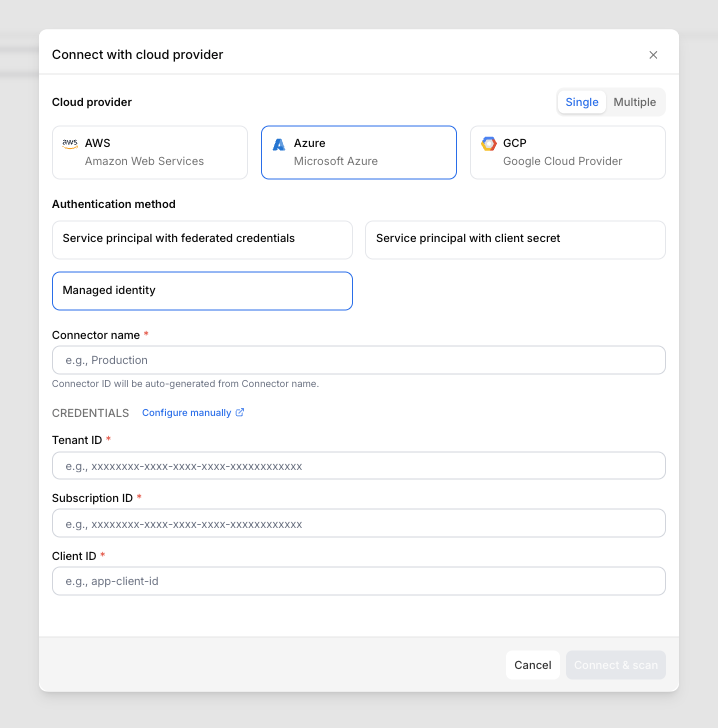
- Navigate to Organization settings > Connectors > Cloud providers in StackGuardian.
- Click Connect with Cloud Provider and select Azure.
- Select Service principal with federated credentials and provide:
- Connector name
- Tenant ID
- Subscription ID
- Client ID
- Click Connect & scan to finalize.
Service principal with client secret
Service principal with client secret authenticates using a secret key tied to an app registration. Use this method when federated credentials or managed identity are not available in your environment.
1. Create the app registration
- Under Microsoft Entra ID, navigate to App Registrations and click New registration.
- Enter the following and click Register:
- Name:
StackGuardianConnector - Supported Account Types: Accounts in this organizational directory only
- Name:
2. Create a client secret
- In your App Registration (e.g.,
StackGuardianConnector), navigate to Manage > Certificates & Secrets. - Click New client secret.
- Provide a Description, select an expiration period, and click Add.
- Copy the client secret value immediately — it will not be shown again.
3. Grant permissions to the application
Always assign the minimum permissions required. Follow the principle of least privilege:
- SGCode (compliance scanning and resource discovery) requires only read-only access — assign the Reader role.
- SGOrchestrator (infrastructure provisioning and management) requires minimal write access — assign the Contributor role, or a custom role scoped to only the resource types it needs to manage.
Steps:
- Navigate to Subscriptions and click on the target subscription.
- Select Access control (IAM) and click Add > Add role assignment.
- Under Role, select the appropriate role:
- Reader — read-only access, recommended for SGCode.
- Contributor — read and write access, minimum required for SGOrchestrator. Prefer a custom role with narrower scope where possible.
- Under Select, choose the app registration created above (e.g.,
StackGuardianConnector) and click Review + assign. - Repeat for any additional subscriptions StackGuardian should have access to.
4. Finalize the connector in StackGuardian
- Navigate to Organization settings > Connectors > Cloud providers in StackGuardian.
- Click Connect with Cloud Provider and select Azure.
- Select Service principal with client secret and provide:
- Connector name
- Tenant ID
- Subscription ID
- Client ID
- Client secret value
- Click Connect & scan to finalize.
Managed identity
Managed identity allows StackGuardian to authenticate with Azure using an identity already configured in your Azure environment. No client secret is required, reducing credential management overhead.
-
Create the managed identity in Azure
- Sign in to the Azure Portal.
- Search for Managed Identities in the search bar and select it.
- Click + Create.
- Select your Subscription and Resource Group.
- Provide a Name (e.g.,
sg-workload-identity) and select your Region. - Click Review + Create, then Create.
-
Assign permissions
Always assign the minimum permissions required. Follow the principle of least privilege:
- SGCode (compliance scanning and resource discovery) requires only read-only access — assign the Reader role.
- SGOrchestrator (infrastructure provisioning and management) requires minimal write access — assign the Contributor role, or a custom role scoped to only the resource types it needs to manage.
Steps:
- Navigate to your new managed identity resource.
- In the left-hand menu, select Azure role assignments.
- Click + Add role assignment.
- Configure the following:
- Scope: Select Subscription (or Resource group)
- Subscription: Select the target subscription
- Role: Select Reader for SGCode, or Contributor (or a more restrictive custom role) for SGOrchestrator.
- Click Save.
-
Configure federated identity credentials
This step establishes the trust relationship between Azure and StackGuardian.
- Within the managed identity resource, select Federated credentials.
- Click + Add credential.
- In the Federation scenario dropdown, select Other issuer.
- Fill in the following fields based on your StackGuardian region:
Field EU region US region Issuer https://api.app.stackguardian.iohttps://api.us.stackguardian.ioSubject identifier /orgs/<YOUR_SG_ORG_ID>/orgs/<YOUR_SG_ORG_ID>Audience https://api.app.stackguardian.iohttps://api.us.stackguardian.ioName StackGuardian-TrustStackGuardian-TrustimportantReplace
<YOUR_SG_ORG_ID>with your StackGuardian organization ID.- Click Add.
-
Configure the connector in StackGuardian
- Navigate to Organization settings > Connectors > Cloud providers in StackGuardian.
- Click on Connect with Cloud Provider and select Azure.
- Select Managed identity and provide:
- Connector name
- Tenant ID
- Subscription ID
- Client ID
- Click Connect & scan to finalize.
Managed identity
Multiple Connectors
You can connect multiple Azure subscriptions at once instead of creating individual connectors — ideal for organizations managing large numbers of subscriptions.
The service principal used for multiple connectors must have permissions across all target subscriptions. The recommended best practice is to assign the service principal a role at the Management Group level — permissions are then automatically inherited by all subscriptions within that management group, avoiding the need to grant access per subscription individually.
Always follow the principle of least privilege:
- SGCode requires only Reader access assigned at the management group scope.
- SGOrchestrator requires minimal write access — assign Contributor or a custom role at the management group scope.
Service principal with client secret
1. Begin multiple connectors setup
- Log in to the StackGuardian Platform and navigate to Organization settings → Connectors → Cloud providers.
- Click Connect with Cloud Provider.
- In the connectors modal, select Multiple.
- Enter a Connector group name.
- Provide the Tenant ID, Subscription ID, Client ID, and Client secret value. Ensure the External ID matches the format
<org-name>:<random-string>or<org-name>-<random-string> - Click Next.

Create multiple connectors
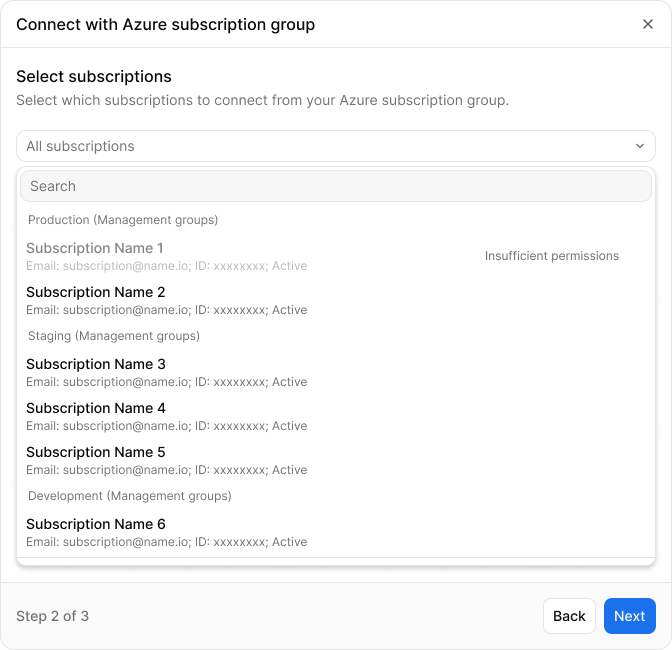
2. Select Azure accounts
- Use the Select accounts dropdown to select individual accounts or All accounts. The list will include each account's Email and Account ID.
- Click Next.
Select Azure accounts
3. Configure the subscription settings
- Under Subscription settings, fill in the Client ID for each account.
- Click Connect & scan to complete the setup.
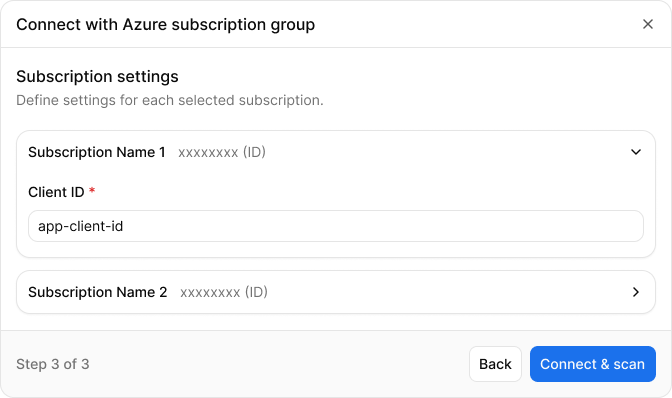
Configure default settings and individual accounts
Compliance and security best practices
- Use Role-Based Access Control (RBAC): Ensure roles and permissions are minimal and precise.
- Monitor Resources: Enable continuous discovery checks for real-time monitoring of resources.
- Use Workload Identity: Prefer this method for higher security, avoiding secret management.
Additional information
For further details, visit: