Create Policy
Overview
Policy Sets let you enforce compliance on your Workflows, Stacks, and Infrastructure as Code (IaC) before anything reaches your cloud. You group related rules into a Policy Set, decide what happens when a rule passes or fails, and choose where the Policy Set applies.
To see all your Policy Sets, go to SGOrchestrator > Policy set. For details about the list, see the Policy Sets overview.
To create a Policy Set:
- On the Policy sets page, select Create policy set.
- Fill in the details:
- Policy set name: StackGuardian generates the Policy set ID from the name.
- Description (optional)
- Tags (optional): Type a label for a normal tag, or
key=valuefor a context tag. Select the link icon inside a context tag to pull its value from a Workflow, Stack, or Secret.
- Select Create.
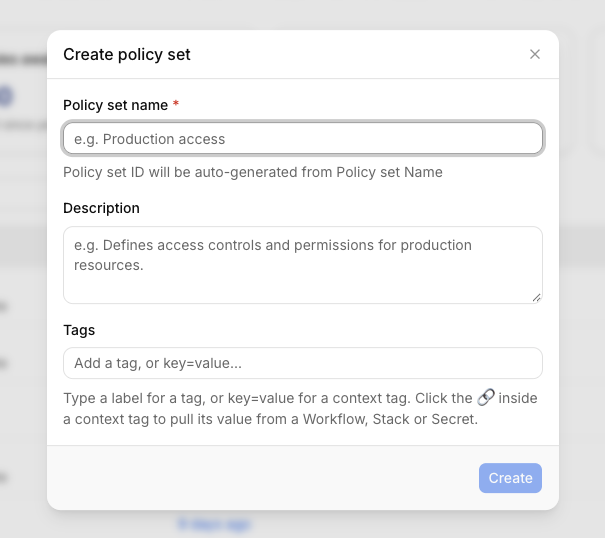
Create policy set
Policy Set details
Select a Policy Set to open its details page. The header shows:
- Name and resource ID: Select the pencil icon next to the name to edit it.
- Description
- Policy type: The number of rules that use each policy configuration type: Open Policy Agent (OPA), Tirith, and Marketplace. Hover over an icon to see its type and count.
- Last evaluated: When StackGuardian last evaluated the Policy Set. Shows "Never evaluated" until the first evaluation.
- Policy rules results: The number of rules that failed, are awaiting approval, produced a warning, passed, or were skipped in the latest evaluation. Shows "No evaluation results yet" until the first evaluation. Use the Policy options menu in the top right to Clone or Delete the Policy Set.
Below the header, the details page has four tabs: Overview, Rules, Scope, and Meta.
Overview
The Overview tab shows how the rules in this Policy Set last evaluated across every Workflow and Stack in scope.
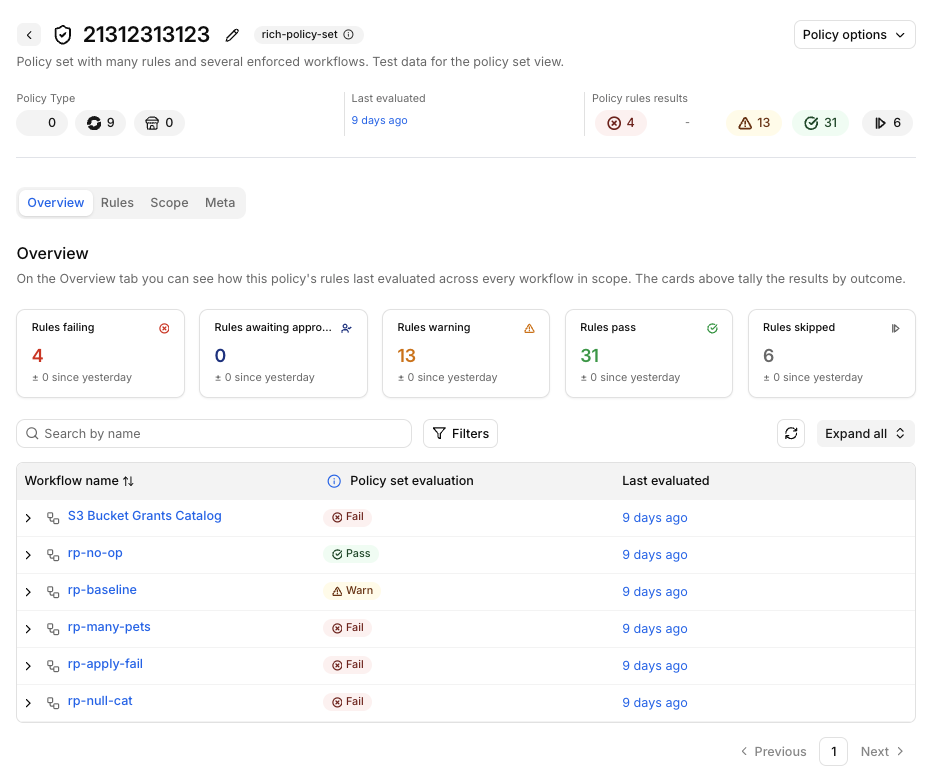
Policy set header
The cards at the top tally the results by outcome:
- Rules failing
- Rules awaiting approval
- Rules warning
- Rules pass
- Rules skipped: Rules that weren't applied Each card also shows how the number changed since yesterday.
Below the cards, a table lists the Workflows and Stacks in scope:
- Workflow name: The name of the Workflow or Stack. Select the name to open it. Sort the column to reorder the list.
- Policy set evaluation: The overall result for each Workflow or Stack. When a Policy Set has several rules, only the worst result shows. Select the info icon to see how results are ranked.
- Last evaluated: When the Workflow or Stack was last evaluated against this Policy Set. Results are ranked in this order:
- Fail: One or more rules failed. Fail always wins.
- Approval required: A rule is waiting for someone to approve it. It shows as the overall result only when no rule failed or warned.
- Warn: No rule failed, but at least one rule warned.
- Pass: Every evaluated rule passed, and none are waiting for approval.
- Skipped: None of the rules were evaluated. For example, if one rule fails and two rules pass, the result is Fail.
To find a Workflow or Stack, search by name or select Filters. Select the arrow at the start of a row to expand it, or select Expand all.
An expanded Workflow or Stack lists each rule in the Policy Set with its result (Pass, Fail, or Warn), when it was last evaluated, and a View policy evaluation button.
Rules
Rules define what the Policy Set checks and what happens with the result.
The Rules tab lists every rule in the Policy Set. Each row shows:
- Name: The rule name
- Status: For example, Active or Draft
- Policy configuration: The policy type, for example Tirith (StackGuardian Policy Framework)
- Enforcement: The action when the Policy passes and the action when it errors, for example On pass: PASS and On fail: WARN
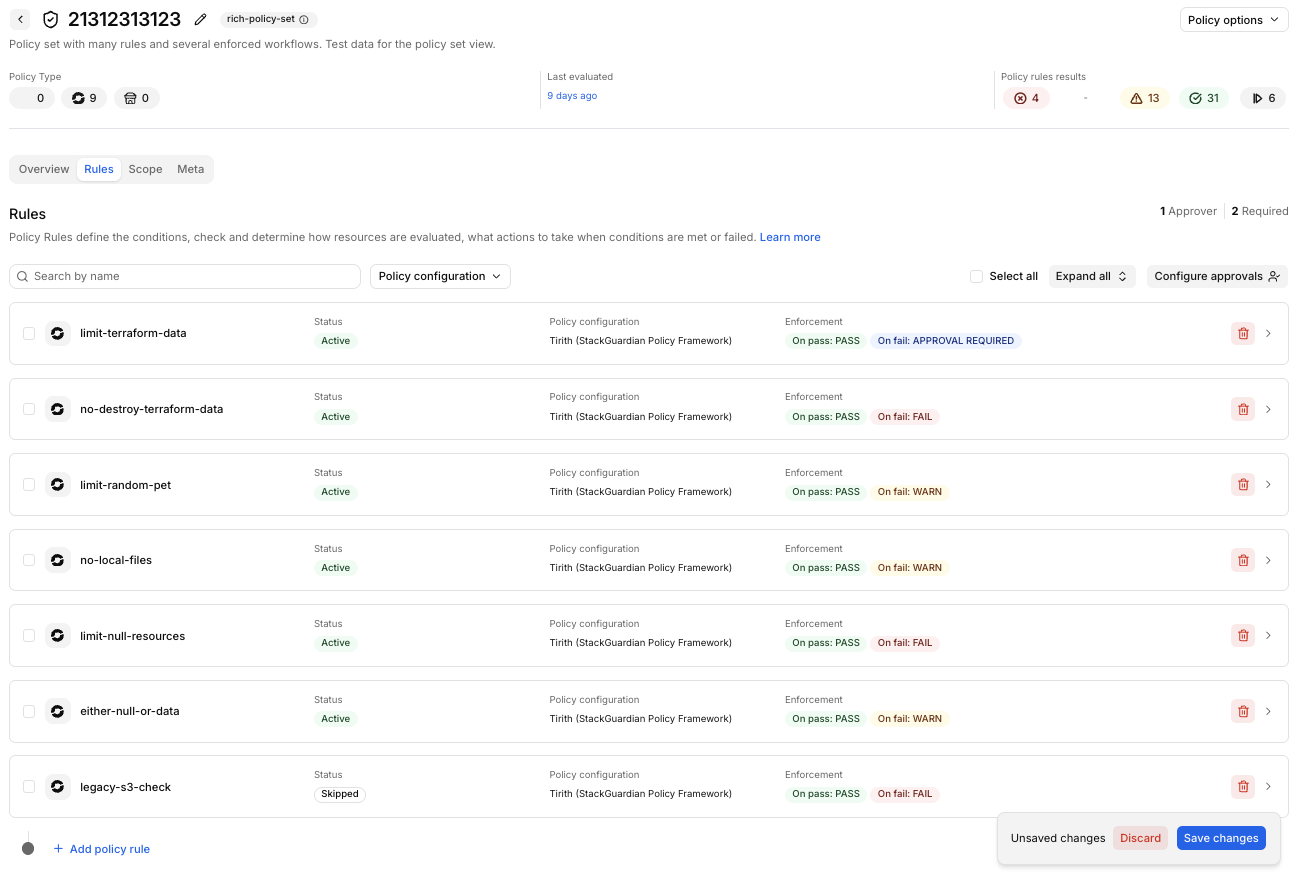
Policy rules tab
To manage the list:
- Search by name, or filter by Policy configuration.
- Select the arrow at the end of a row to expand it and edit the rule, or select Expand all.
- Select the trash icon on a row to delete a rule.
- To delete several rules at once, select their checkboxes (or Select all), then select Delete.
Add a rule
- On the Rules tab, select Add policy rule. The new rule opens as a Draft.
- Under Select your policy configuration, select the type of rule:
- Open Policy Agent: Use an open source, general-purpose policy engine to enforce policy across your infrastructure.
- Tirith (StackGuardian Policy Framework): Define rules that govern the configuration and provisioning of infrastructure with SG noCode.
- Marketplace Policy Template: Use a shared template from SGMarketplace.
- Enter a Name for the rule. Use a valid slug, for example
aws-best-practices. - Configure the rule for the type you selected. See the sections below.
- Under Enforcement, set the actions to take (see Actions).
- In the Unsaved changes bar, select Save changes. To cancel, select Discard.
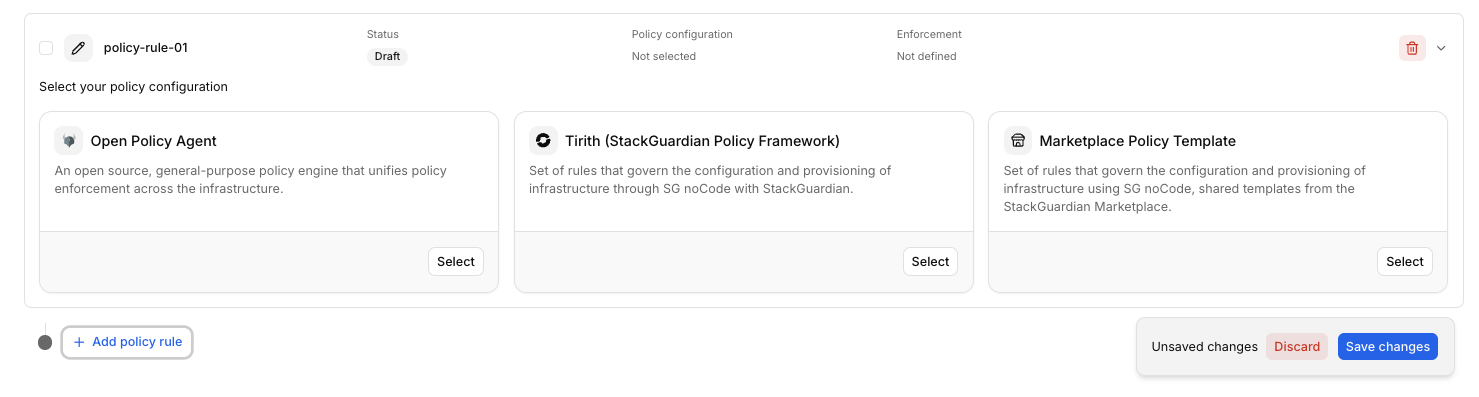
Add policy rule
To ignore a rule without deleting it, turn on Skipped during evaluation at the top of the rule. StackGuardian treats the rule as inactive.
Open Policy Agent
- In Version Control, select Git Others (SSH, Secrets or Public Repo) or one of your VCS connectors. To add a connector, select Add new VCS Connector.
- In Repository, enter the repository.
- Optional: In Branch, Tag or Commit, enter a Git reference such as
mainorv1.0.0. If you leave it empty, StackGuardian uses the default branch. - Optional: In Working dir, enter the path to your policies, for example
/modules/vm. - Optional: In Git Sparse Checkout Config, enter the paths to check out, one per line.
- Optional: Select Enable git core.autocrlf to convert line endings in text files when they are checked out or committed.
- Optional: In OPA Deciding Query, enter the rule that decides the final result, in the format
<opa-package-path>.<rule-name-returning-boolean>. The query must return a boolean. - Optional: Turn on Pass JSON inputs to provide JSON data in the code editor. StackGuardian passes this data to the OPA runtime in addition to the Rego policies fetched from Git. For more about OPA, see Open Policy Agent integration.
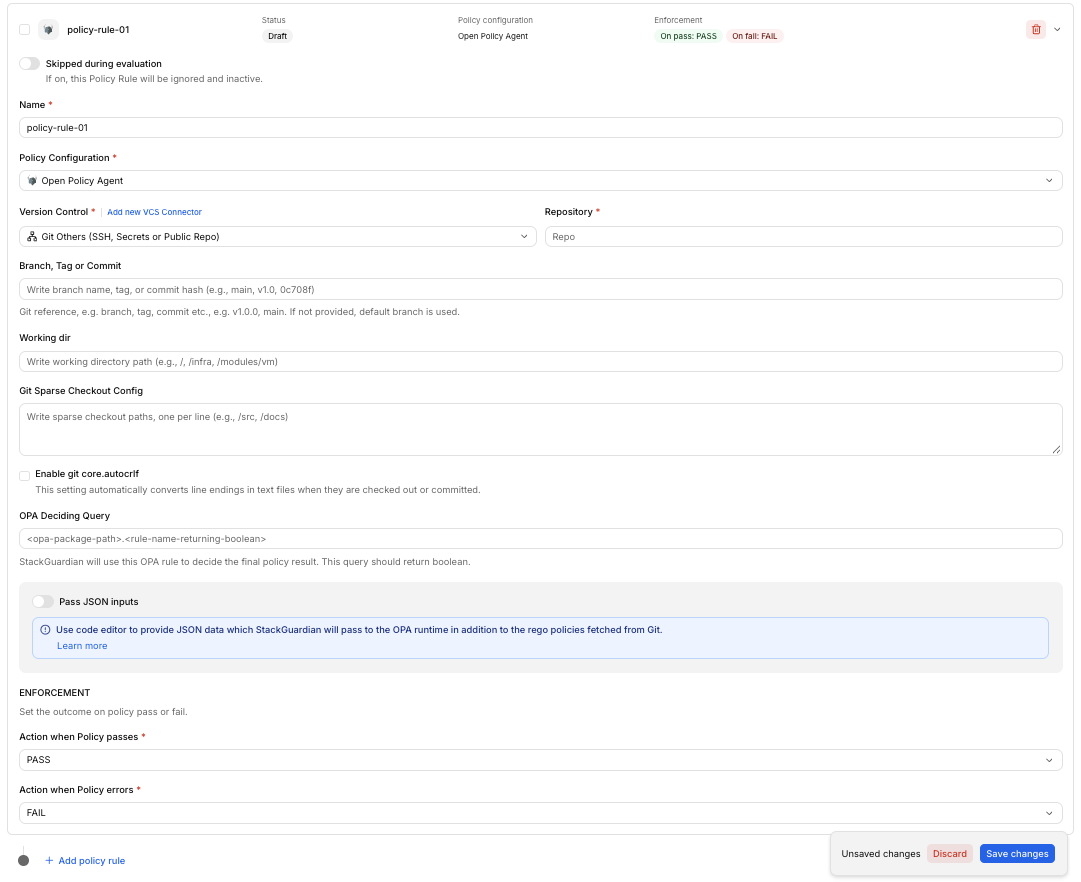
Open Policy agent
Tirith (StackGuardian Policy Framework)
- In Policy Input Mode, select how to define the policy: No Inputs, Code Editor, or SG noCode. The steps below use SG noCode.
- In Provider, select the provider to check, for example Terraform/OpenTofu Plan.
- Under Evaluators, select Add evaluator. Each evaluator checks one value from the provider against a condition.
- In Final expression, combine your evaluators with logical operators, for example
check_id_1 && check_id_3. To review the policy as JSON, turn on Show Policy JSON. For details about providers, operations, and conditions, see NoCode Policy Builder.
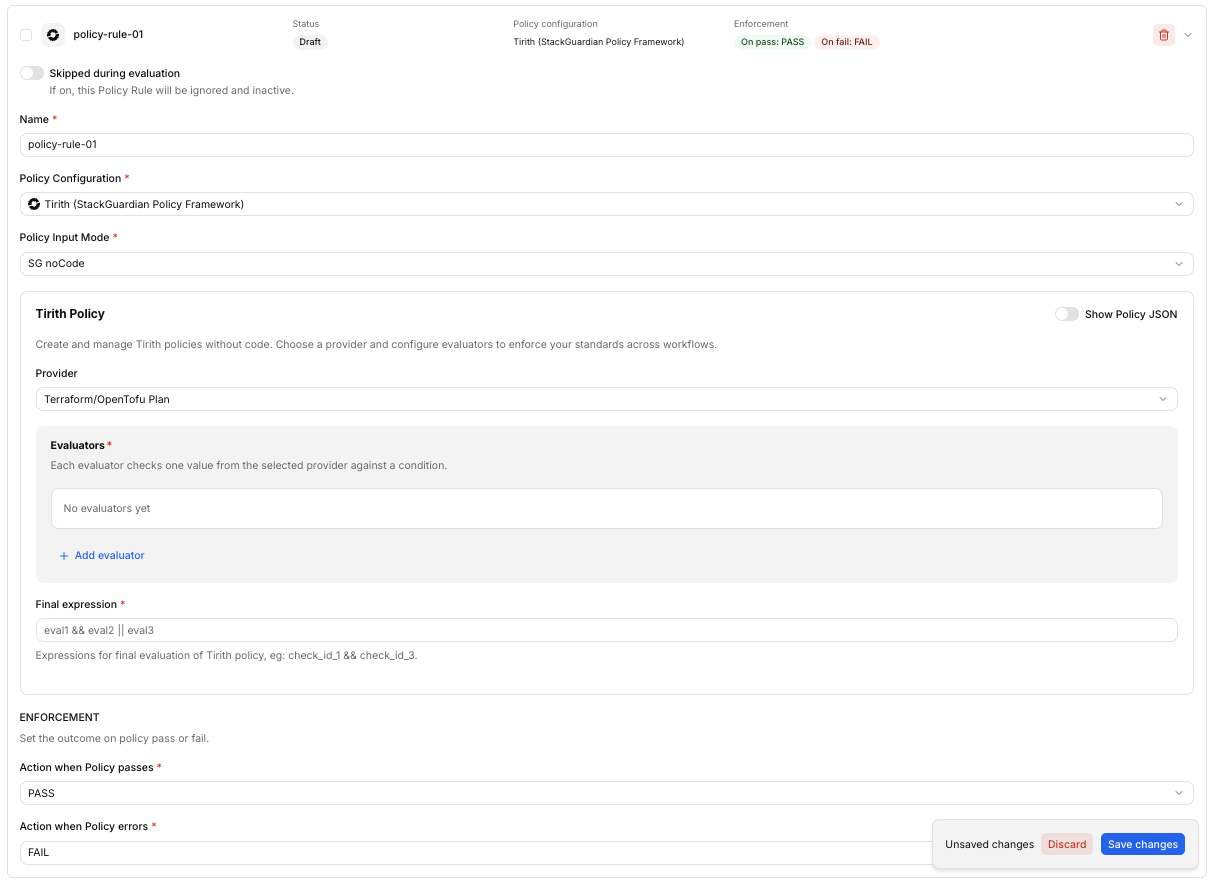
Tirith Policy
Marketplace Policy Template
- In Policy Template, select a template, for example /stackguardian/aws-best-practices-all.
- In Policy Template Revision, select a revision. This field is available after you select a template.
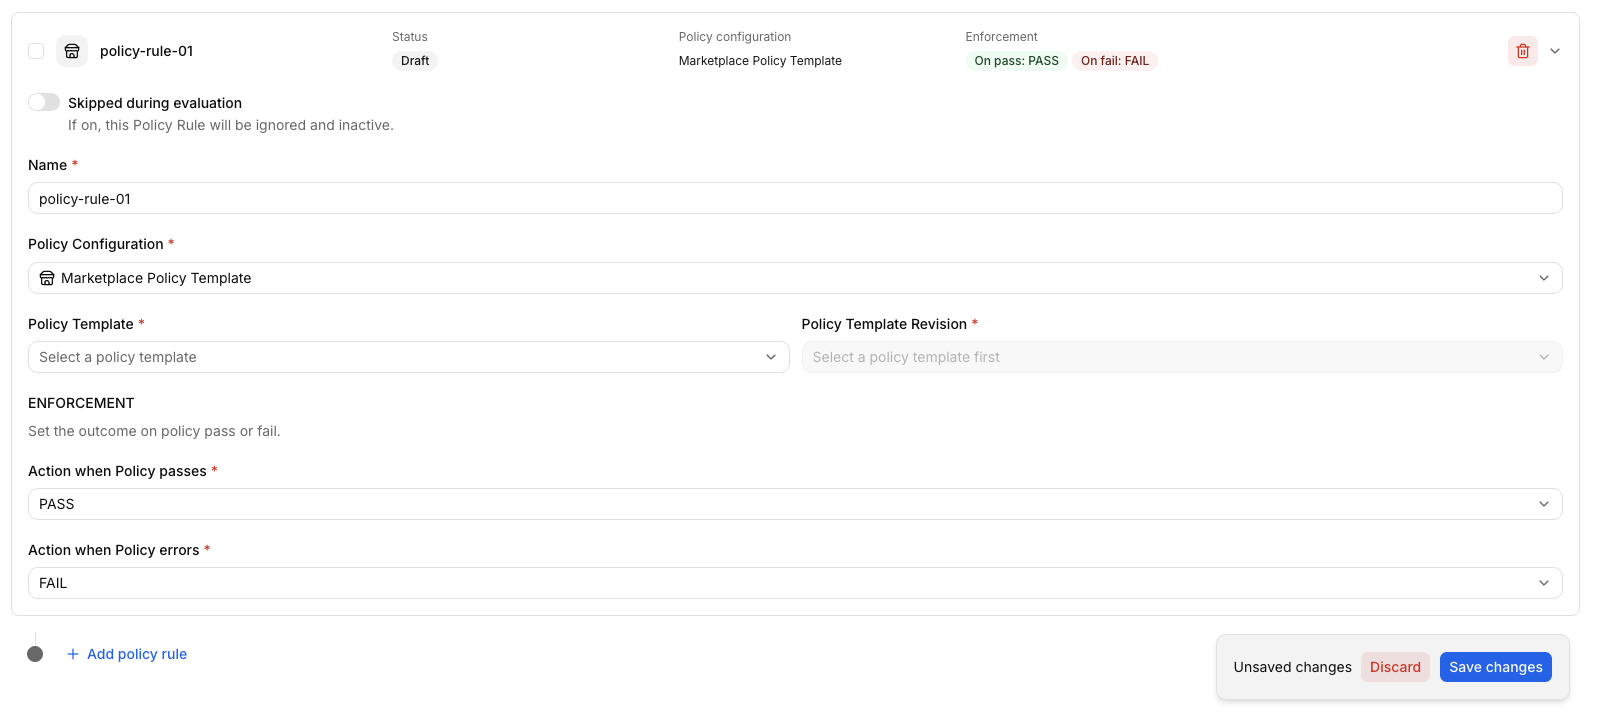
Marketplace Policy
Actions
In the Enforcement section, set the outcome when the Policy passes and when it errors with Action when Policy passes and Action when Policy errors. By default, the first is PASS and the second is FAIL. Each dropdown offers PASS, WARN, FAIL, and APPROVAL REQUIRED.
Each rule can trigger one of these actions:
| Action | Meaning |
|---|---|
| Pass | The resource is compliant |
| Warn | The resource may have issues, but the run continues |
| Fail | The resource is non-compliant |
| Approval required | Someone must approve the run before it continues |
Configure approvals
If any rule uses the APPROVAL REQUIRED action, select Configure approvals at the top of the Rules tab. The settings apply to all rules that use this action:
- Allow anyone to approve: When on, any authenticated user can approve. When off, only the users or groups you select can approve.
- Approvers: The users or groups who must provide an approval in the Workflow.
- Require Approval from: How many approvers must approve, for example From at least 2 approvers. Select Save. The top right of the Rules tab shows a summary of your approval settings, for example 1 Approver and 1 Required.
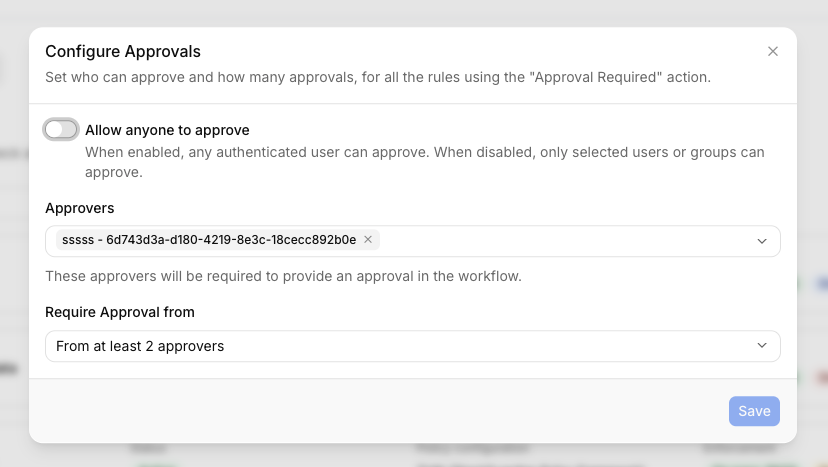
Configure Approvals
Scope
Scope defines where the Policy Set is enforced. You can enforce it on:
- Specific Workflows
- Workflow Groups
- Stacks
- Connectors
- Connector groups
- Your entire organization
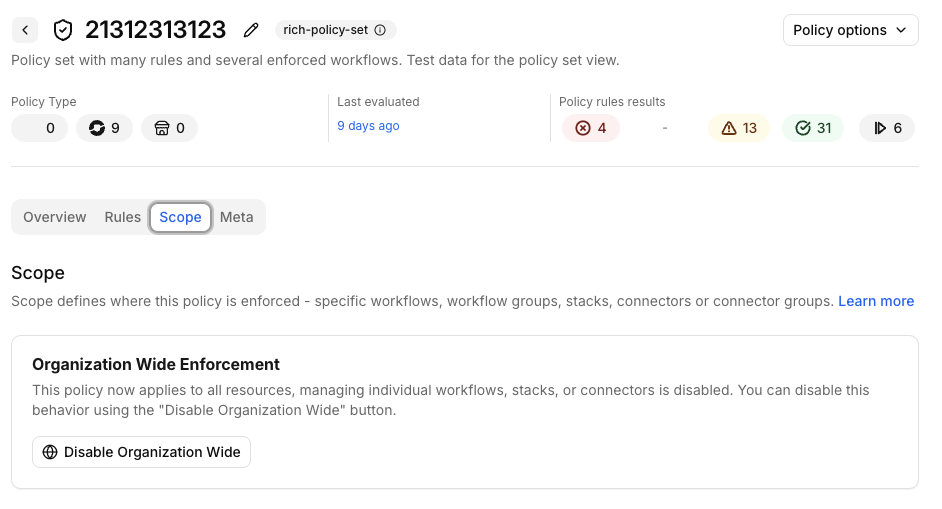
Scope tab
The Scope tab lists everything the Policy Set is enforced on. Each row shows:
-
Name: The name of the resource
-
Workflow usage: The number of Workflows the entry brings into the scope. A Stack, Workflow Group, Connector, or Connector Group counts every Workflow it includes. A Workflow always counts as 1.
-
Type: Workflow, Workflow Group, Stack, Connector, or Connector Group To manage the list:
-
Search by name, or filter by Type.
-
Select Add options, then choose what to add:
- Workflow groups, workflows, and stacks
- Connectors and connector groups
- Enforce Organization Wide
-
Select the trash icon on a row to remove a resource from the scope.
-
Select the refresh icon to reload the list. After you set the scope, track active Policy Sets in the Overview tab of each Workflow.
Meta
Use the Meta tab to manage the essential details and metadata of the Policy Set.
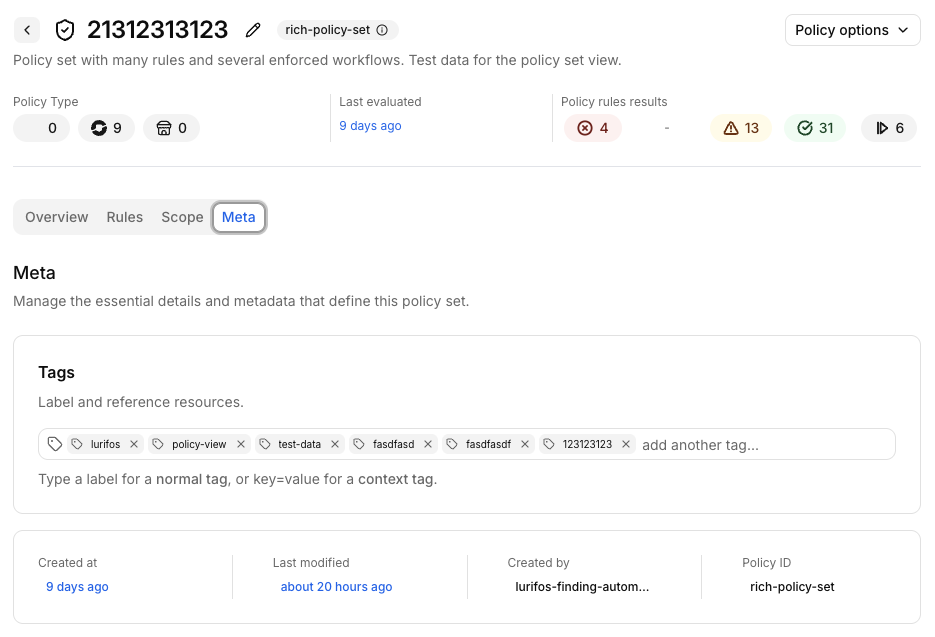
Meta tab
- Tags: Label and reference the Policy Set. Type a label for a normal tag, or
key=valuefor a context tag. Select the x on a tag to remove it. - Created at: When the Policy Set was created.
- Last modified: When the Policy Set last changed.
- Created by: Who created the Policy Set.
- Policy ID: The unique ID of the Policy Set.
You're ready to launch your Workflow with policy enforcement.