Cloud Inventory
Overview
Cloud Inventory is your starting point in SGCode. It displays all resources discovered across your connected cloud accounts and lets you take action on them.
To open the Cloud Inventory:
- Select SGCode on the sidebar
- Select Cloud Inventory from the sidebar or the menu
Cloud Inventory
The top of the page shows three key metrics:
- Total Resources — the total number of resources discovered across your connected cloud accounts. Select View Cloud Providers to manage your connections.
- Infra Projects — the number of infrastructure-as-code projects generated from your cloud resources. Select View All to see them.
- IaC Coverage — the percentage of your resources managed as code. Select View State Backends to manage your state backends.
Use the Options dropdown in the table toolbar to configure a module for your selection:
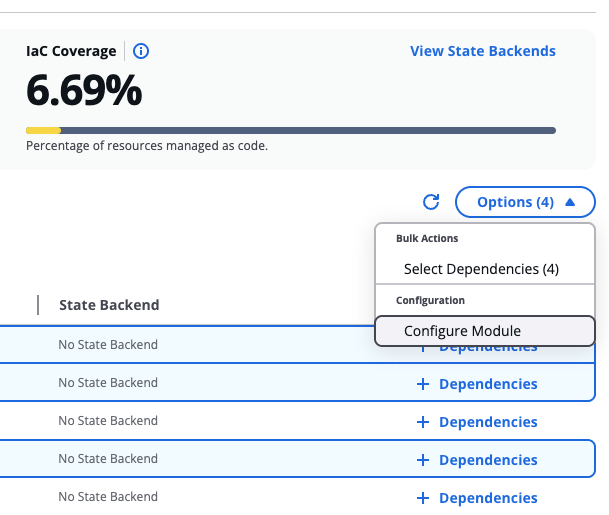
Options dropdown
Resource list
The resources list shows every resource found across your connected cloud accounts.
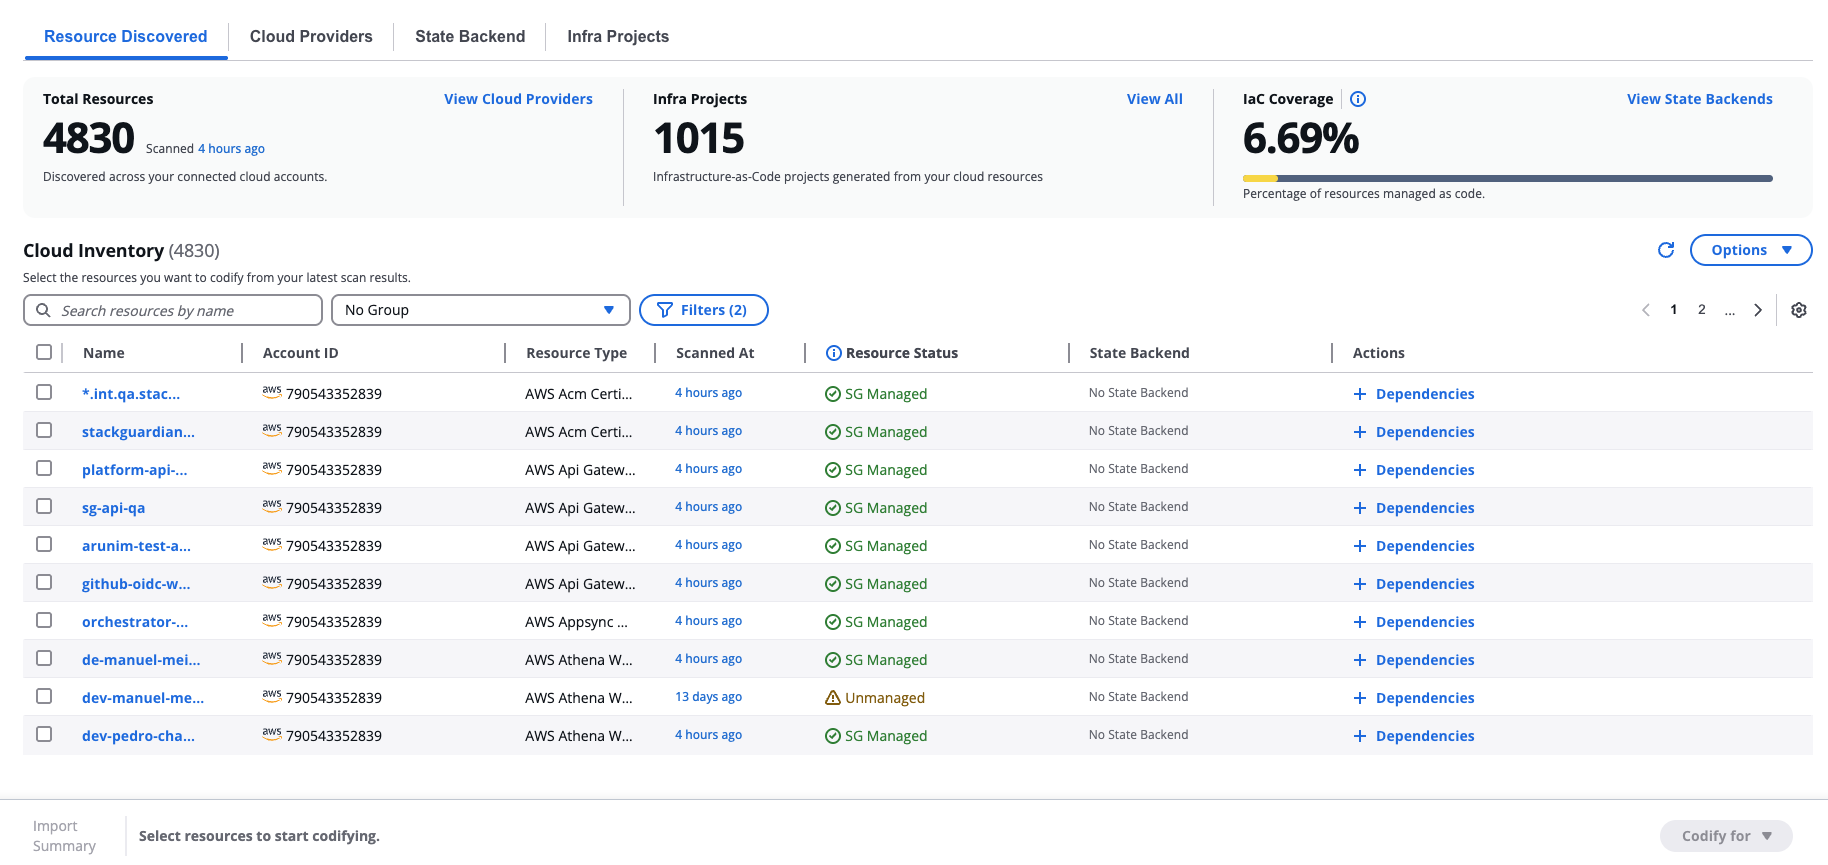
Resource list
The table displays each resource's name, account ID, resource type, when it was last scanned, its resource status, and its linked state backend.
Resource status values:
- SG Managed — Resource is managed through StackGuardian workflows.
- Unmanaged — Resource is not tracked by any IaC state file.
- Externally Managed — Resource is managed by IaC but not through StackGuardian.
- SG Drifted — StackGuardian-managed resource has drifted from its expected state.
- SG State Only — Resource exists in StackGuardian state but no longer exists in the cloud. These resources cannot be codified.
- External State Only — Resource exists in an external IaC state but no longer exists in the cloud. These resources cannot be codified.
- Codifying — Your code is ready. Open the workbench, review, and hit "Create & Plan" — we'll raise a PR and start managing this resource automatically.
Use the Search resources by name field to find a specific resource. Use the Filters button to filter results by resource type, account, or other attributes.
To group resources, use the Group by dropdown next to the search field. Available groupings are: No Group, Group by Resource Type, Group by Cloud Provider, Group by Region, Group by Account, and Group by Tag. When grouping by tag, resources are grouped by tag key only. To filter by a specific tag value, use the Filters panel instead.

Group by dropdown
Resource Details
To view the details of a specific resource, select its name in the table. The Resource Details modal opens with two tabs:
Overview
Shows the resource's key attributes: Resource Name, Resource ID, Account ID, Integrations, Region, Tags, Resource Status, Resource Type, Service, Scanned At, State Backend, and IaC Source.
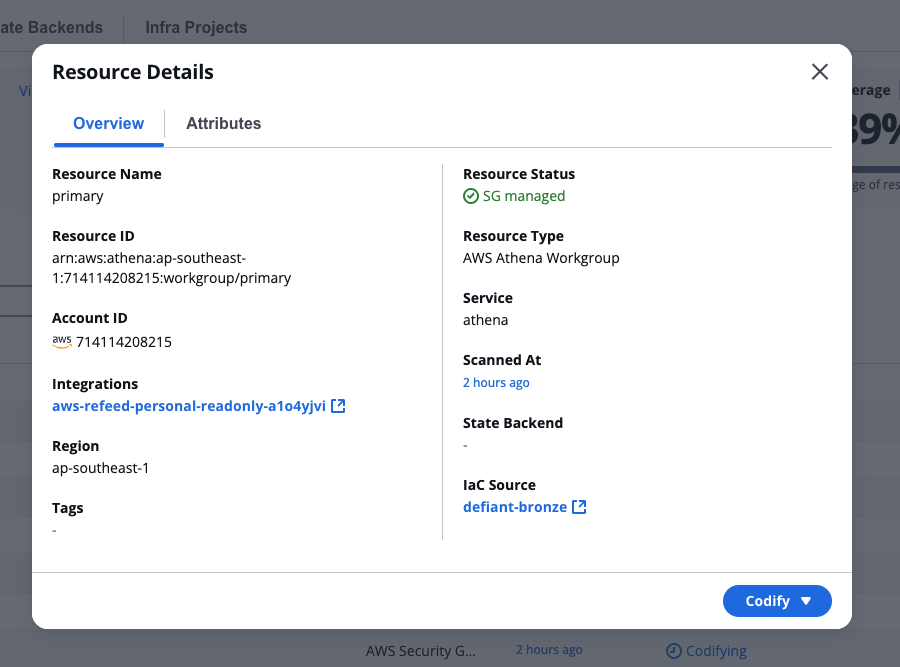
Resource Details
Attributes
Shows the raw JSON attributes for the resource as discovered from your cloud account. Select Copy JSON to copy the full attribute payload.
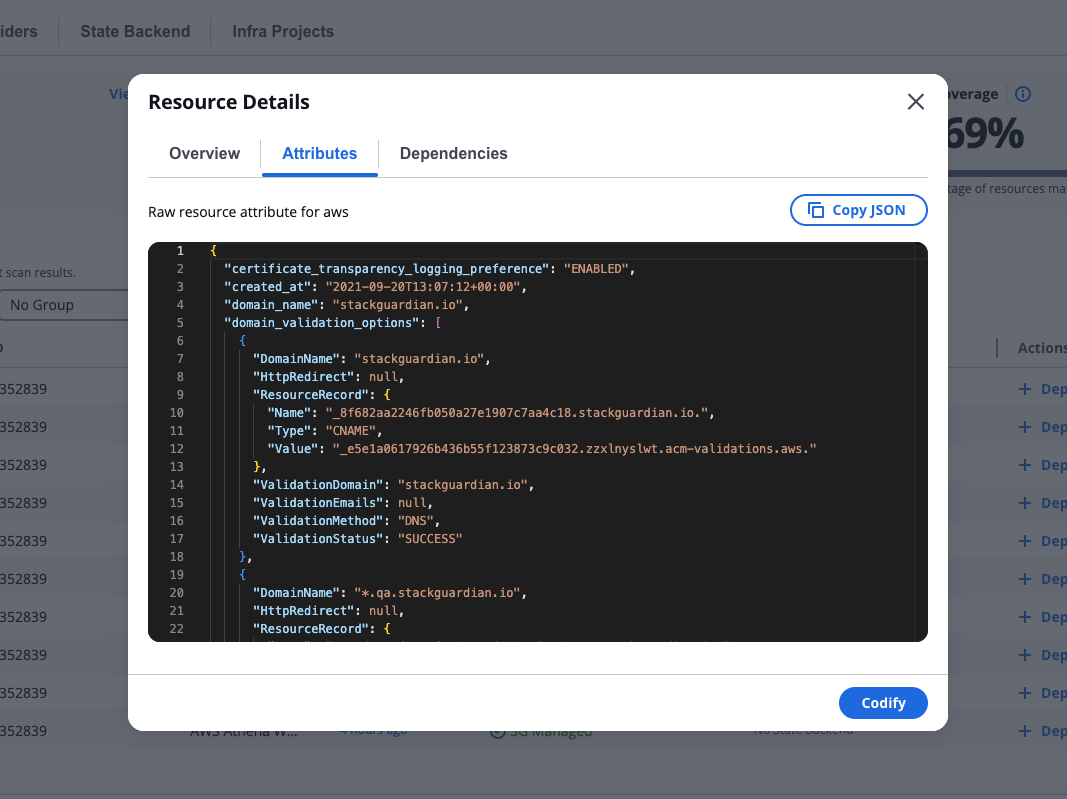
Resource Attributes
Select resources to codify
In the Resource Discovered tab, select one or more resources from the table using the checkboxes. The row highlights in blue when selected.
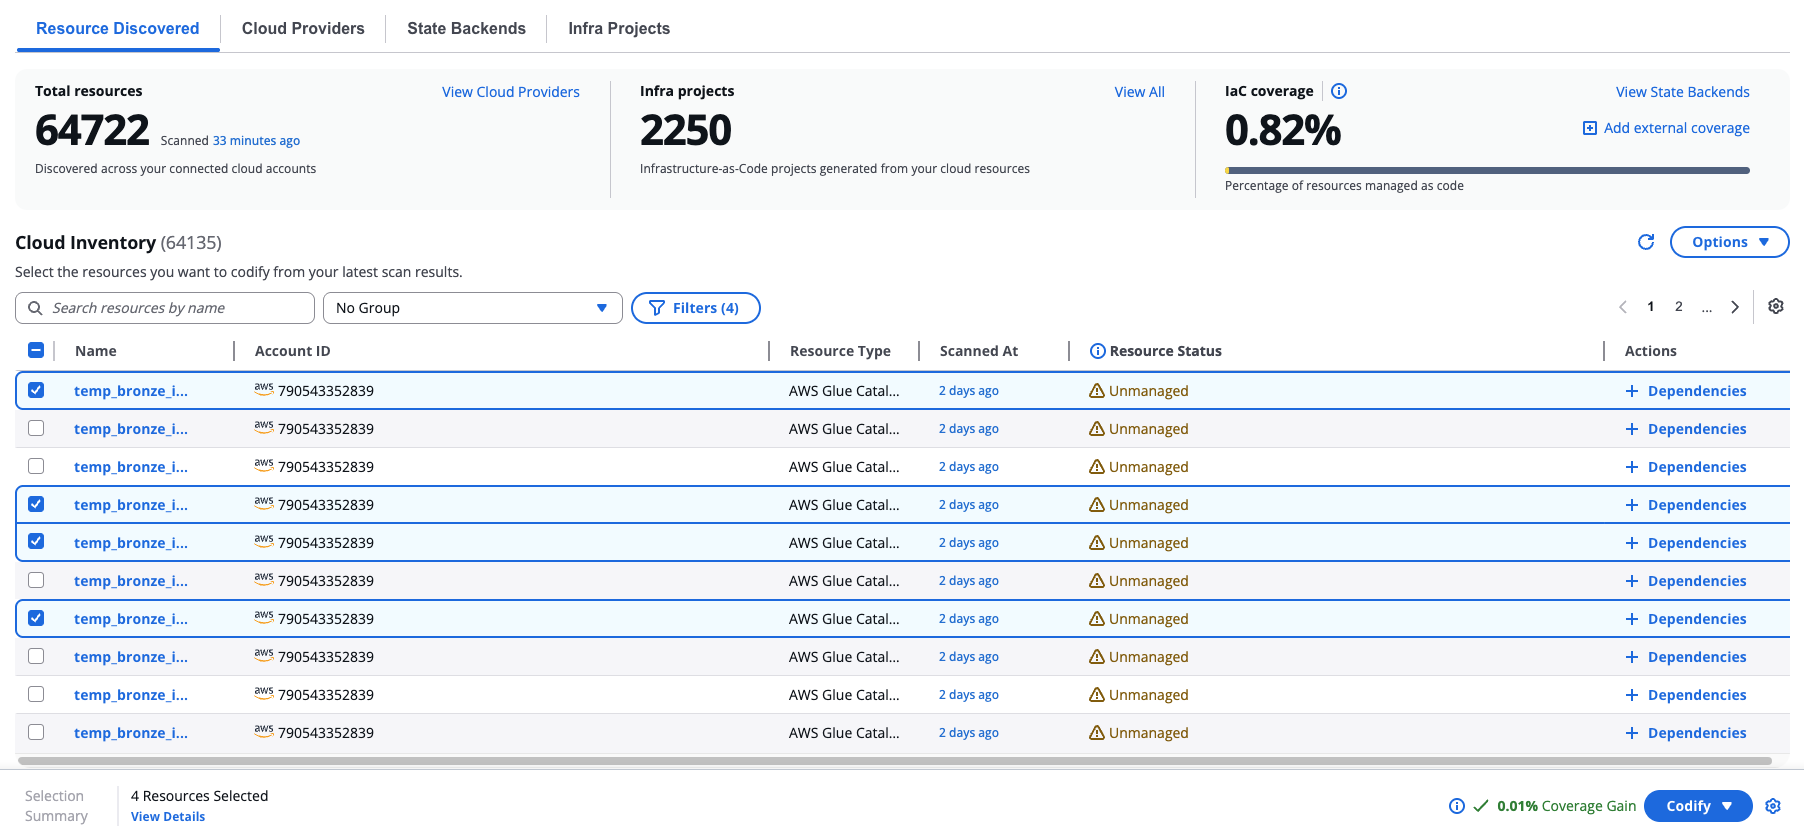
Select resources to codify
When you select resources, a bottom bar appears showing:
- Import Summary and the number of resources selected
- View Details — review your full selection before proceeding
- A projected Coverage Gain percentage showing how much your IaC coverage will increase
- Codify — the button to start code generation. Use the dropdown next to it to choose between Terraform and OpenTofu.
You can add dependencies for a single resource inline by selecting + Dependencies in its Actions column, or by opening the resource's Dependencies tab in the Resource Details modal.
Configure Module
Before selecting resources to codify, you can optionally import a module. Importing a module creates a new grouping filter for your discovered resources based on the selected template. This helps you organise and manage resources that match specific infrastructure patterns.
To import a module, select Import Module from the Options dropdown.
Expand Imported Modules and select a source type:
-
Git Repository
Connect to an existing Git repository that contains your Terraform module.
Complete the following fields:
- Version Control— select your version control connector
- Repository— enter the repository URL
- Branch, Tag or Commit — specify the branch, tag, or commit (for example,
main,v1.0,0c708f) - Working Dir — specify the directory containing the module (for example,
/,infra,modules/vm) - Git Sparse Checkout Config — optional sparse checkout configuration
- Enable git core.autocrlf — optional checkbox for line ending handling
Select Analyze to validate and import the module.
-
Templates
Select this option to import a module from StackGuardian's template library.
Code generation
After selecting Codify, SGCode creates a new project and opens the Code Workbench. The platform generates Terraform or OpenTofu code for your selected resources — this typically takes a few minutes depending on the number of resources selected.
During generation, a progress bar shows the current status. SGCode runs an internal validation cycle: it generates the code, runs a plan to check for errors, and if errors are found, regenerates the code automatically before delivering the final result. If the validation finds no errors, the progress bar moves quickly to completion. If errors are found and a fix is attempted, the progress bar moves more slowly toward the end.
As generation runs, files begin appearing in the file tree and code starts rendering progressively in the editor. Editing is locked during this time, but you can browse the files as they appear. Once generation is complete, editing unlocks automatically.
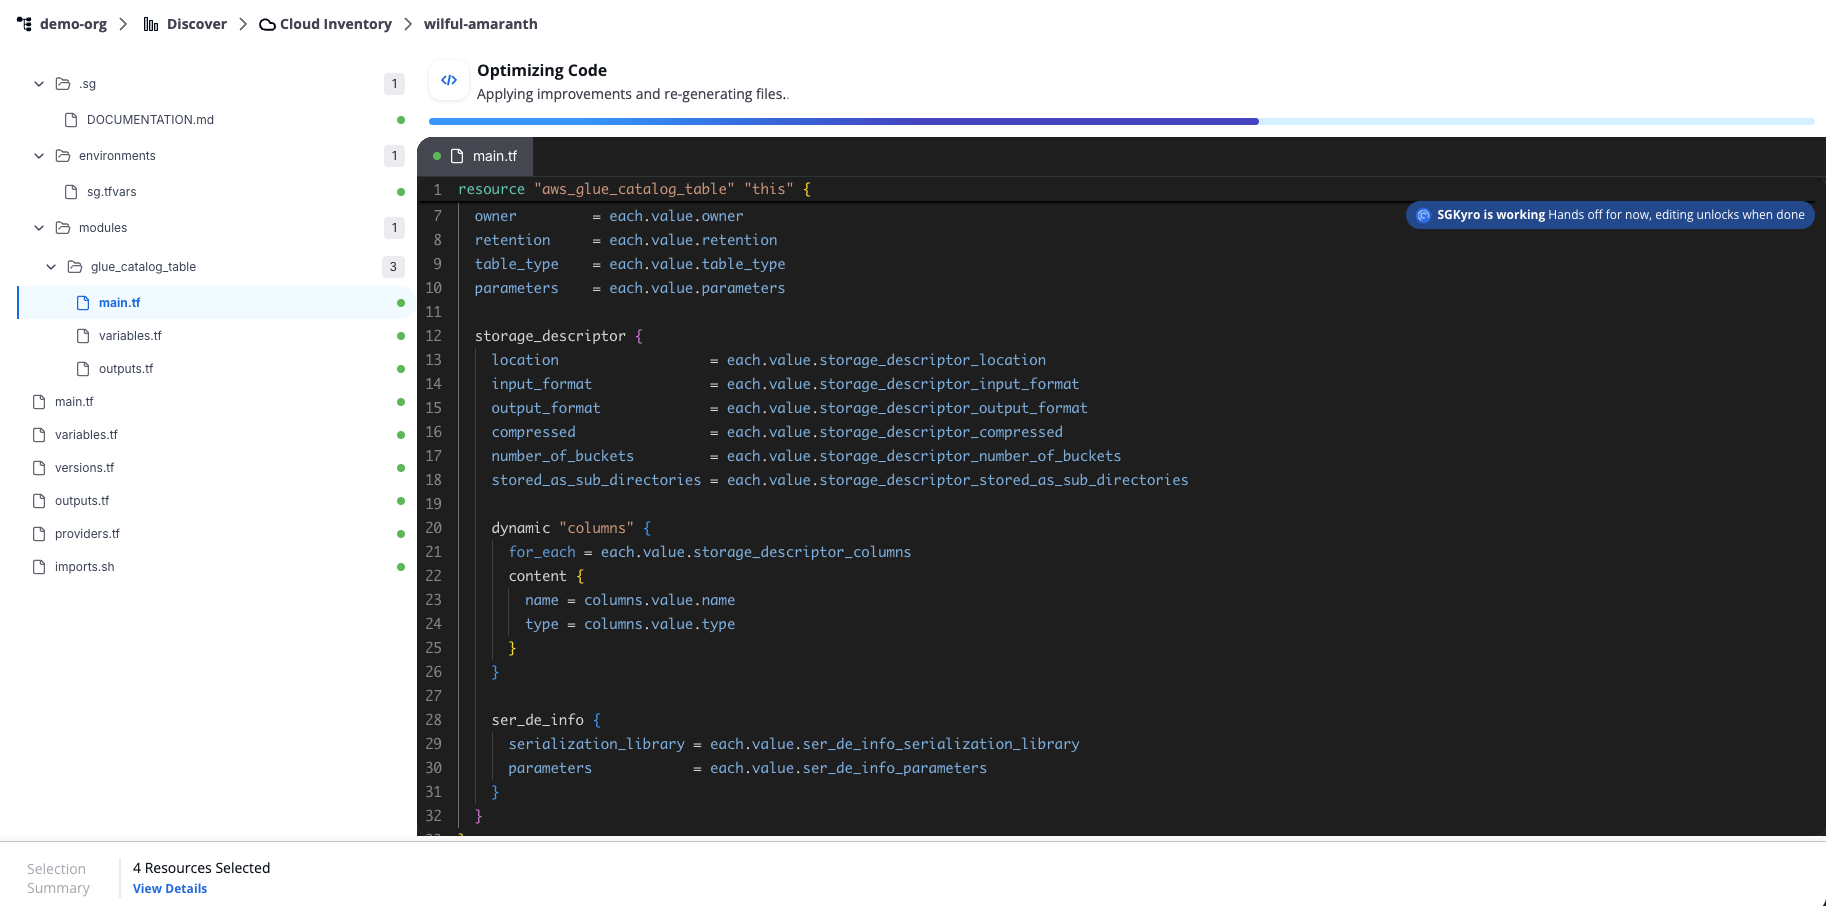
Code generation
You can navigate away from this page while generation runs. To return to a session, open the Infra Projects tab and select the project name to reopen it in the Code Workbench.
Each project is assigned an auto-generated name (for example, clean-blue). To rename it, select the pencil icon next to the name.
Azure's API can return inconsistent casing for some resource properties across different requests. The Terraform azurerm provider does not normalize these values for all resource types, so codification may show casing differences (e.g., resourceGroup vs ResourceGroup) even though the infrastructure is functionally identical.
If you see diffs where only casing varies: retry the workflow or manually update the generated file to match the casing shown.
Code workbench
When generation is complete, the Code workbench displays the generated files in a file tree on the left and a code editor on the right.
Code workbench
The footer shows the project name, last modified time, and the current PR status.
The file tree may include files such as main.tf, variables.tf, outputs.tf, providers.tf, versions.tf, terraform.tfvars, and imports.sh, depending on the resources you selected.
Review the generated code carefully before proceeding. AI-generated code should always be validated before deployment.
Editing the code
You can edit the code directly in the editor. Use Cmd+S (or select Save) to save your changes. An asterisk on a file tab indicates unsaved changes. Use the undo and redo buttons in the toolbar to manage edits.
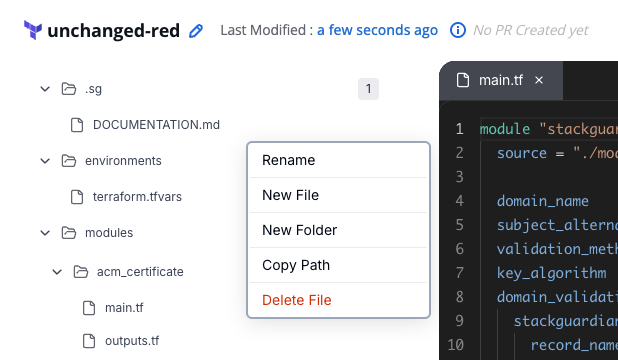
Select the three-dot menu on a file or folder in the file tree to access additional options: Rename, New File, New Folder, Copy Path, and Delete File.
Editing the code
Plan logs, Summary, and Issues
The bottom panel contains three tabs:
- Plan logs
- Summary
- Issues
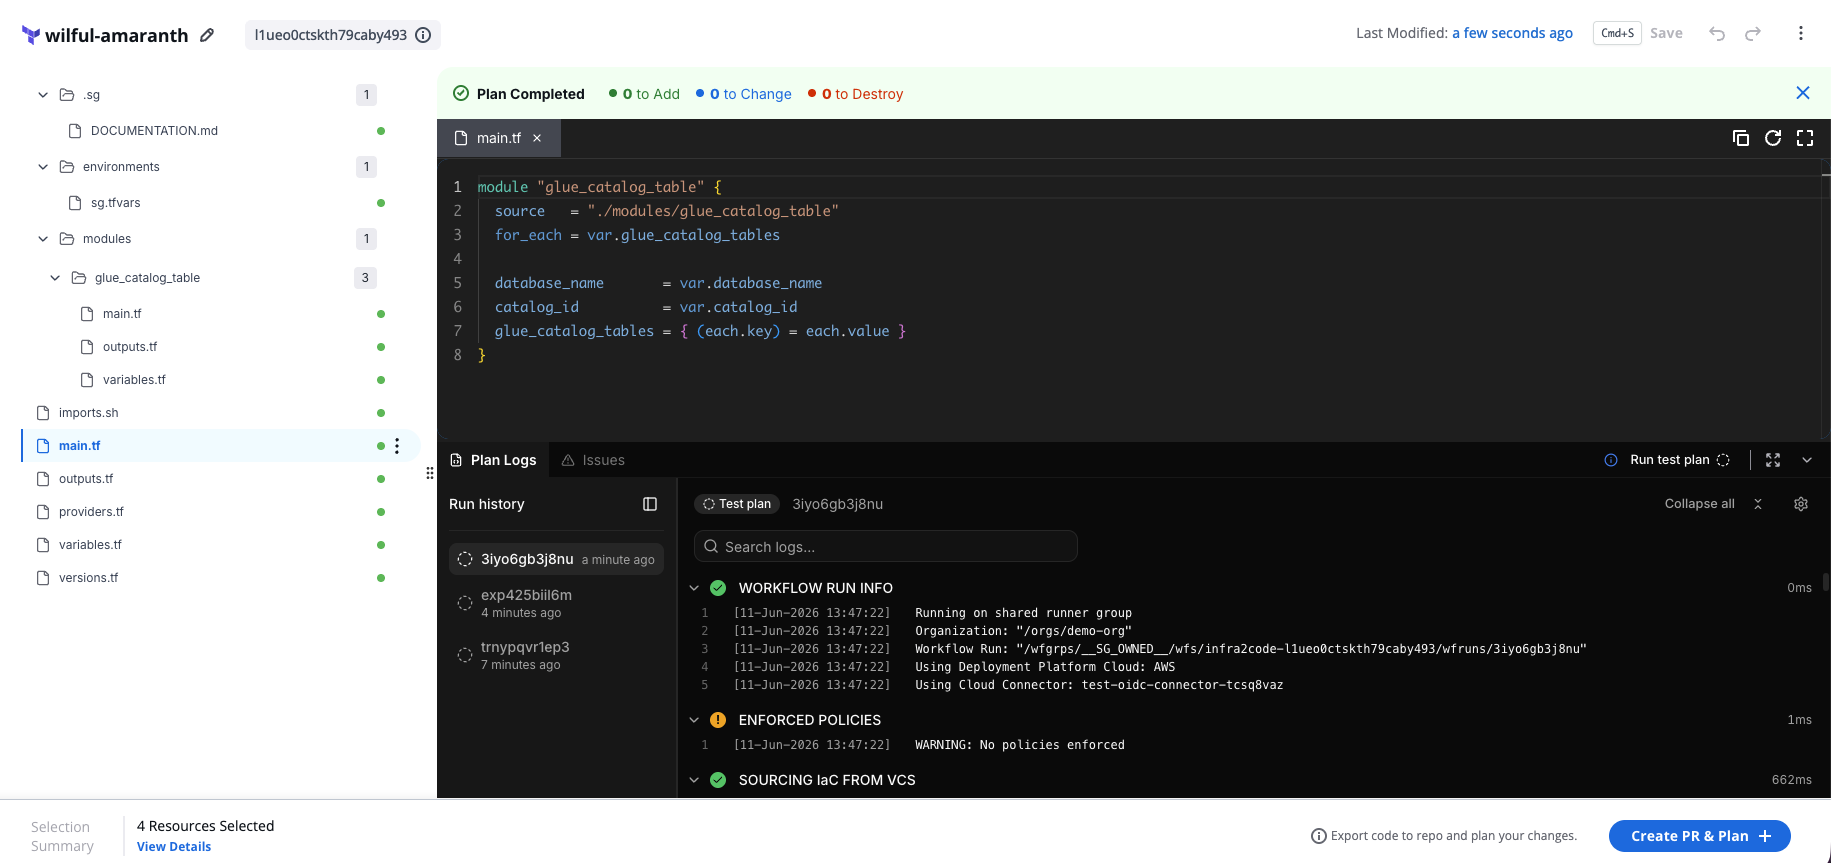
The Plan logs shows the logs for the selected run. Use the Run history panel on the left to switch between previous runs.
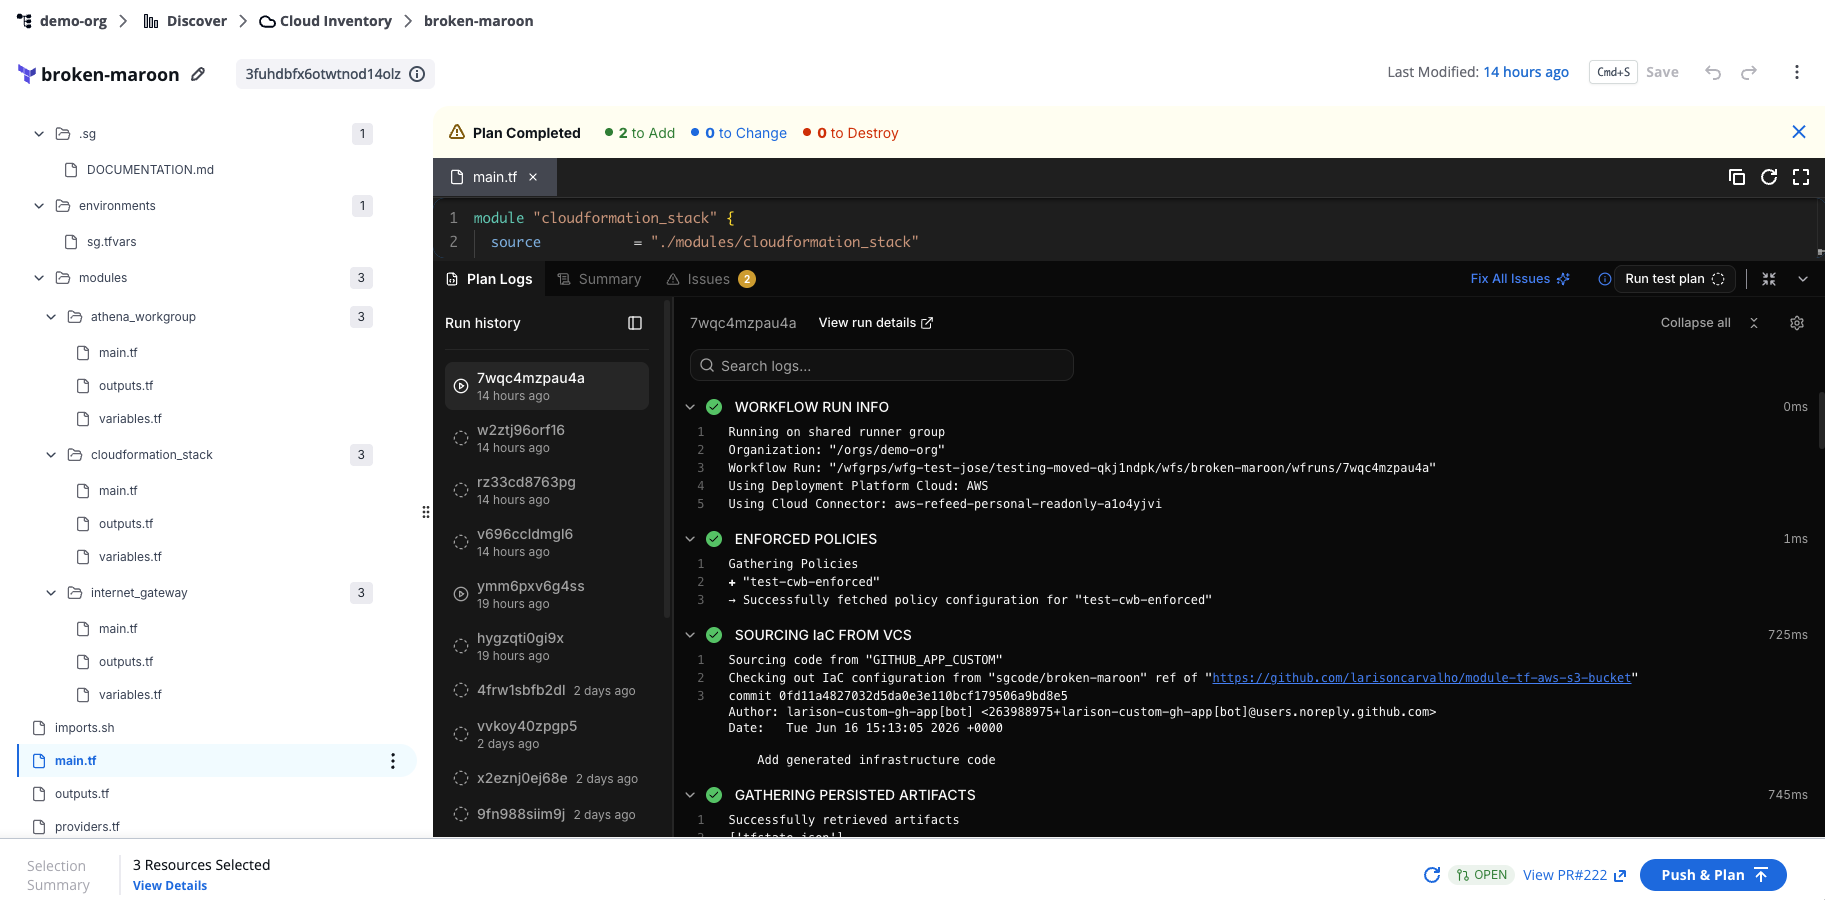
Plan logs tab
Run history
The Run history panel lists all previous runs for the current project, ordered from most recent to oldest. Each entry shows the run ID and how long ago it ran.
Select any run in the list to load its logs in the Plan Logs tab. The active run is highlighted.
Runs triggered by Run test plan are labelled Test plan in the run header. These runs don't affect your infrastructure and aren't counted as regular workflow runs.
Log settings
Select the settings icon in the top-right corner of the Plan Logs tab to access log display options:
- Show timestamps — toggle timestamps on or off for each log line. Timestamps are shown by default.
- Download raw logs — download the full log output as a file.
- View raw logs — open the full log output in a new browser tab, without accordion grouping.
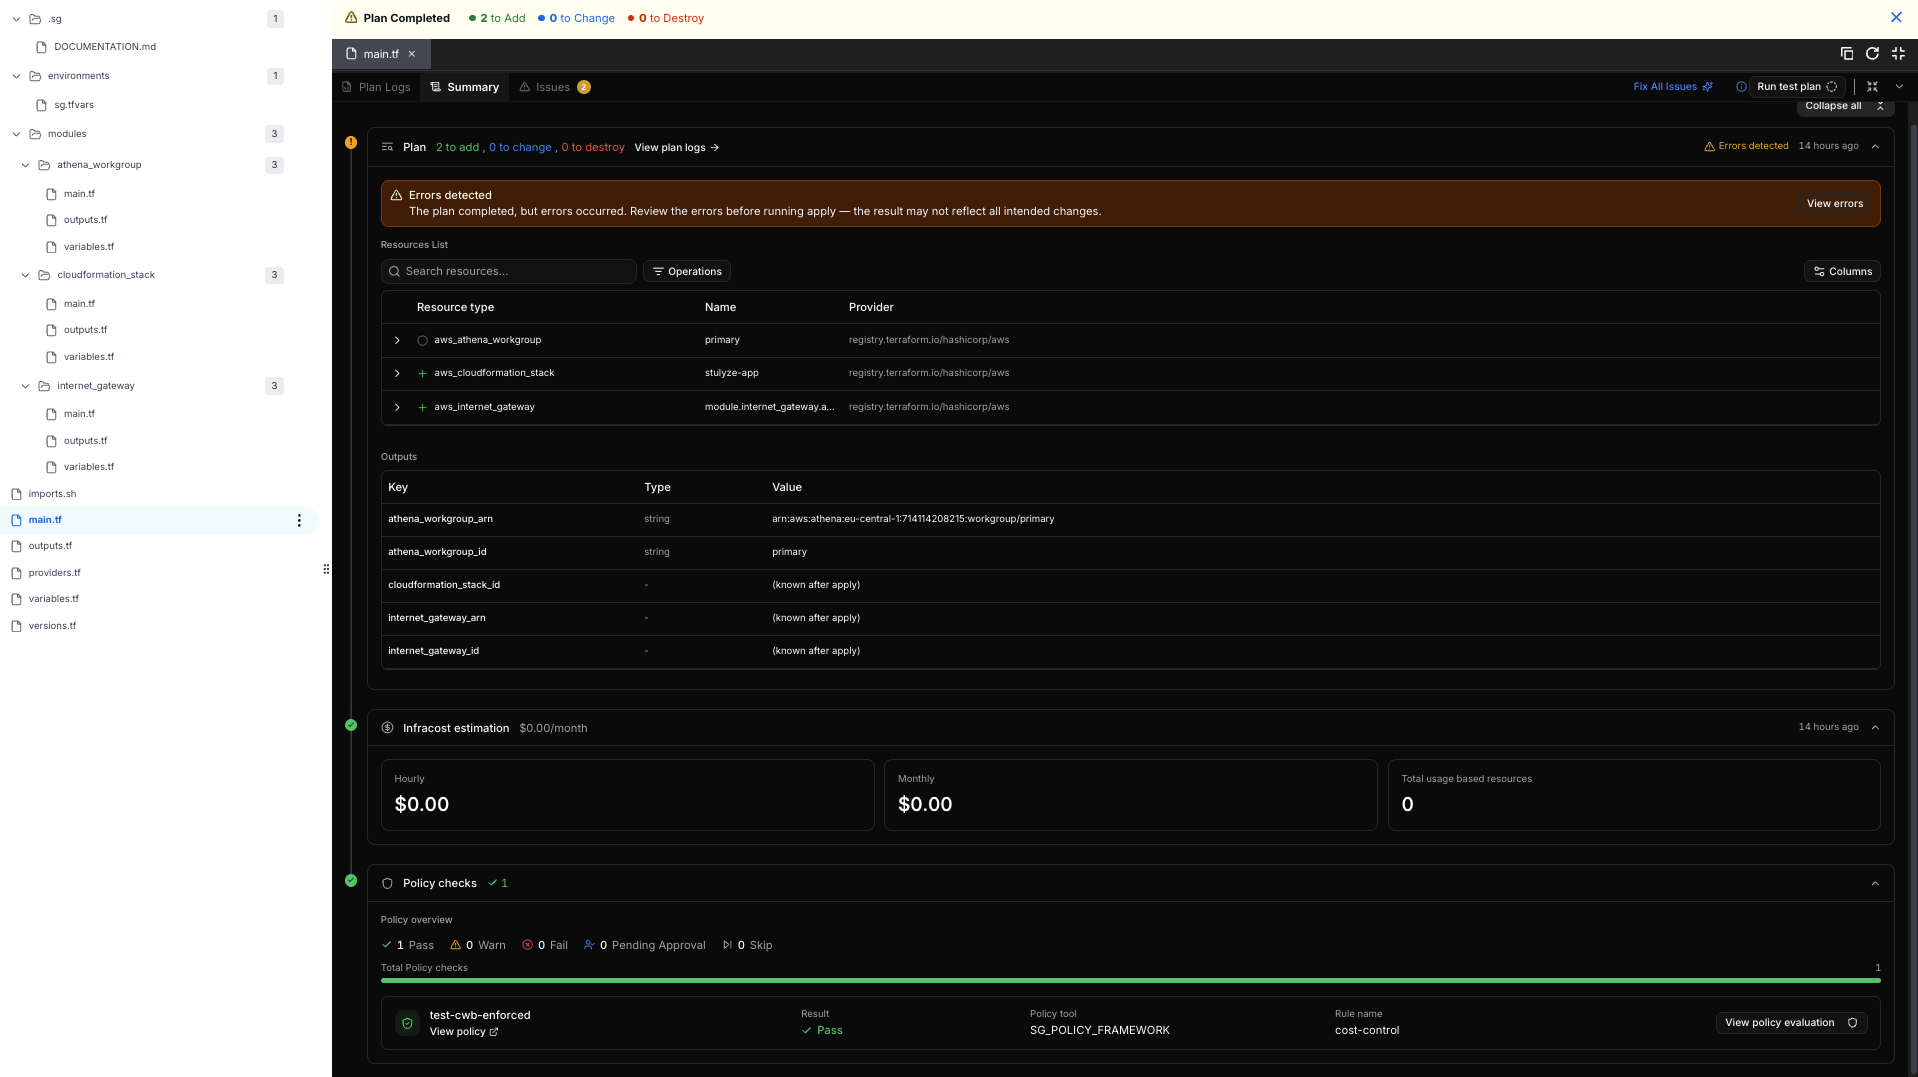
The Summary tab shows the plan results, generated resources, outputs, cost estimation, and policy check results for the most recent plan run.
Summary tab
Plan
The Plan section shows how many resources the run adds, changes, and destroys, along with a timestamp for when the plan ran. Select View plan logs to open the Plan Logs tab for this run.
If the plan completes with errors, an Errors detected banner appears above the resources list. Select View errors to review them before running apply, since the result may not reflect all intended changes.
The Resources List shows the resource type, name, and provider for each resource in the plan. Use the search field to find a specific resource, the Operations filter to narrow the list by operation type, and Columns to choose which columns are visible.
The Outputs table lists each output value defined in the plan, along with its type. Values for resources that haven't been created yet show as (known after apply).
Infracost estimation
The Infracost estimation section shows the estimated hourly and monthly cost of the plan, along with the total number of usage-based resources.
Policy checks
The Policy checks section shows the result of every policy rule evaluated against the plan: Pass, Warn, Fail, Pending Approval, or Skip. Each row lists the policy name, result, policy tool, and rule name. Select View policy evaluation to see more detail for a specific policy rule.
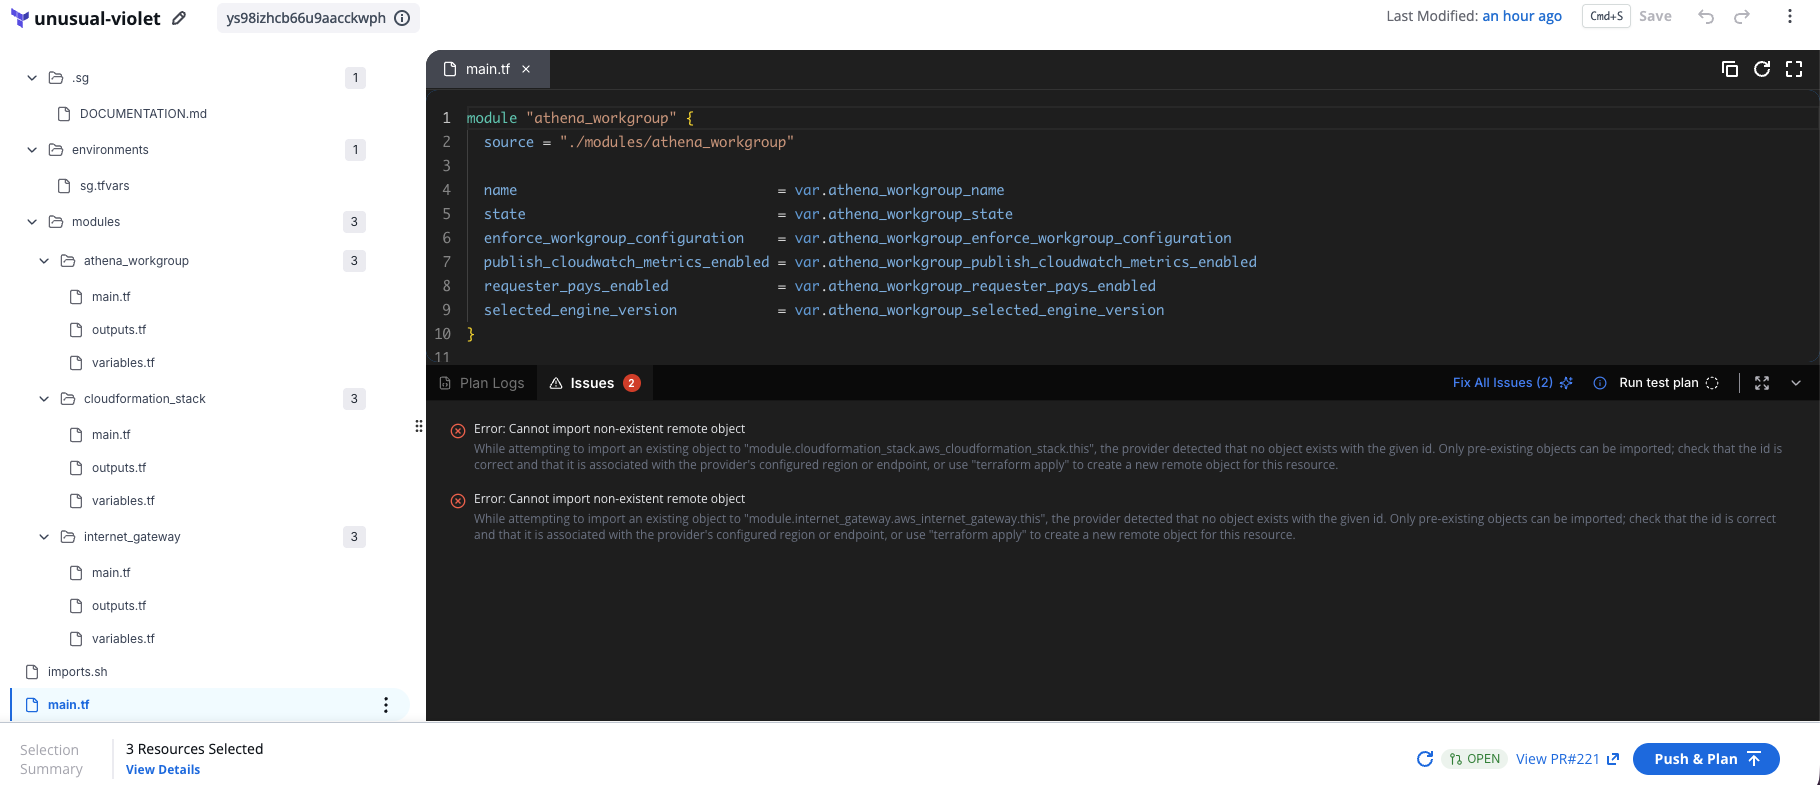
The Issues tab shows errors detected in the generated code, each with a file reference and a description. If issues are present, a Fix All Issues ([n]) button appears. Select it to let SGCode attempt an automatic fix.
Issues tab
Reviewing fixes with diff view
When you select Fix all issues, SGCode attempts to resolve the detected errors and opens a diff view showing the original code on the left and the proposed changes on the right. A file counter shows how many files were affected (for example, FILE 1 OF 1).
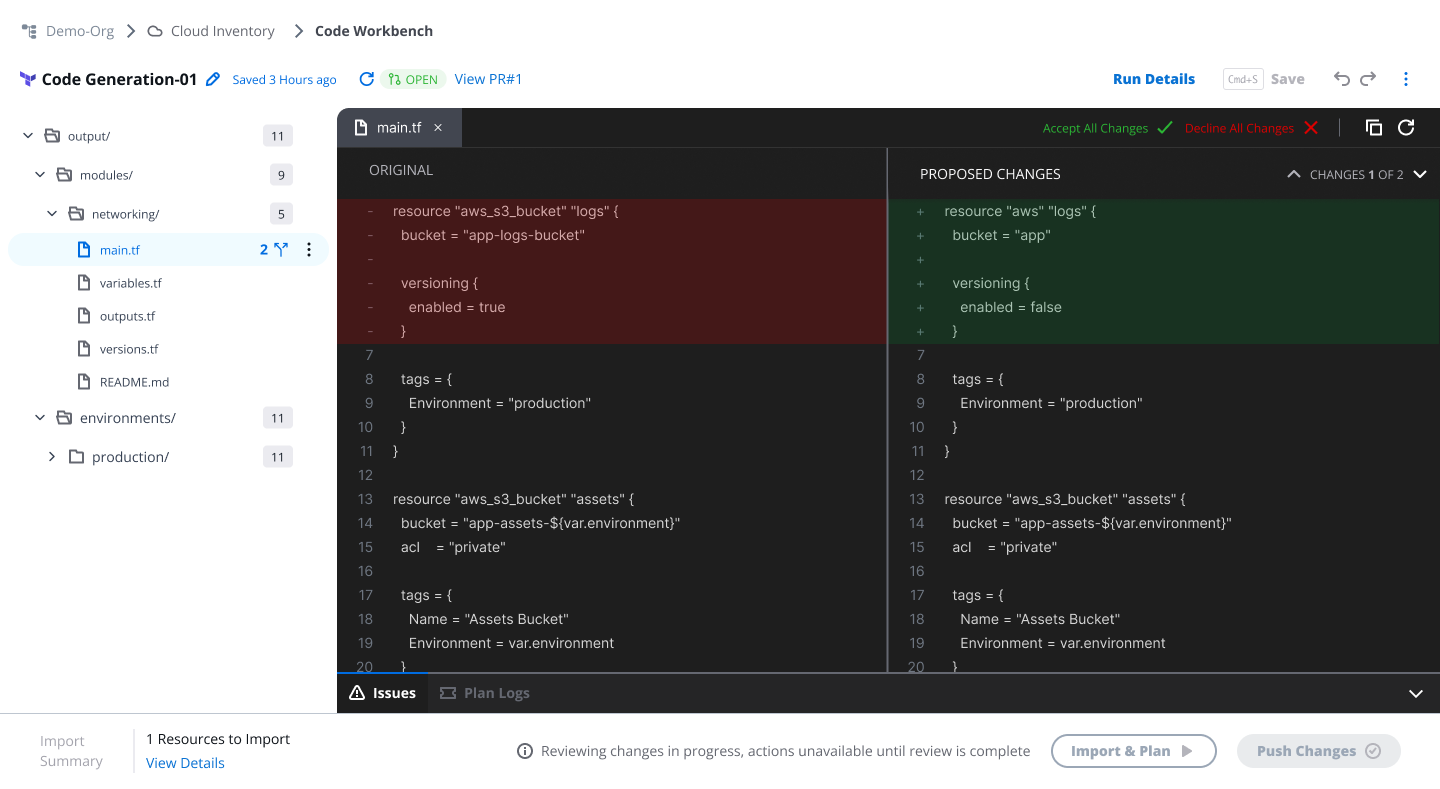
Reviewing fixes with diff view
Review the proposed changes and select:
- Accept Changes — apply the fix to the file
- Decline Changes — discard the fix and keep the original code
Run test plan
Select Run test plan in the top-right corner of the bottom panel to validate your code at any point during editing — without pushing changes, opening a pull request, or triggering a deployment.
Use Run test plan to:
- Check that your generated or edited code produces a valid Terraform plan
- Verify that your code passes policy checks before committing anything
- Iterate quickly on code changes without creating a pull request for each attempt
A test plan runs the plan against your current workbench code in isolation. No changes are pushed, no pull request is created or updated, and the run is not stored permanently. It appears in the Run history panel labelled Test plan for the duration of your session.
Test plan runs do not count as workflow runs and have no effect on your infrastructure.
Create PR & Plan
When you're ready to validate your generated code, select Create PR & Plan in the bottom bar of the Code Workbench.
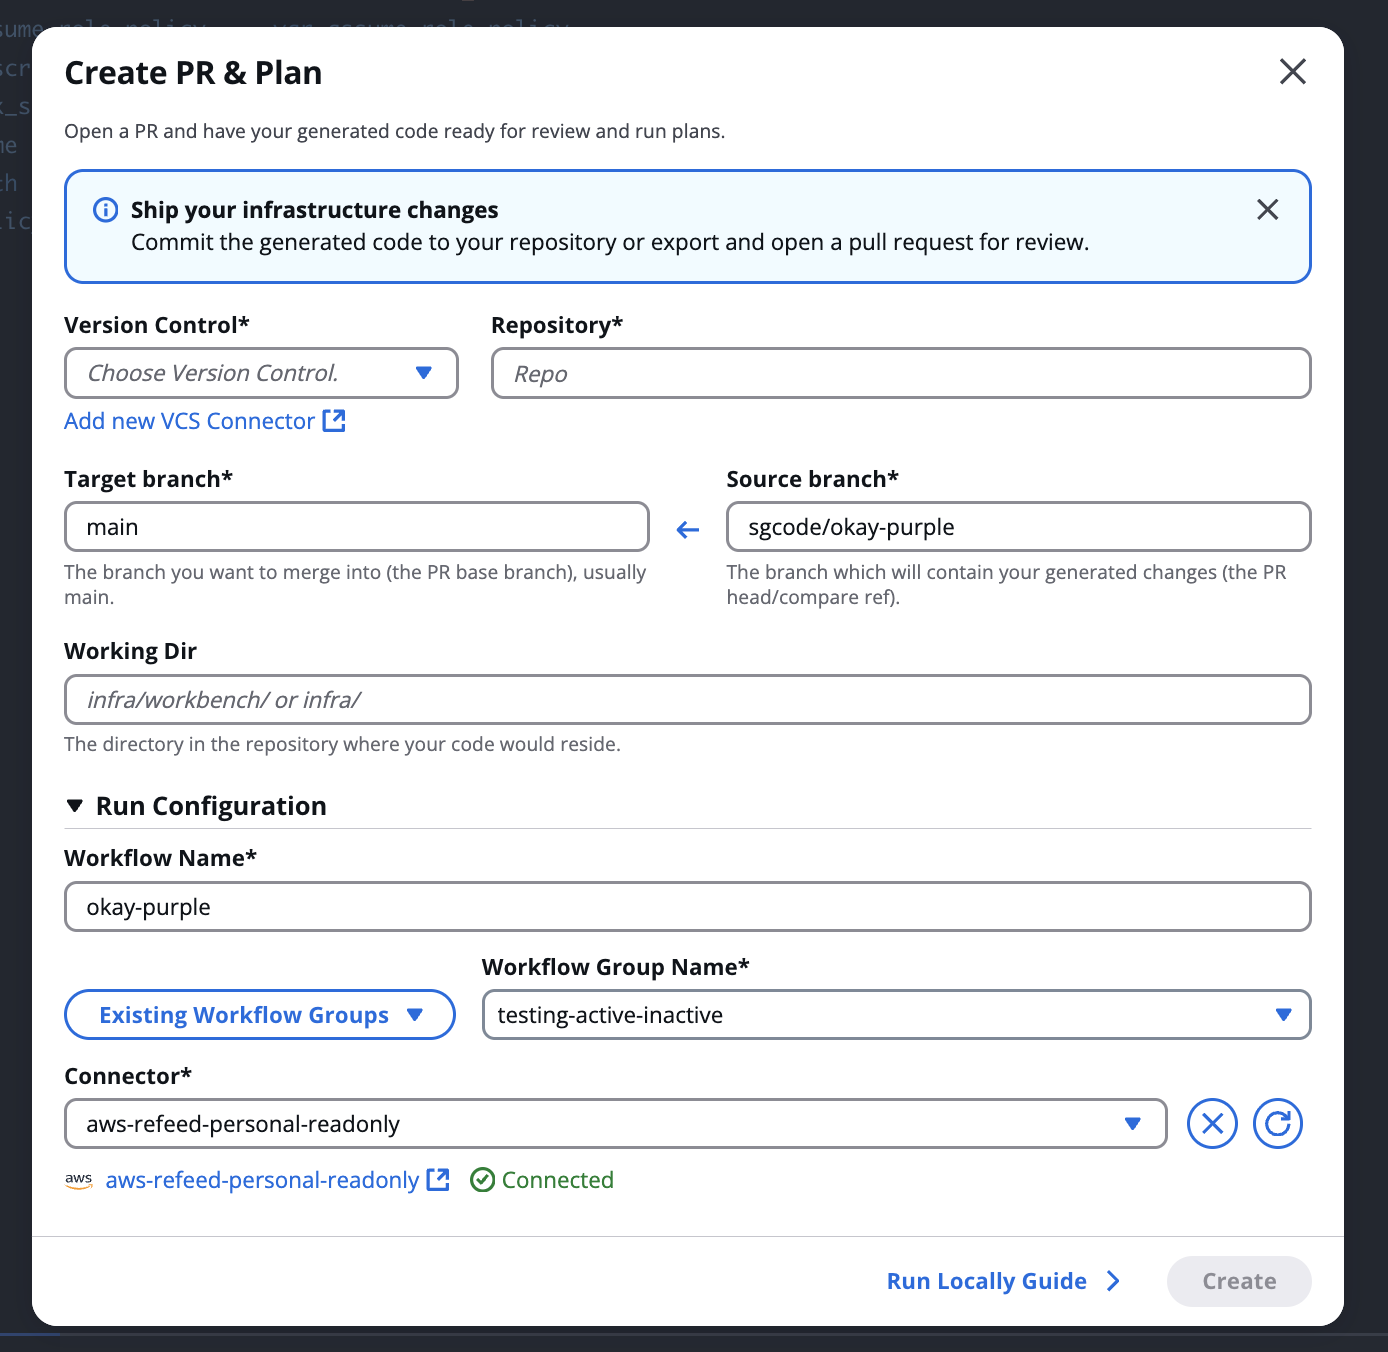
Create PR & Plan
This opens the Create PR & Plan modal, which creates a pull request and runs a Terraform plan in a single step.
Complete the following fields:
- Version Control — select your version control connector. Select Add new VCS Connector if you haven't connected one yet.
- Repository— search for and select the target repository.
- Target branch — the branch to merge into. Usually
main. - Source branch — the branch SGCode will create to push your generated changes. Must be a new branch name that doesn't already exist in the repository.
- Working Dir — the directory in the repository where SGCode will place the newly generated code.
Expand Run Configuration to review or adjust the workflow settings:
- Workflow Name — defaults to the project name
- Existing Workflow Groups / Workflow Group Name — select or specify the workflow group
- Connector — select a connected cloud provider connector
Select Create to create the pull request and start the plan. A workflow is created automatically.
- A pull request is required to run a plan.
- Pull request management — including merging and closing — happens in your version control system.. SGCode does not merge pull requests.
Run locally guide
If you prefer to manage your code outside the platform, select Run Locally Guide in the modal for an alternative path:
- Download your code as a ZIP, extract it, and push it to your repository
- Set up a Workflow in StackGuardian to remotely test and maintain the code
- Inject the OpenTofu/Terraform cloud block config to connect your code to the StackGuardian Workflow
- Authenticate your local environment by running:
- For EU Region:
terraform login api.app.stackguardian.io - For US Region:
terraform login api.us.stackguardian.io
- For EU Region:
- Run
terraform planlocally and connect to the StackGuardian Workflow
Push & Plan
Once a pull request is open, the bottom bar updates to show the PR status and the Push & Plan button.

Push & Plan
Select Push & Plan to push any new changes to the open pull request and run the plan again.
While the plan runs, the status bar shows "Running Terraform Plan" with the message "This may take a few moments, open run details to follow progress." Plan logs stream live in the Plan Logs tab.
Plan completed
When the plan finishes, the results appear in the Plan Logs tab. If the plan shows changes (for example, 3 to Change), it means the generated code differs from what's currently deployed in your cloud account.
Select Fix all issues to let SGCode attempt to reconcile the differences automatically. The diff view opens showing the proposed changes. Review and select Accept Changes or Decline Changes, then run the plan again to verify.
Repeat until the plan shows 0 to Add, 0 to Change, 0 to Destroy — or until you're satisfied with the changes.
Push changes
If you make further edits to the code after creating a pull request, select Push Changes in the bottom bar to commit the latest changes to the open pull request.
Only one active pull request per project is supported at a time. To create a new pull request, close or merge the existing one in the version control system first.
IaC coverage
IaC coverage is the percentage of your discovered cloud resources managed as code. SGCode displays this metric at the top of the Cloud Inventory page and updates it as you codify more resources.
When coverage is low, a risk indicator appears — for example, High Risk: Codify Resources — to guide you toward the next action.
When you select resources to codify, the bottom bar shows a projected Coverage Gain so you can see the impact before you start generation.